30 April 2014

LO: love who you are...

Hi dear crafters!
My new LO is with foto from my university years :)I had a long hair and even one white strand))))
As background I made few daubs with pink paint and a bank card))) Than took few pages from old book and doily. As a last accents made black spatters.

I used papers Glitz Design (Carpe Diem), glimmer mist Tattered Angels Chalkboard - Seven Seas, washi tapes MME, paints, bradses, dots MME and little chipie Wycinanka

As mask I used the pieces from chipboard))


Threads are also very nice detail :)


hope you liked it
Have a nice day!
Tanya Privalova

28 April 2014

linocut part 2

Hello everyone!

I have always loved prints. Every kind of printmaking! I thought that I would love to try. But where to start? I don't have a huge studio, no space for professional tools etc. That's why I have chosen linocut which is perfect for small spaces and which is really fascinating technique.

Today I will tell you where to start. What you need for the first steps and also give you some tips. I'm not a huge expert, only a few prints in my drawer but with gaining my experience I will write and share more with you.


MATERIALS
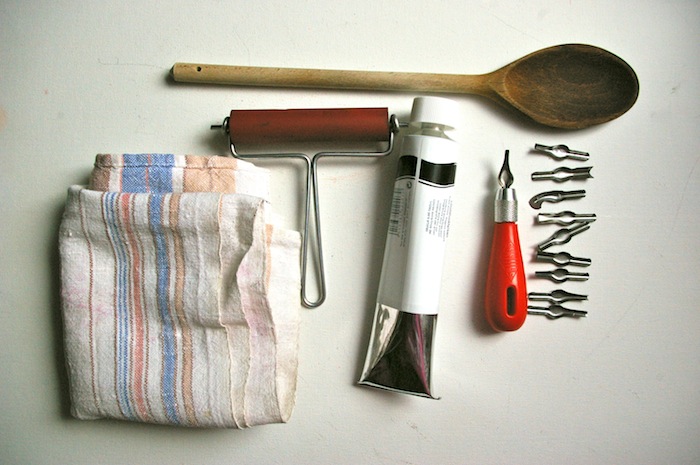
There is a lot of materials which probably you will find useful in the future but for now you will need only a few things.

Cutting tool you can find lino cutting sets or high quality linocut tools at shops. Of course for the start buy a cheap handle (plastic or wooden) with replaceable blades. They are good for learning and you will have an opportunity to get used to the different types of blades.
Never throw your blades together because you can damage them.

Lino block – you can buy linoleum in various sizes and thickness. You can buy bigger sheets and then cut them or buy small sizes. It really depends what you want the lino for.
At the shops you will also find SoftCut. The carving material is very smooth and easy to cut. Cleaning the SoftCut sheet is easier then traditional linoleum. It can be washed under a tap after use.

Roller – there are various sizes but for the start and not a big prints you won't need a huge one.

Printing ink – there are two kinds of printing ink: water-based and oil-based. I have chosen water-based for the start because they are easy to clean (using only water) and are safe to use. You will find that there are a lot of different brands of printmaking ink and prices also vary. When buying the inks for linocut always buy ink for relief printing NOT etching inks.

I bought a big tube of cheap ink for learning and smaller one which is more expensive to more advanced prints and of course to see a difference between the two of them. I bought only two colours black and red for the start (I didn't know if printmaking would be for me ;)).

When buying the inks for the first time I think it's enough to buy only a few colours, black and some of the primary colours (you can always mixed them). But for simple print you will need only one colour!

If you use oil-used inks remember to use gloves or special cream for protection. Also you will need a good ventilation. Don't confine yourself in a small room with a lot of oil-based ink ;)
If you are a messy person wear an apron.

Paper – for the start you can use whatever paper you want but I recommend cartridge paper (huge amount for only a few quid). First prints won't be perfect, don't waste you best paper. Remember to use a smooth paper for prints.

A tool for burnishing – you can find a special tool (baren) for that or you can use your hand but I have chosen a wooden spoon. Yes! I took the one from my kitchen drawer ;)

A surface for inking – I use a sheet of glass which I took from a picture frame. Easy to use and to clean. Put something under the glass if your desk is smooth, you don't want to hear this squicky sound when glass in moving when you ink your roller ;)

Cloth – for cleaning tools


I hope I have helped you a little with choices and I hope to see your first prints soon!

Magda x

26 April 2014

It's nest building time.

It's that time of year when the birds come back to the garden and start building their nests. 

I used the cute Darkroom Door Carved birds 1, stamping them onto a piece of scrap patterned paper so they'd take up some of the texture and pattern from underneath.

 I love these birds they're adorable.


It's a good job I'm not a nest builder, mine's tripe.


Have a good weekend, 

Jaine x

24 April 2014

Color Bloom...

excuse the spelling, it is correct. Honestly. 

I'm please to be able to bring to you the news that the long awaited Prima Color Bloom Spray Mists have arrived!
yay!!


22 gorgeous colours in total in 3 finishes. 

10 Sultry Shimmers
6 Vintage Metals
and 
6 Sparkling pastels. 


The bottles have an abundance of shimmer allowing for 1-2 refills.
A unique nozzle design that provides two different effect: full coverage or splatter. 

Check out the Prima video to see them in action. 


They're now in the shop and priced at £7.49 each. 
 No gimmicks, no multi-buys, just the lowest price we can bring them to you for. 

Just when you thought you didn't need (more) spray mists in your stash.

Happy Creating!

Vicki 


20 April 2014

Converse with spirits!

Hello!
A little quirky assemblage from me today!......

I found the phrase in an old book, I definitely think the hare may be looking skyward trying to find someone to talk to!
I documented the process, so you can see how it was put together.
The bright colours come from inks, India inks and Acrylic inks. Bright enough to make an impact, but translucent so the book text shows through perfectly. I watered the ink slightly, then sponged it over my pages...
I dried the page, then glued it to a bit of card. I then glued another page of a different colour to the back of the card, giving me double sided, multicoloured text!
I then drew some leaf/petal/long arch shapes on the text. Totally random, although I did make sure there were some larger than others. I doodled on them too...
I cut them out, flipped them over and doodled on the other side...
The edges need to be coloured...
Next, I stamped the hare (Crafty Individuals) onto plain text, and again onto a scrap of the yellow. I cut the crown from the yellow....
Then stuck the hare to some card to give it more stability, then cut that out too.....
Glue the yellow crown over the plain one, then once dry the hare can be stuck to the stand, which in this case is a wooden spool. I use a cube bead to do this, glue the bead to the spool...
Then the hare is glued to the flat face of the cube....
Then, I attached the petal shapes. First, glue the smallest shapes around the spool....
The larger shapes were glued in a second layer on top of the small petals..
Once done, the hare will be nearly hidden!
Start to gently roll the shapes up, I rolled them around a pencil to get them to curl nicely! Once done, the hare will once again come into view....
The need for a double sided petal becomes more obvious when they are curled, and the contrast between different colours on the same shape comes into it's own....
I had a couple of shapes left, so glued these to the base of the spool, then I added my phrase..
As a finishing touch, I tied a little black cord around the petal shapes. Not needed in a functional sense, just a final decorative touch!
I hope you like my quirky hare, I have been creating lots of assemblage recently, and I love it!
See you soon!
Trish xxx




19 April 2014

Stamp Carving - Jaine


I think when Vicki announced she'd managed to get lino cutting tools and Softcut stamp cutting material in to the shop, there was a general feeling of excitement all round, then Vicki sent me a sheet to play with and once I'd got it on my table it just sat there looking at me. Not from lack of inspiration, I knew what I wanted from it but from fear of cutting into it. I imagined cutting the perfect stamp then slicing into it and messing up the whole thing.

So there it sat until a coversation with Magda sparked me off to just give it a go. Was I happy I did! Once I'd made that first cut I was hooked.


I wanted to create a head for using in my journals. A big enough sized head and without hair so I can add any hair-do I like.

I turned to my magazine tracing method again and found the perfect head shot and traced it out onto the surface of the rubber.


Making that first cut following the lines with the smallest cutting tool was scarey but  taking it slowly I could control the cut very well.


Now at this point maybe I should have listened to Magda because once I'd inked it up to test it, it became obvious that what I actually wanted to create was an outline stamp. This is not easy and not really recommended for beginners.

It was too ambitious for my first stamp and I made a lot of mistakes along the way but I'll know better next time.

 I cut away with a larger cutting tool testing the stamp every so often to see how it was looking. Here you can see I still had to cut a little bit on the left side of the stamp and in fact in the end I decided it was the type of stamping block I was using that didn't really help.

You can see that on the left hand side I've cut away a large portion of the face, this is because, not having an outline on that side meant I could cut away more rubber to save me having to scoop it out.


So there she is all finished. She's not perfect but I guess practice makes perfect.  I also cut the word LIFE too and used a Finnabair doily stamp by Prima as hair.


Happy Easter weekend

Jaine
Now I'm totally hooked and can't wait to

17 April 2014

Power flower - linocut part 1

Hello everyone!
The weather has been fab in last few days! I can't sit and work in my studio that's why I try to work in my garden. Today I would like to show you my flowers. No! No gardening and flowers from my garden. But I used a cutting tool...

This is a very simple print. If you are a beginner it's something which you can make without any problem. If you are still thinking about lino printing but you are not sure where to start next time I will have for you some guides.

The first print is on a white cardstock.


The second one on a background which I prepared before using gesso and Dylusions Ink Sprays.


Magda


15 April 2014

a sprinkle of colour...

hello everyone! 

April already. Easter! wowzers.

Thank you to everyone who took part on the March colour challenge!  We had some fabulous entries, which, as always, made it hard to pick just one winner. 

That winner is....Fena!
Congratulations! 


For the April challenge we've decided to open it up a little and have an "Anything Goes" challenge.  
We'll have a nice vibrant colour challenge for you in May though!

You can find more details by popping across to our challenge page here.

Wishing you all a very Happy Easter!

Vicki 


12 April 2014

Yet more texture paste.

Yes I know, yet more texture paste! I can't help it, I'm obsessed with the stuff. The Golden Crackle paste to be exact over a sprayed background and sprayed on top of when dry.


I wanted to add some machine stitching to it just to test the paste really and I'm happy to report it didn't flake, woo hooo! Happy day.

The stickers and washi tape are all from Glitz Design, the Finnley collection.


See you soon with something which isn't texture paste, maybe :)

Jaine x

10 April 2014

LO by Tanya Privalova

Hi dear crafters!
My name is Tanya :)

Few words about me: My name is Tanya. I live in Ukraine. In scrapbooking I came 3 years ago.My favourite style..my real passion and inspiration is american, shabby and free style. I love create cards (especially mini-cards), layouts and mini-albums . Many details in work and layers...working with paper.. to do something very sweet and pretty ar very very unusual for me personally. there is the things what make me a real happy scrapper)))

I created the LO))))One sweet day on the one of the favourite places in my city.
I used very tender paper by Glitz Design (Carpe Diem collection), Glitz Roller stamp Tattered Angels Glimmer Mist Seven Seas, mask Tando Creative - Sequin Waste, flowers by Prima, ribbon and chipboards.


I added some doodles near the chipboards. 


Have a nice day!
Tanya :)

09 April 2014

Highline..

hi everyone,
Now we all complain that the US stores get products months before we get them in the UK,
but I am pleased to announce that this is NOT the case with the new BasicGrey collection: Highline!
Here’s a peek at some of the papers.
BGHGL4584
BGHGL4578 BGHGL4588
Chalkboard Wood TagsBGHGL4601
Title Stickers
BGHGLTitleStickers 
Vellum Tape
BGHGL4604
In all seriousness I am in love with this collection and it’s online right now ready to order!
There are 12 double sided 12x12 papers, Collection Kit, 6x6 paper pad, Stickers galore, snippets 4x6 stacks, brads and so much more.
You can find it here. I’m off for a play!
Vicki

08 April 2014

a little incentive....

Hi everyone, 
Vicki here, aka "the boss"
 (of everything at ASOI HQ but my kids don't quite believe me! )

Three years ago, almost to the day we (the Royal we) created " a sprinkle of imagination". 
A long held dream of mine. It took us lots of late nights, long hours, bald patches and temper tantrums to make it a reality.  There have been lots of late nights and very long hours to get it up and running and to keep going.  

Believe me when I say that there have been times when I have been ready to say "enough now!" when the frustration levels have hit high on the dial. 

We have been truly blessed by the response we have received in that time.  We have a fabulous set of loyal customers who come back to us time and time again, and every day we get new customers come through our virtual doors.  I personally read every email we get from our customers and am so grateful for the wonderful feedback you give us. 

OK - gushing isn't my style, but there is a point to this.  As a thank you to you, our customers, for your support so far, we have taken the decision to offer a loyalty scheme. 


The scheme starts with orders placed from 7th April 2014 onwards (so yesterday), meaning the first few cards and loyalty stamps are currently winging their way with orders. 

You'll get a card in your first order, and then for each full £10.00 you spend with us (excluding p&p charges), you will get a stamp.  You can trade in your card at either the half way stage for £3.50 or when full for a £10.00 loyalty voucher to spend with your next order. 

You can find more details on how it works on the website here. 

We hope you'll enjoy earning your reward stamps, 
and once again we would like to thank you for your ongoing support & custom. 

Happy Creating!

Vicki