31 October 2015

What a Story - Layout

Hi my lovelies,

Georgie here today and sharing my latest layout - What a Story.

I'm going to list all products used at the end of this page  :)


Lots of different elements used to build up this composition. I played a little with different colours to build a grunge look to contrast the soft photo.


Started with some stencilling mixing paste with Mica Powder, then added some stamping. Also with the stamping I went around the outside to keep the eye focussing inward.


Lots of gorgeous elements to help build layers, and splatters of white gesso to tie everything in.


Adored playing with Mica Powders, some of them the new release from Finnabair. 

Here is the list of items used:

7 Dots Studio:


Finnabair Line:


Prima Embellishments:


That's my post for today, and hope it proves some inspiration for you.
Hugs
Georgie
xx


29 October 2015

Whimsical Animals

Good morning lovely and creative ones, Tracy here with a quickie post from me today.....

For a long time I have looked at all those cute critters appearing in everyone's art journals and said to myself 'I want to do that'
I have never been the best at drawing and learn more from watching than trying to figure it out myself but have found lately that I am more able to look at things and break them down into basic shapes therefore making it easier to create things I never thought I could....


Using the fabulous Dylusions and Dina Wakley paints I created my background and sketched my bear on top, just basic shapes, circle for the head, semi circles for the ears, eyes and nose. 

I used the golden paints in ochre and umber paints mixed with white to paint my bear adding my shading and highlights as I went along. 

I love creating my whimsy animals, I just can't stop. Look what else I have been creating....,


Aaaah my lovely little bunny !!!


And my happy little hippopotamus!!!!!

The possibilities are endless

Show me what you can create!!

Bright and painty hugs
Tracy
Xxx

25 October 2015

Making Tracks


Hi folks, Shirley here with a card for those oh-so-hard-to-make-for menfolk in our lives.  The Tim Holtz Treads Layering Stencil was the perfect starting point.  I used Finnabair's Graphite Texture Paste through the stencil onto some watercolour card.  Don't be put off by the 'undercoat' colour of the paste - when it dries it's a beautiful dark colour with a fabulous slightly sparkly texture.

A close-up of the texture - with sticky pads in the grooves, ready for the stamped image.
Once the paste was dry I wet the paper and dropped in some Distress Inks with a paintbrush - Faded Jeans, Seedless Preserves, Dusty Concord, Forest Moss, Peeled Paint - and let them move around and flow into each other.


I diecut the 'happy' (Hero Arts, Happy Stamp & Cut) from black card, smeared it with clear pigment watermark ink then brushed it with Finnabair's Mica Powder - Frosted Lake.

On a separate piece of card, I stamped the male image from Dylusions Couture Collection - Mini Couture, coloured it with the Distress Inks and fussy cut it.  I added the 'birthday' then matted the whole piece to a white base card.


I hope that's given you an idea for cards for your men.  Thanks for stopping by!

23 October 2015

Happy Dylusions... and half term

Hello there!

Just a quick post to let you know that we have reduced a selection of our Dylusions Stamps Sets


And.... On a slight side note,  it's now half term 
here in sunny Yorkshire, 
so any orders placed will now be dispatched from 
Monday 2nd November! 

Happy creating and have a fun filled week!

Vicki 

21 October 2015

Discover Imperfection !!

Good morning, Tracy here with a quick post today.


One of the most common phrases I hear when teaching is 'I can't do that' !!!
As adults we are so obsessed with our art being perfect that we forget to enjoy the process......
But when we let go of perfection amazing things happen......


If we just enjoy the process and fall in love with the colours and not think about the end result then we can truly enjoy our art. 

For this journal page I used the yummy dylusions paints in Fresh lime, London blue, Vibrant turquoise, Bubblegum pink and Lemon Zest for my background and just scraped them on with a palette knife keeping the layers thin so they would be ideal for painting on.


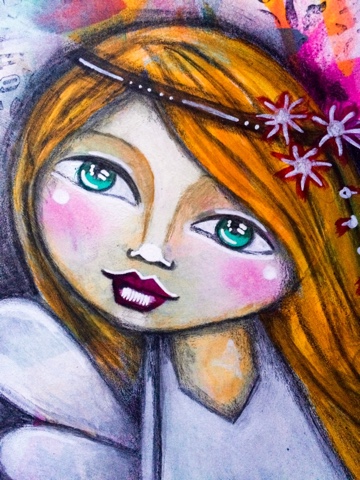
I love the way my beautiful fairy flower girl emerged onto the page, I sketched her out and then began to paint in the features using a mix of Dina Wakely heavy body white, magenta, turquoise and umber paints, and Golden's nickel azo yellow. I finished all the details with Inktense coloured pencils and White Posca pen.


So next time you think you can't create something beautiful, let go of your fears, throw down the colours and discover and embrace imperfection   

Thanks for stopping by
Bright and painty hugs
Tracy
Xx


Hiding in Autumn

Good morning to you all. Is autumn hiding? With the glorious sunshine we have been having lately the only reminders of the season is the cool, dark evenings and the scattering of crisp golden leaves falling from the trees. So with that in mind I took some inspiration from the array of seasonal colours to help me with today's A Sprinkle of Imagination blog post.

First of all I painted an MDF heart with Dina Wakely media paints. I used tangerine, ruby, lemon and umber.
Once the paint had dried I stamped with the Finnabair dot grunge stamp and added some stenciling with white paint through the Tim Holtz burlap layering stencil
I masked with some die cut leaves and dry brushed over with some white and white with a spot of umber.
Using the Dina Wakely fine tip applicator I outlined the leaves and background with umber paint.
I had to leave this a while to dry so I stamped Crafty Individuals Crowned Bunnies onto some white card and added a hint of colour with some Inktense pencils. I also stamped the sentiment Love Wish Dream from the Tim Holtz stamp set 'Stuff to Say' onto some white card, cut out and set aside to assemble later.

Waste not want not, I painted the leaves that I used as masks in the same manner as the heart. I spread melted bees wax over my project and adhered the bunnies and sentiments. The leaves were arranged around the bunnies, standing proud for some dimension. Finally I added some doodling with paint pens to my autumn foliage.
That's all from me today. Happy crafting one and all!
Hugs,
Clare x x x

15 October 2015

Just playing....

Hello!
Sometimes, just sitting and playing with no real plan in mind is very therapeutic! 
It is also really good to revisit stash that you may have had lurking about for a very long time....
I combined both of these things when creating my latest project to share with you!

I came across a box of white tiles when having a clear out, so decided to have a simple crafty session, just dripping alcohol ink onto one of the tiles to create some colourful wall art!


You can sit for ages, adding tiny drops and watching them spread out and merge with one another... it's very relaxing!
I used Ranger Adirondack inks, in a rainbow of different colours. The whiter dots were added using the blender fluid on the end of a wooden skewer!
Keep going until you create something you love... then you can put it in a frame and hang it on the wall. Or, wipe it off and start again as many times as you want!
Loads of vibrant colour:


Such a nice way to while away an hour or so!
Have a good day!
Trish xxx


11 October 2015

new stampotique originals

hello there! 

If you've been to the shop lately you may have noticed a few friends have arrived 

If you have been to the shop...well. a few new friends have arrived from Stampotique Originals

Its always like THE best Christmas EVER when we get our Stampotique deliveries. 

Here's a peek at a few of the designs we have from Magda Polakow (yes...formerly of our design team... couldn't be happier for her!) , Daniel Torrente and Kate Crane to name a few! 


You can see all the new designs. and some long awaited restocks here in our "new in" section. 
I'm sure you'll find some to add to your Christmas list!

Happy Creating!

Vicki 


10 October 2015

Autumn's Graffiti


Morning peeps!  Shirley here with a rather vibrant autumn card.  I've been playing with Dylusions paints, and I'm really impressed with the amount of rich coverage you get with the smallest amount of paint.  This panel is actually the paint-off from another panel that I'd done.  Here's a view of it in its early stages, with some stencilling through Balzer Bits Two Leaves:


I stamped the leaf image from Hero Arts Brush Strokes using Versafine Onyx Black,


then added some doodling with a black fineliner and white gel pen, and handwrote part of my sentiment on white card, cut the words out and outlined them,


and stamped the graffiti sentiment from the Hero Arts set.


Thanks for stopping by!
Shirley x

08 October 2015

A Piece of the Puzzle

Hiya

Georgie here today, and I have been playing with the very fun, Dina Wakley paints... again! Boy, I am venturing more and more over to the bright side. I love how the colours on their own just lift your mood! Forget chocolate, these paints are the way to go!

Anyway.... :) back to the card. How many of you chuck away puzzles, with missing / dog-eared / eaten pieces? I have about three of my son's chunky puzzles which were about to find themselves in the bin, but the crafty brain got thinking, and voila:


Tried out some shadowing techniques with a stencil for the background. Laid down white paint first and then went over with purple, over a pink and blue mix base of colour.


Gorgeous Lawn Fawn die, had my eye on this for ages. This is just plain black card stock with UTEE over the top to give it that glossy domed look.


Finnabair stamps, those elegant butterflies and quirky text bubbles, stamped with Archival Inks. I coloured the butterflies with Picket Fence Distress Paint and edge with Intense pencils.


Bling bling!! Of course and little sparkle. Stunning faceted gems by Prima.


Products Used:

Dina Wakley Acrylic Paint:
White
Sky
Magenta
Ruby 
Lemon
Tangerine

Lawn Fawn Die Scripty Hello
UTEE
Finnabair Stencil Bubbles
Distress Paint Picket Fence
Prima Gems
Inktense pencil Hot Red