Showing posts with label Finnabair. Show all posts

22 August 2016

Master board makes

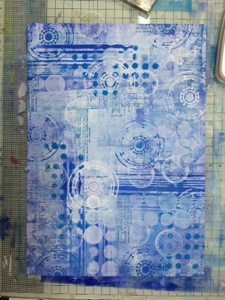
Hello fellow bloggers,  I've been going master board crazy lately, it really is a good place to start when you are looking for inspiration for a project.  Working with stencils and paints to build up the layers and create different looks the effects you can end up with are too many to mention.


I started of with with my master board using Dylusions white linen, London blue and after midnight.
With the help from Dylusion, Tim Holtz and TCW stencils I built up my layers.  I added some
background stamping using the stamps from Tim Holtz District warehouse set.


The circles are from Finnabair Don't for get to fly set.  I stamped these directly onto my master board and then stamped these onto watercolour card with black ink and heat embossed with clear powder.  I coloured in the flowers and added some doodling with a white Posca pen.


I cut out the circles and layered them onto the card.  With a white and black posca pen I flicked and splattered across the card and finally added the lawn fawn sentiment 'Happy birthday to you'.


 I also used another section of the master board using the warehouse district and still have another couple of pieces to come back to for future birthdays.


Thank you for stopping by today.  I hope you have enjoyed my blog post? Come back again soon!

Crafty hugs,

Clare X X X 


http://www.asprinkleofimagination.com/stencils/

21 July 2016

Clock Flower Journal Pages

Morning, peeps!  I don't often do journalling, but I was in the mood for a little painty play recently.
I started off by dragging some Dylusions Paints across the double page spread using a credit card.  Lemon Zest, Vibrant Turquoise, White Linen, and London Blue around the edges.
Added a bit of stencilling in White Linen and Squeezed Orange using Tim Holtz stencils, and while the sponge applicator was still loaded with Squeezed Orange I made three circles.
When the circles were dry I outlined them and drew stems and leaves with a black Derwent Inktense pencil, then smudged it with a damp paintbrush, and added white highlights with a Sakura gelly roll pen.  I overstamped the circles with the clock image from Tim Holtz Curiosities set using Ranger Archival Jet Black ink.
I finished the pages off by adding a sentiment, butterflies and a border with a Finnabair stamps.
Thanks for taking a look, and enjoy your day!

Shirley x

19 July 2016

All hearts and flowers.

Good morning all! It's been a while since I last posted for A Sprinkle of Imagination so without further ado let me show you what I have been up to in the room of craftiness!


For this card I used The following Dylusions paints: Dylusions paints Cherry pie, Lemon zest, white linen.  I started by scraping lemon zest over the card with an old credit card.  I repeated this with the cherry pie, with the edge of the card I added some lines with the Cherry Pie.  I dried with a heat tool and then scraped over some white linen. I blended some more white linen through  the Tim Holtz 
splotches stencil. Through the Dina Wakely TCW stencil , grunge hearts, I blended with Cherry pie and Lemon zest.


Onto some card, previously sprayed with Dylusions inks, I stamped with the heart stamp from Finnabair set Trust the magic several times to create my petals.  I assembled them together and added some glimmer with a Wink of Stella clear pen.  Using the small butterfly from the Finnabair spread your wings set I stamped a couple of butterflies to embelish the card.  I finally splattered with my black and white Posca pens.


Thank you for stopping by today.   I'll be back soon with some more painty and inky mayhem.

Crafty hugs,

Clare x x x 


17 June 2016

Time Flies

Hi guys!  I've been playing with various media to make this Time Flies canvas.

I started off by making my weathered wood panel by swiping Distress Ink minis from top to bottom.

Then scoring it every half inch before stamping with the Peeled Paint background stamp from Darkroom Door.  I painted my canvas with black gesso and adhered the panel to the canvas.

Added a few buttons, paper flowers, bandage fabric scrap and some moulded items from my stash, and painted those black.  
Once everything was dry I sprayed Dylusions White Linen over it and when that had dried, rubbed on some Viva Decor Inka Gold in Lava Red, Jade and Gold.
The Inka Gold adds a lovely antique metallic look to the painted flowers.
Using the Julie Nutting Mixed Media Doll Wings stamp as a template, I cut out a pair of wings from black card and painted them with Finnabair Art Alchemy Acrylic Paint - Opal Magic Rose-Gold.  You see the gold in one light, and the pale rose colour in another.  The clock is from Tim Holtz Curiosities, sponged with Antique Linen.
I hope time isn't flying too quickly for you this summer!

Enjoy your weekend.
Shirley x

08 May 2016

Rainbow Heart


Morning all,  Clare here with my blog post for A sprinkle of imagination.  Recently I was having a little play in my journal and my Daughter fell in love with my page and asked if I could make her a canvas for her bedroom so I set about making a girly creation.


First of all I layered up all of my bright Dylusion paints along with Dylusion stencils. 


Onto this I stamped on some Finnibair butterflies and hearts , from Dont forget to fly & trust the magic stamp sets.  I drew a freehand heart onto the canvas.  Carefully, I painted around my images using Dylusion paints with Turquoise and white.


Once this layer had dried I stamped some Dylusion stamps with white Dylusion paint randomly around the canvas.  Using a black Inktence pencil I edged my images.  For the doodles I pulled out my trusty Posca pens.  Finally through a stencil I  swept through some Finnabair art basics   3D gel matt medium and sprinkled a dusting of glitter.


My daughter is overjoyed with her canvas which is now hanging up in her room.  I hope you like it too?

Thanks for stopping by today.  I'll catch up with you all soon x x x 

Crafty hugs,
Clare x x x 


13 April 2016

Colourful Masterboard


Morning, folks!  I decided to make a masterboard that I could cut up for cards.  I started by sponging my Dylusions paints onto a sheet of A4 card using Mini Blending foam.  Next came some stencilling using Tim Holtz Stencils, then then stamping with Dina Wakley Textures using Ranger Archival Ink.

Then I started chopping the masterboard up for card fronts and toppers:


148mm sq card (Dymo tape sentiment)
A6 card
Topper on A6 card - this one's my fave!
This could either be a bookmark or a gift tag.
Topper on a 148mm sq card
After I'd finished sponging each colour, I got rid of the excess paint by sponging circles (as recommended by Dyan Reaveley in one of her videos) onto another sheet of card:

Out came the circle stamps from the Finnabair Don't Forget To Fly set.  I allocated one stamp per colour, and stamped over all the circles, filling in the gaps with some of the smaller stamps:


And now I've got another masterboard!

Have a crafty day!

Shirley x

22 February 2016

New Products | Finnabair

Hello there! 

We are absolutely delighted to have received our shipment of new goodies from Finnabair. 

I know I say this EVERY time, but wow!  Honestly, Wow.  

The new Art Alchemy Acrylic Paints are just stunning!  We have both the Metallique and Opal Magic colours in stock.  


We, of course have the new Mechanicals.... 
 and once again it was hard to not snaffle everything for myself! 

Just look at these Steampunk versions and those Heart lockets pendants!


Lets get down to Art Basics... 

Heavy Body Gel...   Mixed Media Sample kits and textures powders and art stones,  


There are four more clear stamps available, best news is the pricing has stayed the same with the small stamps still being £1.99 each


And last, but by no means least - 

I LOVE THESE!


Told you... 
WOW! 

So, what projects will you be planning now? 

Happy Creating!
Vicki 

28 January 2016

De Claris Sancte

Hi there

Georgie here today and if you have come over from my blog you may have read a little story to go along with this creation. If not, and you fancy a mind wander, you can check it out here.


This whole book was made completely from scratch, I will list all products at the bottom of the post. However, a spoonful of Tim Holtz ideology products, a pinch of Prima Relics, a dash of Finnabair mediums and a whisper of paint you get this!

Papers are made from regular computer paper with some tea stain, then a touch of Vintage Photo Distress Ink.


Some torn Tim Holtz French Industrial papers. I found matte medium was the best for gluing and and layering with. Most importantly though, use it to seal the top layer.

 I love Sandra's gorgeous relics from Prima. They add such a magical dimension!

Products Used:
Tim Holtz Idea-ology Bird Cage
Tim Holtz Idea-ology 
Tim Holtz French Industrial
Tim Holtz Vintage Photo Distress Ink
Tim Holtz Vintage Photo Distress Paint
Finnabair Matte Medium
Glossy Accents
Finnabar Black Gesso