Showing posts with label embellishment. Show all posts

21 February 2014

Robe a la Francaise - GDT Riikka Kovasin


Happy Friday! It's soon weekend! Riikka here to share with you my third and last GDT piece. Hope you have liked my creations so far!

Who am I? My name is Riikka Kovasin, I'm a Finnish mixed media style scrapbooker with a passion to have my fingers inked on weekly basis. I'm happiest when I can get messy with different paint media and create a piece of memory keeping at the same time. What a perfect combination! My blog is called Paperiliitin. Please come and say hi!


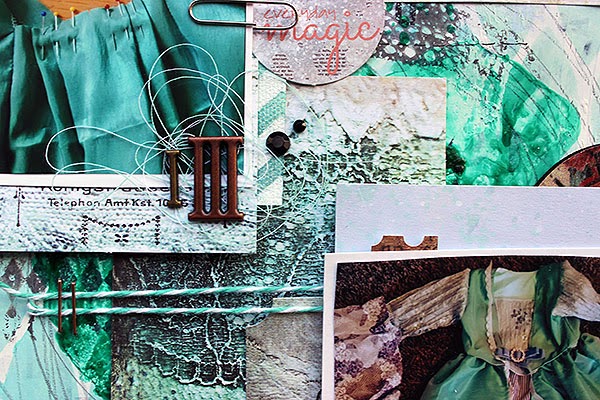
I'm more of a scrapbooker than anything else so I decided to do another layout for my last project. The spark for this layout was my a namesake of mine who asked me an advice over at Facebook for a layout she was working on. I really liked the composition she had going on there and asked her if I could do my version of the same. So here Riikka, is my take on the two photos and vertical title! 

The topic of the page is a princess dress I sewed for my 3-year-old as her birthday present. Her big sister got one just like it when she turned three so it's kind of a tradition. I used the same patterns for this dress than to the previous one, but the color is different. My older one wanted a yellow dress (her favorite color at that time) and my younger one chose turquoise (her favorite color). The dress has a flowing back piece, like the robe à la francaise has.


I started creating the layout by gessoing an area of the background paper where my main composition would go. Then I poured some Glimme Glaze to the paper and let it dry. After that I added some stamping, pencil doodling and inking through a TCW stencil. I also inked a piece of Prima Marketing resist canvas and used it later on in the layers behind the photos. I thought canvas and lacy details would really fit the subject of the page.

After the background was finished I then layered some patterned papers, stickers and other embellishments behind the photos. I used papers from 7 Dots Studio "9th Wave" collection as it fitted the color scheme so well. The embellishments are from that collection together with some from the "Domestic Goddess".

Thank you for taking a look - it has been a pleasure guesting here! Thank you for having me, Vicki! Hope to see you all around!


Supplies:


other: gesso, pencil, thread, twine, half pearls, stapler, correction tape

06 February 2014

Valentine's Cards - GDT Riikka Kovasin


Hello there! Riikka here with a few guest design creations - first of all these Valentine's inspired cards.

Who am I? My name is Riikka Kovasin, I'm a Finnish mixed media style scrapbooker with a passion to have my fingers inked on weekly basis. I'm happiest when I can get messy with different paint media and create a piece of memory keeping at the same time. What a perfect combination! My blog is called Paperiliitin. Please come and say hi!  


I created these four cards using the gorgeous 7 Dots Studio "Messy Head" collection. It's soft tones and pink shades are perfect for Valentine's Day themed creations! The card basis are cut from sheet of Bazzill's Card Shoppe papers.

The main pieces of the cards are cut from a 12x12" paper and then layered with pieces of other patterned papers and embellishments. All of the cards have a common background style, a piece of patterned paper stamped with Finnabair's doily stamp using Prima Chalk Edgers and Archival Inks. The other thing the cards have in common are splashes of pink Glimmer Glaze.


I used different kinds of embellishments in the cards. They all have a bit of thread underneath the embellishments, but then the different cards have different moods. I used Mechanicals in some, Prima wood icons in some and 7 Dots Studio stickers and die-cuts in others. Please see the supply list at the bottom of the post, after some of the detail shots.

Thank you for looking! 


Supplies:


other: thread, paperclips, half pearls, chipboard arrow, pencil

24 January 2014

Metal Heart....

Hello!
I'm still on my 'use techniques you haven't played with for a while' kick..... so today I want to share a little weathered metal...

(This entire blog post is also a frustrating exercise in how difficult it is to get a good picture of mirrored card...especially a picture that didn't have me reflected in the surface!)
Now, I usually do this with metal foil, never tried it with cardstock, so it was a bit of an adventure! Worked brilliantly though!
Here's how...
Cut a shape from sturdy chipboard or greyboard. I drew around a big wooden heart I have in my 'things to alter' box!
Cut this out, then get the mirror card ready. (This is Ranger foil card)
We need to stick it to the greyboard, but my usual glue n seal/ gel medium approach is not going to work this time. Wet glue will leave a dull, non shiny residue on the surface, however carefully we apply it. I used a sheet of double sided adhesive, Wonder Tape sheets work very well. Once the adhesive sheet is on the back, cut the card into squares and rectangles of varying sizes.
Next, stick the shapes to the big heart shape, making sure they overlap slightly.
(that pic *almost* has me in it at the bottom lol!)
Trim the edges, and add a large eyelet if you want a hole to hang it up!
Next bit is where the 'magic' begins! Using a small balled embossing tool, press hard into the cardstock, and create dots and lines...
Scary bit time.... cover the whole thing with a layer of black alcohol ink...
Mine has a definite dark brown look....not a clue as to why, but I like it!
Next, take some wire wool (from the DIY shop), and rub away at the dried ink...
You will need a little elbow grease here, but remember not to rub too hard. This is cardstock remember, not actual metal! Once done, wipe down with a soft dry cloth to remove any wire wool residue...
So, background done! I've not gone overboard with the finishing touches as I wanted to show off the 'metal' not cover it up! A red clay heart....
and black cord tied through the hole...

So...get out that mirrored cardstock and give it an industrial look!
Trish xxx


18 September 2013

Follow Your Heart.....

Hello!
I've gone a little off piste today...... I've made a *thing*.....
It's a hangy dangly thing.....!
Remember the heart I used on this project? That one was made of clay. This time I used the same mould, but used  UTEE for a different look. I'll show you how I made the heart embellishment....
Paint up a bit of book page (I like the look of this so much I've stored the idea away in my head for future use!!!)
Glue the heart to the book page using glossy accents. Make sure you press really hard to get rid of any trapped air bubbles. Doesn't matter if it oozes out of the sides!
Leave to dry.....and you can't hurry it with your heat gun, the heart will melt remember! Cut closely round the shape , but don't worry about being too exact...
Use an emery board to gently sand the paper away to get a very neat finish. Sand in strokes from the back to the front so the UTEE heart doesn't get scratched....
I then drilled a hole through it.... This needs to be done gently so I used a small Archimedes drill (purchased from Ebay, loads on there)

Everything else on my hanging was threaded onto wire coming from the heart. I twisted the wire after threading it through my drilled hole....
I made five rolls of book pages. Very simple, just add a little paint and stamping, roll up into a tube and glue in place. One of the tubes was given a rub on phrase, this will be the one next to the heart. I poked a hole through each tube, then threaded the wire through......
As you can see, I also added a little bead in between each tube. Once all five tubes were on, I formed a loop with the remaining wire, and twisted the end around to secure....
Lots of dimension to this hanging...
Finished off at the bottom with a handmade UTEE heart embellishment....
Something different from me today, hope you like it!
Trish xxx


21 February 2013

Embossing workshop part 3. Embellishing the embellishments.


I'm back with part three of my embossing workshop and as promised I'm back to using the melty stuff. I'm using the UTEE again with a little technique which also uses Perfect Pearls and chipboard shapes. I love this technique which is perfect for using with UTEE and chipboard.  UTEE stands up to longer heating time and chipboard stands up to a lot of layers. So let's get going...
 
I'm using a puzzle piece to work on for my demo but in the shop you'll find chipboard sheets or grungeboard which is great for cutting your own shapes.  I chose two colours of Adirondack die ink and after painting my chipboard with gesso, I coloured the base with my ink.

 
With the ink wet, cover with a layer of UTEE and melt.

 
Go back over the chipboard piece with a clear ink pad or Perfect Medium then dot on some Perfect Pearls. You don't need to cover the piece entirely just random spots of pearl powder.

 
Next comes the delicate bit. Cover with more UTEE being quite generous with it. As there isn't any ink to hold the powder in place, hold the heat gun high up at first so as not to blow the powder away, then move in closer when you see the first beads appear.

 
Keep heating even when it's melted and you'll see the Perfect Pearls move or float about underneath. 

 
The effect is a bit like that of expensive Dichroic glass which has coloured bits inside it.  It's so cool. 

 
Here I did the same thing again but using different colours of Perfect Pearls.

 
While the top layer of UTEE was still molten I gently pushed this mini bulb into it. You could try adding beads or sequins too. 

Here I covered the whole tag in UTEE and PP and after adding the top layer I put the whole thing in the freezer for a few minutes. After I'd taken it out I could easily crack it by bending the card.  If you end up with too many cracks just re-heat it and start again.
 
To finish my piece I used a Ranger Kraft tag, gesso,  Dr Martins Bombay ink in yellow, a little off cut of Glitz Design Yours Truly Polka paper,  Perfect Pearls in gold, forever blue, forever red, perfect pearl, copper and rust, Jenni Bowlin alphas and a Prima typo bulb.
 
Next week is part four and my final workshop in this series. So don't forget to come back.
 
Jaine x