30 June 2015

My assemblage return


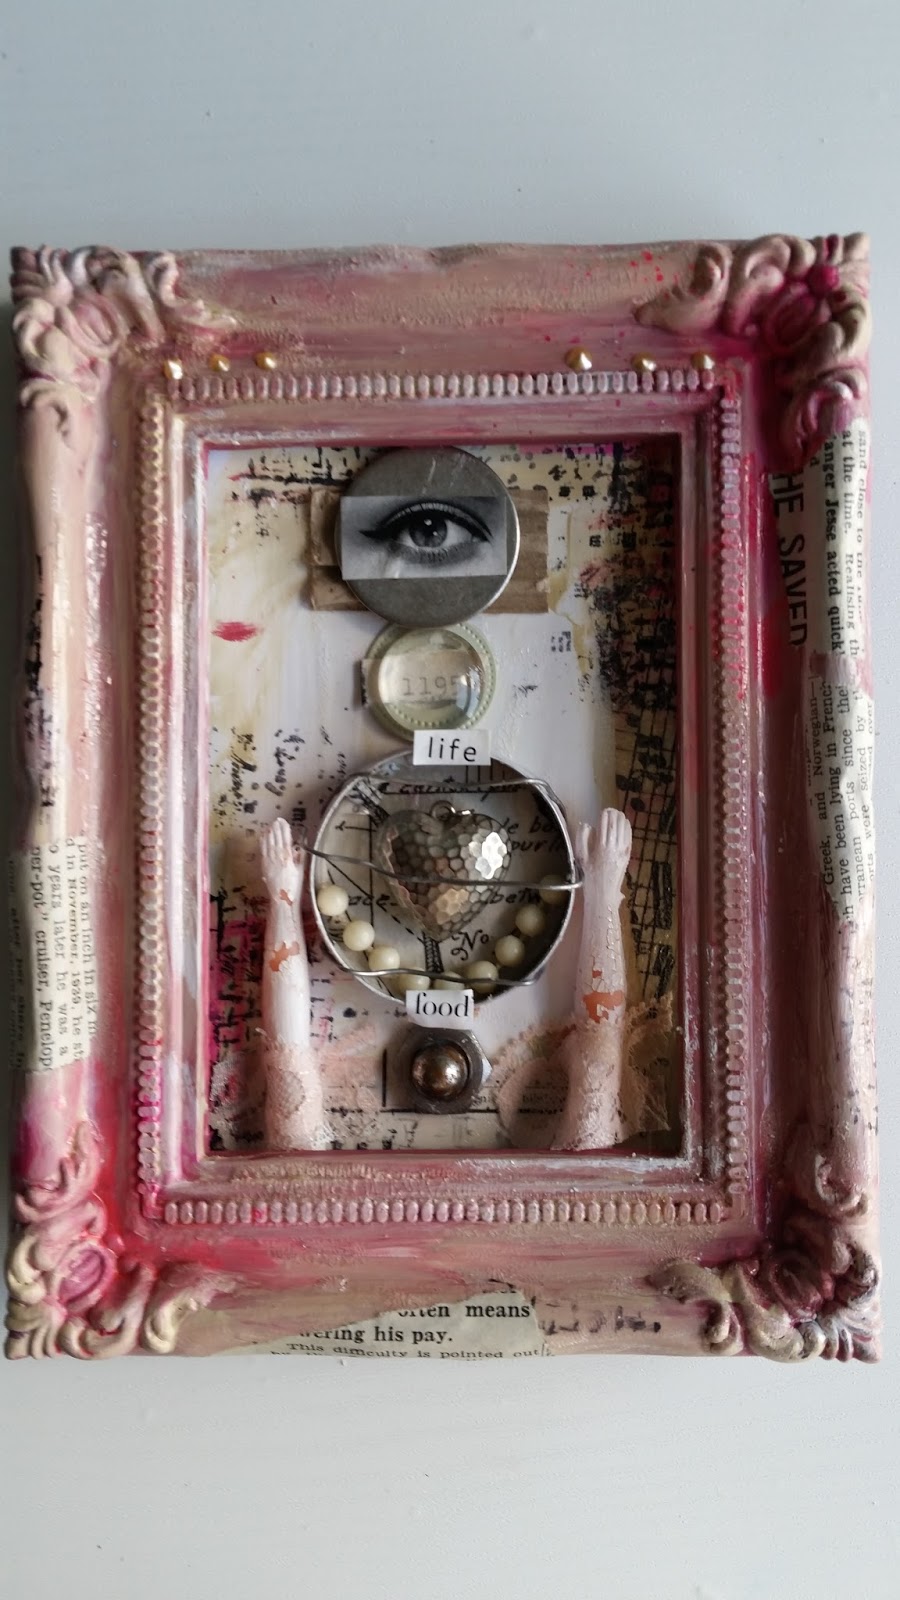
Not sure if I mentioned it before but I love to do assemblage from found objects. Very often it becomes very weird but I think that not all art has to be pretty, cute or "nice". My assemblage ideas came from nowhere- I found one element it goes with something else and here  we go....

I humbly returned to assemblage idea last week when that lost, silver heart just caught my eye. Let me quickly explain to you where the objects came from before we move to the altering stage.


The silver heart comes from a broken jewellery, hands from a cheap plastic doll, the circle is a lid after Nivea lip balm, metal string of course from a DIY box, some random metal bits as well and the frame is a 99 pence plastic frame.


I finaly decided to use my Prima chalkboard paints and this was the start. I covered the frame first in darker colour then let it dry and did dry brush with the lighter colour. The trick to that aged look is to let the first layer dry and then apply second colour in very fast strokes.  For darker and more pink corners I reached for few drops of Dylusions Ink Spray. The crackle effect was my first time with Distress Crackle Paint and I liked these small, subtle crackles it creates.

Inside the frame I collaged with random bits of paper and used some Chalkboard paint as well as Distress Crackle paint. To give the whole more worn out look I used a stamp from Nathalie Kalbach N studio set Mish Mesh. I randomly stamped the frame as well.


These small plastic hands were somehow to bland for me so I applied some white Dina Wakley gesso and Crackle Paint on the top (just remember that gesso has to be dry). I tried to position hands in different directions but somehow it felt right the way like just about to have a meal...Then I found two random words in the magazine: life and food.
Isn't a heart our life's food? True nutrition for our life is in our hearts where we keep love, passion and devotion...Don't you think?

28 June 2015

Go big or go home?!?!

Hello!
More experiments from me today.... Does size matter?! I fancied having a go at a big face... as you do... and to try a more detailed hairstyle. So..... this is what happened!


I thought I would share a little of the process.... First thing I did was sketch out the head and body. Poor sausage looks very odd without hair!


Adding hair helps a LOT....


Colouring her face. As I've said before, after trying all manner of things I decided I like watercolour pencils best for this. First colour...


You can control the variation of tones from just the one colour by adding more or less water, so now I really only use three pencils for the face itself. If I had stumbled upon that fact before buying ALL the pencils from all the brands (well nearly!) I might have more money at this point lol! Anyway... second colour...


Third colour.....


Cheeks look weird before the eyes go in! They look much better afterwards...


I'm not a fan of drawing noses.... so I don't... :)
Hair next, I've used Bombay Ink (teal) for this....


(The splodge is me testing out the colour first!) I then added a little detail to the hair. The closeup at the end will show this better..


I draw my faces/figures on watercolour paper, the cut them out and glue them to my background. This works out well because I can chop off bits I dislike! From the pic above, I hated the black swirls coming off her hair, so they went! Didn't much like the extension of her hair either, looks too much like a wonky, very long eyelash. That went as well.... I had also drawn a black line around the side of her face, that was carefully snipped away too. So, finished face was then glued to the background...


Don't fall down.... not a messy painty background for once! This is ripped up washi tape, with a tiny bit of white sponging to soften it here and there...


I added a word or two onto the green dress..


Her hair was doodled on to give more detail. Jury is still out on that, not sure about it...


As far as the experiment goes, I think big can definitely be better, sometimes!
See you soon!
Trish xxxx


25 June 2015

Creating with Inktense !!!

Morning my lovelies !!!

Tracy here with today's post !

Do you have art supplies that you purchased because you just 'had' to have them ???....... Come on, own up !!
I know I do....all those lovely supplies that I 'needed' desperately at the time and then have hardly if ever used since.....sometimes I think I could set up my own art store with the amount of unused arty loveliness!!!!

No more !!!! ( alright who am I kidding !!) but I've decided that I need to start using things that I buy, play and explore all these gorgeous new mediums, experiment and justify their purchase !!!


So this week I decided to get out my inktense pencils, which I'm ashamed to say I've had for approximately 3 years and only ever used the black 'tut tut'

I started by sketching in the basic outline of my girl, I didn't want to do anything too complicated, after all this was all about the pencils.....


The colours of the pencils are amazing I used Cadmium Yellow, Hot Red, Fuchsia and Mustard and even though I only used a few colours the amount of depth I could get with them was great by adding more or less water or by using them direct to the page...


I used a thin black fine liner to add in some final sketchy details. 

I love how my girl turned out and I am in awe of these pencils. The colours are 'intense' hence the name I guess and they are super easy to use. 


Ok I'm off now to see what other purchases I can justify !!!

Have a fabulous day
Tracy
X

24 June 2015

A fairy tail - II. Two wedding layouts.

Hi, everybody!
Elena Arts here with you today. It is very sunny here in Spain, so I just want to have some refresh drink, to sunbathe in the sea and do nothing all the time:)) lol
However, scapbooking is always welcome :) So, previously I shared with you my first page of the guest book for the bride and groom from Lebanon and today I will show you two others ones.


Creating these pages, I used materials from the store online A Sprinkle Of Imagination where you can find a lot of the products for your Mixed Media work.
I started with covering the paper with Finnabair Art Basics: Clear Gesso, then with the same gesso I glued a piece of gauze to get more texture. Next I apply  Prima Color Bloom Sprays in some specific places. I created relleve with Buckground stencils and  Finnabair Art Basics: Modeling Paste. To finish I always add a little bit of  Background stamps
Once the decor was chosen and glued, I reviewed above all elements with a brush dampened with a Finnabair Art Basics: Soft Matte Gel and  Finnabair Art Ingredients Art Sugar.
I sewed the photos with the sewing machine. I love how them look like, I think it is very  beautiful effect and the photos seem to be framed.
All the details are chosen to convey elegance, beauty, and the tenderness of the moment.
The next my post I will show you the last page and the covers to complete this project. At the moment it is all for today :)  I hope you liked it.
Many kisses and see you soon!
Your Elena.
xxx

21 June 2015

Back to Project Life.

No one likes a procrastinator right? Well I think I'm the biggest procrastinator of them all. Last year I boasted of keeping up to date with my Project Life pages but then real life got in the way and I just sort of let it slip. I gave myself deadlines to finish it up to the end of the year but these came and went and since January I've not looked at it.....once!

Well, this weekend I've put that right.


I feel so much better now for completing another week and hopefully it'll kick start me into getting it finished.

I turned to Basic Grey "Spice Market" papers to cut my own cards and an Echo Park Designer die called Thought Bubble and Hello . 

I also made use of some beautiful washi tape from MME  in teal and the stickers are mostly from Simple Stories Daily Grind.


Here I've used the negative from cutting the Hello on the title card.  I'd also completely forgotten I'd got Enamel Accents by Ranger which I used to create my own little dots on some of the cards.


I'm so happy I've got back into this project and I really hope I can keep going now to finish it off.

Jaine x


19 June 2015

new stamping delights...


Good Mooooorning Stampers!

While we have been busy giving the website a complete overhaul (hope you like it by the way), we have also been taking lots of deliveries of stamping goodness. 

The first I wanted to let you know about are the NEW designs from Finnabair.
5 new clear texture stamps at a bargain £1.99
and 
5 new cling mounted sets

You can find all the new and existing Finnabair stamps here on the website


Next up for your delight are three new colours of Ombre Ink Pads from Hero Arts. 

I personally love these ink pads, and yes, I have stolen some for my own 
ever growing ink pad mountain.  When I do catch up with my memory keeping these ink pads are starting to feature a lot! 


Right, back to it, we have more goodies to add to the website and lots of details of new products coming out to drool through.  

Happy Creating!
Vicki 

18 June 2015

'Stay Strong' ATCs

Hello and welcome!

Georgie here with you today and this week I'm sharing a pair of ATCs that I have created.


Some Dina Wakley paints 'came into my possession' a little while a go and I've been sitting on them, wanting to play, feeling a tad nervous (brights are still her territory for me) but also just not really having the time to experiment. Boy have I been missing out!


I must say they were a dream to work with and being fabulous quality acrylics they hold so much pigment that you really don't need a lot and they keep their brightness. Plus side of acrylics... Painting over 'mistakes', that is definitely a positive in my book!! 


I shadowed with the Inktense pencils, inside the bubbles and around the hearts. This created extra depth. 


The bubbles were created using Finnabair's Don't Be Afraid To Fly stamp set, using three different sizes to get the border. 

UTEE was used to create the glossy hearts. That stuff is just a requirement in my stash - can't live without it!! To add more interest a white pen was used to create more bubbles. Finally I finished up with enamel dots (another new addiction)!

List of 'ingredients' can be found below with links to the shop.

Hugs
Georgie xx

16 June 2015

Selfie Collage


As we probably all agree the world is absolutely obsessed with selfie concept. Sefie images on social sites and even the selfie stick (uh!!!). But I am always a firm believer we have to come outside of ourself to be fully present. And to simply twist the idea of selfie obsession I also decided to do selfie but in mixed media/collage concept. Why? Because having a distance to yourself with a pinch of laughter is the best way to approach the beast!:))))

I started with using my old diary and covering pages with Dina Wakley white gesso. Then using Dylusions Ink Sprays as well as some of home made ink sprays I built colourful parts. Before the inks I covered some parts of both pages with blue and green Acrylic paints from Dina's range as well.


 Ok so now the selfie collage- the funniest part! Do you have any passport photos that were not used? If not you can always use other face photo or just take a new one. I used a tag for the body part and bit of measuring tape plus a tea tag for more edgy look (guessed what-this tea tag was actually on the tea bag I was having in my cup at that very moment!)

Finishing touch for the person collage was covering tag with a mix of white gesso and yellow Dylusions Ink. Blue handwriting was done is Posca paint pen as well as a few scribbles on site.

Here is a close up of the collaged person-my mixed media version of selfie:


For the black circles I used my new set of stamps N Studio with a black Archival Ink. There are few more in a set and can't wait to get my hands on them-so wait for more!


Wishing you lots of fun with creating your own selfie:)
Honorata

14 June 2015

May Challenge winner

Once again a massive thank you to everyone who entered our challenge for May. We love looking through your entries and I have to say the standard is extremely high. 

As ever we had to choose a winner and the winner of this challenge is number 5


We loved the colourful bird and his little niche home. 


to claim your prize explaining that you're the May winner. 

Look out for the next challenge coming up very soon.

x


13 June 2015

Joy

Hello!
Yes yes yes...here we go again... does she EVER do anything other than people these days.......

I know, I'm sorry. I'm just trying to find my way of doing these things, and my experiments are all ending up on here! Here is todays offering...

 I have definitely decided watercolour pencils are my face-colouring-medium-of-choice... but with this one I wanted to not use a fineliner as much, and to get a grip with myself and draw open eyes rather than the cowards way out of leaving them shut! I think I prefer the 'less fineliner' look...

My background is a random bit of chipboard I found, painted up with Dina Wakely paint in Sky and Blackberry, with lots of white smeared on for good measure. I also did my old trick of sprinkling white UTEE in places and melting in for that splattered look...

She is holding bunting, with teeny alpha stickers to spell out the word..

She looks very calm for a red head doesn't she!!

(the shop is undergoing construction right now, so there are no product links in this post. Once the shop is back up and running, I'll pop back in and add them!)

Have a great day!
Trish xxxx


10 June 2015

A fairy tail - I. Wedding layout.

Hi everybody!

How are you? I hope that everything goes well and you are enjoying the summer days. I have a new project to show you. It's a guest wedding book for bride and groom, who live in Lebanon and they get married next July. :) For this book, apart from to make pages for firms, I have to integrate 4 photos of the couple in the book. So, I have created first page in Mixed Media style, of some pastel colors and a very romantic air.
So, I have started with applying the Finnabair Art Basics: Clear Gesso, which function is to make waterproof paper for later using of paints and sprays. After that, I've created a different textures using Finnabair Art Basics: Modeling Paste with some Buckground stencils. I've  glued a piece of gauze using Finnabair Art Basics: Soft Matte Gel . To add color, I resorted to my loved Prima Color Bloom Sprays and I also have added a little bit of  Background stamps.
To decorate, I have created a floral composition, with some wegging chipboards, a Shabby lace and other small decorative elements. You can buy all the materials right now in the store Sprinkle Of Imagination here. You will find a lot of great products fro your beautiful Mixed Media work! :)) Don't miss it out!!!

Here I have used Tim Holtz Distress Stickles to fill the cup ;) Some thouches of color and  Finnabair Art Ingredients Art Sugar for the last details and the page is ready! :)

And it is all for today :) I still woprking on 3 more pages and soon I will share them with you :) I Hope you liked it and see you soon!
Many kisses!xxx