
I have always loved prints. Every kind
of printmaking! I thought that I would love to try. But where to
start? I don't have a huge studio, no space for professional tools
etc. That's why I have chosen linocut which is perfect for small
spaces and which is really fascinating technique.
Today I will tell you where to start.
What you need for the first steps and also give you some tips. I'm
not a huge expert, only a few prints in my drawer but with gaining my
experience I will write and share more with you.
MATERIALS
There is a lot of materials which
probably you will find useful in the future but for now you will need
only a few things.
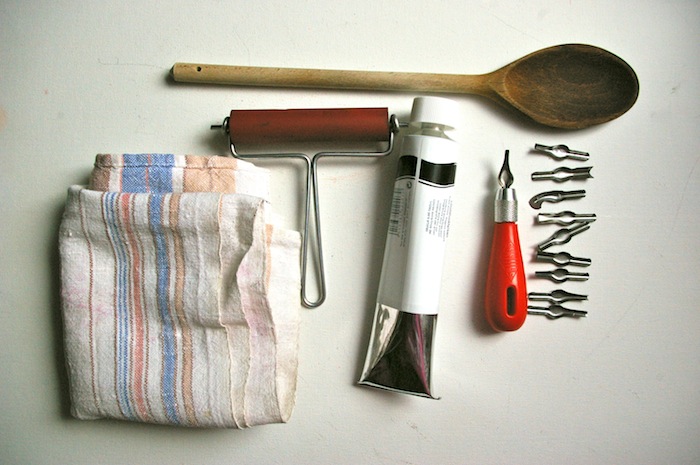
Cutting tool –
you can find lino cutting sets
or high quality linocut tools at shops. Of course for the start buy a
cheap handle (plastic or wooden) with replaceable blades. They are
good for learning and you will have an opportunity to get used to the
different types of blades.
Never throw your
blades together because you can damage them.
Lino block – you can buy linoleum in various sizes and thickness. You can buy bigger sheets
and then cut them or buy small sizes. It really depends what you want the lino for.
At the shops you will also find
SoftCut. The carving material is very smooth and easy to cut.
Cleaning the SoftCut sheet is easier then traditional linoleum. It
can be washed under a tap after use.
Roller – there are various
sizes but for the start and not a big prints you won't need a huge
one.
Printing ink – there are two
kinds of printing ink: water-based and oil-based. I have chosen
water-based for the start because they are easy to clean (using
only water) and are safe to use. You will find that there are a lot of
different brands of printmaking ink and prices also vary.
When buying the inks for linocut always buy ink for relief printing
NOT etching inks.
I bought a big tube of cheap ink for
learning and smaller one which is more expensive to more advanced
prints and of course to see a difference between the two of them. I
bought only two colours black and red for the start (I didn't know if
printmaking would be for me ;)).
When buying the inks for the first time
I think it's enough to buy only a few colours, black and some of the
primary colours (you can always mixed them). But for simple print
you will need only one colour!
If you use oil-used inks remember to
use gloves or special cream for protection. Also you will need a good
ventilation. Don't confine yourself in a small room with a lot of
oil-based ink ;)
If you are a messy person wear an
apron.
Paper – for the start you can
use whatever paper you want but I recommend cartridge paper (huge
amount for only a few quid). First prints won't be perfect, don't
waste you best paper. Remember to use a smooth paper for prints.
A tool for burnishing – you
can find a special tool (baren) for that or you can use your hand but
I have chosen a wooden spoon. Yes! I took the one from my kitchen
drawer ;)
A surface for inking – I use a
sheet of glass which I took from a picture frame. Easy to use and to
clean. Put something under the glass if your desk is smooth, you
don't want to hear this squicky sound when glass in moving when you
ink your roller ;)
Cloth – for cleaning tools

I hope I have helped you a little with
choices and I hope to see your first prints soon!
Magda x
2 comments:
I needed this before I jumped in and started Magda. Can you come to my house?
Yes! Tomorrow? ;)
Post a Comment