28 September 2013

A none spooky Halloween hanger.

It's almost the season for getting the grunge on, mixing everything with a touch of black and generally having as much fun as you did when you were a kid. 
I though I'd get ahead and start out early with my Halloweeny style projects and made this little wall hanging.


I started with a 3 x 6 chipboard sheet by Tando Creative  and cut it into a banner shape.


The little triangle I cut off the bottom I also covered with paper and distressed to form a roof shape. I punched holes through the chipboard to hang them together.


I had some old metal corners and a keyhole which I've had for ever and gave them a coat of black gesso so they would fit in with my grungy theme.


Putting it together I've used other Glitz papers to die cut the rosette and the paper on the banner at the bottom is the reverse pattern from the stripe paper. 

I finished off with some wire to fix the two parts together and create a hanging, an old bit of black lace, die cut letters and an old tape measure. 


Have a good weekend. 

Jaine x


26 September 2013

I like rain and...

Hello!

It was a very busy month for me that's why today I would like to show you a very quick mixed media piece. Five minutes and a project is ready (not counting drying time ;))

Here is my autumn project.


I used:
- Chipboard sheet
- Liquitex gesso
- Stampotique Originals
- Ph Dr Martin's Bombay Indian Ink
- Tattered Angels Glimmer Glaze
- Dylusions Ink Sprays
- Dylusions stencil
- Prima Donna Downey mask
- Ranger Liquid Pearls
- Ranger Archival Ink

Magda x

25 September 2013

So Beautiful

Hello!
Following on from my 'put a smidge of paint and stamping on a corner of a book page' eureka moment last week, I kind of carried it through to my project to share today.....
This is actually a really quick idea, great for if you only have a few moments to get painty!
I covered my 6 x 6 chipboard sheet with book pages, then smeared on some white paint in the corner. I then added a little red....
I initially thought the red was too dark, so spritzed with water. That's the pink wash effect you can see! Not the intention really, pink.......
Anyway, after the 'eek pink' moment, I carried on with the stamping. Red paint, white paint and black ink.
I used the Bo Bunny dots and Jenni Bowlin grid again, and also used one of the circles from the fab Prima stitched circle set. If you look at the picture of the stamp set, it appears that there is one big stamp with three circle designs as well as the two separate small stamps. Not so!!! The three are individual stamps, just one inside the other on the sheet. They can be separated to use by themselves, or you can carefully keep them together and stamp as one (watch out for a project soon where I've done this!) Brilliant stamps to use on journalling pages too!
I also sprinkled a little black embossing powder and melted it, for that fine, delicate splattered look....
My gorgeous Stampotique girl was stamped onto non painty book page, then cut out and glued to the background. Prima Sticker words to finish....
I think in the end I quite like the pink look!
Trish xxxx


24 September 2013

Heffalump collage tag!

Hi there, it's Gez here today! I am delighted to be sharing a tag I've made for you this week.

A sprinkle of imagination have a great choice of scrapbooking papers in store, along with a fab selection of paints, pens and other goodies.. I love browsing the store!

Isn't he... just the cutest heffalump!

I started out with using a sheet of patterned paper from the Yours Truly range called Polka by Glitz Design. I simply cut a tag shape around the elphant and ran it through my sewing machine.. I also added scraps from a couple of other sheets.. you know those tiny pieces that you save and never want to throw away!!

I used the reverse side of the Polka sheet, I love double sided paper as you get more for your money! The word 'LOVE' comes from a sheet called Ephemera also by Glitz Design, I have had so much mileage from this sheet!

To finish the tag, I added a couple of Prima Crystals and a piece of dyed muslin cloth for the tie.

Many thanks for calling and leaving a comment if you get the chance.
 Happy creating, Gez

20 September 2013

Journal play


Here's a page which didn't take too long to do or much thinking about, it just happened.

I started out giving the page a coat of gesso, spreading and making marks in it as I went along. Once dry I used Caran D'Ache Neo colors to scribble all over the page and because the base was gesso and non-porous I could add water to activate the paint in the crayons and get it all to blend in nicely.  I glued down a few bits of paper and added more colour but that was about it. 
I cut the figure of a child from a magazine and pasted it onto a piece of black card, then fussy cut around the shape even getting into that little bit at the nape of her neck. It's fussy alright but so worth doing.  

The balloons were drawn on some coloured paper and cut out and details added later with a Sakura Micron pen. You can see on the silhouette, the more time you spend fussy cutting the better the detail will be. 


The flowers are Dylusions 'How does your Garden grow' and again my Micron pen was used for the stems and border details.


Have a good weekend.

Jaine x


18 September 2013

Follow Your Heart.....

Hello!
I've gone a little off piste today...... I've made a *thing*.....
It's a hangy dangly thing.....!
Remember the heart I used on this project? That one was made of clay. This time I used the same mould, but used  UTEE for a different look. I'll show you how I made the heart embellishment....
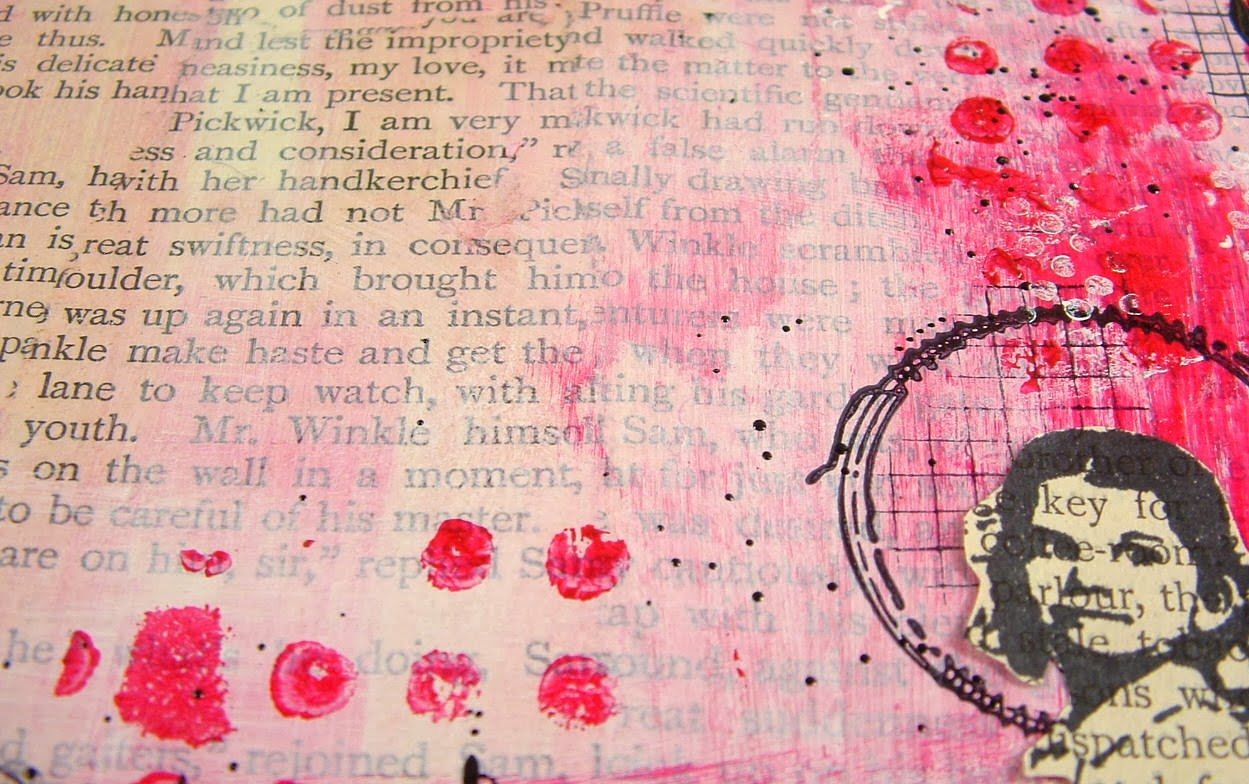
Paint up a bit of book page (I like the look of this so much I've stored the idea away in my head for future use!!!)
Glue the heart to the book page using glossy accents. Make sure you press really hard to get rid of any trapped air bubbles. Doesn't matter if it oozes out of the sides!
Leave to dry.....and you can't hurry it with your heat gun, the heart will melt remember! Cut closely round the shape , but don't worry about being too exact...
Use an emery board to gently sand the paper away to get a very neat finish. Sand in strokes from the back to the front so the UTEE heart doesn't get scratched....
I then drilled a hole through it.... This needs to be done gently so I used a small Archimedes drill (purchased from Ebay, loads on there)

Everything else on my hanging was threaded onto wire coming from the heart. I twisted the wire after threading it through my drilled hole....
I made five rolls of book pages. Very simple, just add a little paint and stamping, roll up into a tube and glue in place. One of the tubes was given a rub on phrase, this will be the one next to the heart. I poked a hole through each tube, then threaded the wire through......
As you can see, I also added a little bead in between each tube. Once all five tubes were on, I formed a loop with the remaining wire, and twisted the end around to secure....
Lots of dimension to this hanging...
Finished off at the bottom with a handmade UTEE heart embellishment....
Something different from me today, hope you like it!
Trish xxx


17 September 2013

French Country magnetic notepad

I don't know if it's the same in your house but we are always looking for something to write a quick note on.. I've come up with the idea of having a handy notepad to keep on the fridge door..

I started out with a chipboard sheet and ran it through my Bind-It-All before giving it a generous coating of white Gesso.


I then painted the chipboard using Claudine Hellmuth Studio Paints. I love how creamy they are and only needed to use one coat, a little goes a long wayy..


I wanted to keep a grungy effect and ran through the paint with a dry brush as it was drying..

I then added white dots using a Posca Paint Pen and then set to work building up a decoration using some of the gorgeous, gorgeous papers from Graphic 45's French Country Collection. The little flag banner is from a Jenni Bowlin sticker sheet.. they come blank so you can add you own message.

My kitchen has a pine/country feel to it so these papers work perfectly, I can see more projects to come using these fab papers!


Everything was given a generous coating of Modge Podge ... my NEW addiction.. everthing, EVERYTHING in sight atm is getting a coat.. I love this for sealing projects.


My finished notepad! I added a length of cloth and a pencil so it can't 'just' disappear... (to where all the hair bobbles go to... in our house!!!) some notepaper and a sticky magnet to the reverse side and it's already to go onto the fridge door..


                                     Thank you for calling and leaving a comment if you get the chance. 
                                                                      Happy Tuesday, Gez


13 September 2013

Cool Blues

Hello!
More experimenting with colour schemes again from me today! Or rather, a *lack* of a colour scheme..... blue and white only this time.....
I covered my chipboard sheet with tissue wrap, then gave it a wash of white paint. A wash of blue paint over the top gave me a delicate base to work on...

I then started to build up some detail in the right hand corner. Lots of layers, including stencilling with white paint, and stamping with blue ink. I used the dots from a Bo Bunny set, and a Jenni Bowlin alphabet...
I also sponged embossing ink through a stencil, then embossed it with white embossing powder.
I stamped a Stampotique heart onto white card, then embossed it using a polka dot embossing folder. I cut it out, then added some butterfly wings....
The heart stands proud from the background. I glued a bead to the heart then glued the bead to the chipboard. This gives loads of dimension!
Chit Chat stickers to finish....
A little bland for me really...but a very good exercise in restraint!!
Trish xxx


10 September 2013

Art Journal Calendar pages..

This year I am working my calendar pages in the large Dylusions Creative Journal and looking forward to getting the smaller one too!

I love this time of year, watching all the leaves turn to gold! and so with anticipation I used that as the colour inspiration for my September pages!


The double spread was first coated with a layer of Gesso to help seal the pages. Then I used some of the gorgeous acrylic paints from Claudine Hellmuth's Studio Paints range. I love how creamy these paints spread across the pages.


I used 'found' objects to create some interest.. like bottle top lids, an old plastic store card and a piece of plastic canvas.. then sprayed Dylusions Ink Spray through a stencil by Dina Wakley called Mini Roman Letters and left the pages to dry..


I am looking forward to adding the little date squares and finishing off the pages with some rubber stamping!


  Happy creating, Gez

08 September 2013

Smitten....with colour!

Hello!
I've been playing with my acrylic inks again! Each time I get them out for a play I'm always amazed at the deep vibrancy of colour they give... I'm sure you could do subtle if you wanted, but this time let's go for bold!
I started off by painting my 6 x 6 inch chipboard panel with gesso. This gives a surface for the inks, if they went onto plain chipboard they would just soak straight in! Giving a white base not only makes the colours pop, it gives that coating for your surface so the inks can be moved around and blended. Once the gesso was dry, I used  texture paste through a stencil to give me some more interest. Once the white base is dry, you can start in with the colour!
I've used a mixture of brands here, Daler Rowney 'silver pearl',  Dr P H Martins Bombay Inks in turquoise and aqua, and Liquitex deep violet. I dripped colour onto a craft sheet, then used a small sponge to dab,wipe and smear the inks across the background....
I also swiped a baby wipe across the colour in places, this removes some of the colour and gives a shabby look. This works especially well over the raised, stencilled areas!
Once I'd used the bright colours, I gently added the silver pearl to highlight. Difficult to see in the pics, but the silver gives a really nice shimmery sheen!
Stamping next..... I've used the dots and chicken wire from the Bo Bunny distressed textures set, and the alphabet and tiny grid from a couple of Jenni Bowlin sets.
Ranger Archival ink stamps beautifully over the acrylic ink! You may also notice some splats there... they're the silver pearl ink, flicked on with a paintbrush.
My heart is made from clay,  it's been painted with the violet ink and a few dots of the silver ink. A chit chat sticker to finish....
Hope you're having a good weekend!
Trish xxxx