Showing posts with label Paula. Show all posts

17 December 2014

12 Designers of Christmas *Designer 9* Paula Whittaker

Welcome to our 9th Designer and it's the turn of the very talented Paula Whittaker.

Paula was part of our original Design Team line up and we're thrilled she could come back to join us for our Designer Christmas project party.  I love this container she's made for us, the little bunny is the cutest.


I love the wintery colours of Paula's container, what a gorgeous gift that would make? 

To make it paula used:

Simple Stories Clear Photo Stickers
Crafty Individuals CI-372 Crowned Bunnies
Simple Stories DIY Stamps: Journaling
Prima Wood Icons In A Box: Christmas
Hero Arts White Embossing Powder 
 Distress Ink Pad - Brushed Corduroy

Paula didn't just make us one but two projects and here's her second using the same bunny,


You can visit Paula's blog "Just For One Day" for more gorgeous inspirational projects.

Don't forget to leave a comment on all the Designers posts to be eligible to win an amazing prize.


Come back tomorrow for more. 

Jaine x

02 July 2013

Burning Rubber

Today, I've got 3 cards, the main focal point being the 'Burning Rubber' stencil by Andy Skinner.


Products used from 'A Sprinkle of Imagination' Shop
Andy Skinner Stencil - Burning Rubber
Tim Holtz Distress Ink Pads - Salty Ocean and Mowed Lawn
Stampotique Originals by Janet Klein - Rabbit
Tim Holtz Idea-ology Remnant Rubs -  Words; Numbers; Elements


Card using mainly Tim Holtz Remnant Rubs, the Bon Voyage is made using a Dymo Label Maker.


There's not much to explain with these cards....I just used the 2 distress inks with a bit of Cut-n-Dry foam through the stencil. Stamped the rabbit on to some stamping quality paper, cut out and coloured with marker pens.


26 June 2013

Learn to Dance in the Rain

Paula here again.....another card I know but it can be translated on to canvas or a journal page.


Products Used:
Tim Holtz Distress Ink Pads: Ripe Persimmon; Festive Berries; Worn Lipstick; Black Soot
Donna Downey Stencil: Perforated Dot Flower
Dylusions Stencil: 5x8 Number Jumble
Tim Holtz Stamps: Psychedelic Grunge
Tim Holtz Idea-ology Remnant Rubs: Elements; Words; Numbers
Archival Ink: Jet Black

 
The basic gist, goes a little like this......
 
  • Card blank size is 99mm x 210mm
  • I've used the Donna Downey stencil randomly over the card, using the Ripe Persimmon, Festive Berries and Worn Lipstick.
  • Used the Dylusions Stencil using the Black Soot ink.
  • Stamped the circles from the Psychedelic Grunge stamp set.
  • Added different Remnant rubs.
  • Used a Dymo machine to do the quote.
  • Die cut the man and umbrella out, I used grey card and then coloured it with a black marker.


19 June 2013

21 today

Paula here with a 21st birthday card design.....


Products used:
Tim Holtz Idea-ology Remnant Rubs: Numbers
Tim Holtz Idea-ology Remnant Rubs: Words
Tim Holtz Stamps: Mixed Media
Tim Holtz Stamps: Steampunk
Tim Holtz Stamps: Psychedelic Grunge
Donna Downey Stencil: Perforated Dot Flower
Dylusions Stencil: 5x8 Number Jumble
Tim Holtz Distress Ink Pads: Festive Berries; Worn Lipstick; Black Soot
Archival Ink Pad: Jet Black


Right, the basic gist of this is......
  • Card Size is 99mm x 210mm
  • I took a ProMarker pen and scribbled down a base layer of colour.
  • Used the Festive Berries and Worn Lipstick Distress inks through the Donna Downey Stencil.
  • Used Black Soot Distress Ink through the Dylusions stencil.
  • Stamped the circles and star shape from the Psychedelic Grunge set using Archival ink.
  • Used Tim Holtz Remnant Rubs.
  • Stamped the hand and reverse stamped it (I used an old brayer to reverse the image) Cut the hands out.
  • Typed out Happy Birthday using a Dymo.
  • Stamped the star within circle image from the Psychedelic Grunge in Festive Berries.
  • Added some white rub ons from my own stash, as well as adding the word twenty and the number one.


09 June 2013

A Project in 2 Parts

Now, what do I mean about a project in 2 parts....well, I received a piece of 8x8 chipboard in my DT pack and it ended up with me making a bit of a mess of it.......not just once but twice!

Part One

Anyhow, I started off by giving the chipboard an even coat of Claudine Hellmuth Black Gesso (love this stuff, you don't need much to give a good covering), then I added various Distress Paints and then various Tim Holtz Stamps - I added a few rub ons and then promptly hated what I done.
Here are a few photo's so you can see what I did......


I tried adding some photo's to see if it would miraculously make it better lol Obviously, it didn't!


Part Two

Right, so the second part starts with me taking the Claudine Hellmuth Black Gesso and covering up everything I did.....one even coat of the gesso was all I needed, told you it was good stuff.
I then took the 6x6 Donna Downey Floral Art Stencil and rubbed/dabbed some Picked Raspberry Distress Paint through. Before the paint completely dried, I took my finger tip and rubbed over the paint gently to give a slightly smudged effect. I then took some Lettuce paint by Ranger and rubbed a bit through the stencil over the top of the Picked Raspberry. I also rubbed both of the paints through some sequin waste.
One of the surprising things was, that the rub on word "Found", that I did the first time round was raised and you could still see it, I decided to incorporate it in to this by taking a bit of paint on my fingers and rubbing it over the top.
I stamped the Stampotique Original image called 'Single Tear' on to some pink and green paper (from my own stash) and added it to the piece, as well as some Dymo wording and a few more rub ons (own stash again). The numbers/wording are coloured using Picked Raspberry Distress Paint.

So, here it is.......What do you think? Was part 1 better?


19 May 2013

A Simple Birthday Card


Paula here again, today I'm showing a really simple and quick birthday card........


Products that can be bought from the shop:

  1. Tim Holtz Idea-ology Alphaparts - Ransom and Newsprint
  2. Distress Ink Pads - Salty Ocean and Peeled Paint
  3. Stampotique Originals by Janet Klein - Rabbit (9230)


How to create this......
 
I basically, placed the Alphaparts/Letters on to the card, then stamped the rabbit. I then used marker pens to create the background as well as an ink spot stamp. I stamped the rabbit again on some stamping paper, coloured it, cut it out and adhered over the first stamped image. Finally, I got my old Dymo out and printed the word 'Wishes' out. See, I told you it was quick and simple!


12 May 2013

ATC's


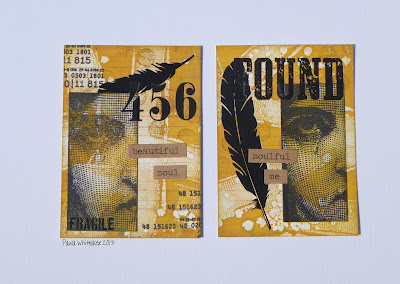
Paula here today, and I'm bringing you a set of ATC's but the design/idea can be scaled up and made into cards or even a small canvas.

 
The base for the ATC's is a Gelli Plate made background, basically I've used Picked Raspberry Distress Paint brayered on to the plate, I've then pressed a large alphabet stencil on to it - and that's as difficult as it gets!
I cut the background sheet up into ATC sized pieces (which is 3.5"x 2.5") and then over stamped in Brushed Corduroy Distress ink using Tim Holtz stamps, I also inked the edges of the ATC's too. The feathers, are Jenni Bowlin rub ons which are the easiest ones to use, you more or less place them down and gentle press and they come away on to the project.
The image is by Stampotique and it's been stamped on to a scrap piece of the background.


So, this Gelli Plate background was created using a mix of Rusty Hinge and Mustard Seed Distress paint - and the pattern is a piece of textured ribbon, think it's called grosgrain(?)


Items used that can be bought from the shop;

Distress Paint: Rusty Hinge, Mustard Seed and Picked Raspberry
Distress Ink : Brushed Corduroy
Stampotique Originals (Face stamp)
Tim Holtz Stamp Sets: Mixed Media, Curiosities
Jenni Bowlin Rub-ons: Feathers
Tim Holtz Idea-ology: Chitchat Stickers
Brayer
Alphabet Stencil


05 May 2013

12x12 LO

 
Paula here, today I'm showing a very simple and clean 12x12 layout...........


It's funny how some things can come together, and this layout had a funny start in life - Well, the lovely paper you can see is a double sided paper called "Aura" from the Finnabair Sunrise Sunset Collection. I cut a piece from the reverse of the paper and I was left with a strip missing, anyhow this side of the paper was laying face up on top of the paper it's layered on, which is called "Scallop" from the Glitz Design Uncharted Waters Collection, and I thought, that looks interesting - then I slipped the chevron paper where the gap was, and basically that's how this page came together!


Ingredients;
Base paper - "Scallop" by Glitz Design from the collection called Uncharted Waters
Chevron paper and the cut out who, what, where, when - Color Me Happy 8x8 Paper Pad by Glitz Design
 

21 April 2013

Large Tag #2


Paula here, I said in my last post that I would blog another #10 Manila Tag by Ranger in a similar style.....hopefully, I'm not boring you too much!
I've used Dylusions Ink Sprays in Squeezed Orange, Vibrant Turquoise and Pure Sunshine for my base. The Tim Holtz stamps I've used are: Spring Sprung, School Desk, Psychedelic Grunge and Steampunk. The Distress ink colours used are Gathered Twigs, Peacock Feathers, Brushed Corduroy and Barn Door, as well as Archival ink in Jet Black.


12 April 2013

Large Tag


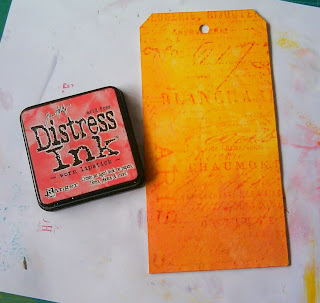
Paula here again, I'm showing a stamped tag today (will be showing another quite similar in a weeks time) - the basis is a large manila no.10 tag by Ranger and that's where the fun began for me.....I started off using Dylusions ink sprays in Vibrant Turquoise, Pure Sunshine and Squeezed Orange BUT I didn't spray them directly onto the tag, I sprayed them onto a non stick mat and wiped the tag into each colour individually. I then added some Distress ink in Peacock Feathers along the top.....then I spritzed the Dylusions inks lightly in places to add a bit more colour on to the tag. I then embossed the tag with a hexagon pattern. Next, I took some sand paper and sanded all the edges and over the embossed design.

I used the grass looking stamp from the Spring Sprung set by Tim Holtz, I stamped firstly in Peeled Paint and then over stamped this in Gathered Twigs - I've used the alphabet stamp from the School Desk set by Tim Holtz in the background using black ink.....I've also added some rub ons. Using Barn Door distress ink I stamped the flourish from the Spring Sprung stamp set. I stamped the rabbit, again from the Spring Sprung set, trimmed him out, added some Copic highlights using 2 shades of grey. I then coloured some paper using a Promarker then over stamped with the butterfly, trimmed image out and added to tag....last touch, was to add a metal clip.
 

07 April 2013

12x12 LO


Paula here, and this is my first project for April...... it's a 12x12 page - the base 12x12 paper is called X-radient from the Finnabair Sunrise Sunset Collection by Prima - I've added some extra colour to the paper by sponging some Rusty Hinge Distress Ink and sprayed a mix of water and Brushed Corduroy reinker.


I then added my other elements, like a torn off top from a Ranger size 5 Kraft Tag, a Donna Downey poppy, a metal Roman Numeral from the Finnabair Vintage Mechanicals, a corked vile and Chit Chat stickers from the Tim Holtz Idea-ology range. I've also added some twigs by stapling then to the page, and some dried Hydrangea petals plus some hessian, fabric and rub ons.


31 March 2013

Chunky ATC using Graphic 45 Paper


Paula here again.....can you believe it's the last day of March, where has this month gone too?
Anyhow, the little project I'm showing today is a chunky ATC - if you haven't heard of an ATC before, then they are pieces of art which are created on a base measuring 3.5"x2.5", they are then swapped with other crafters/artists - so, a chunky ATC is a 3d base to work on (my base is a piece of wood) measuring the usual 3.5"x2.5" but is 1.5" in depth.
For this Chunky ATC, I've cut the images and papers from a Graphic 45 "Olde Curiosity Shoppe" 8x8 paper pad - and apart from the feet, red handle and some word strips that's it.

24 March 2013

Play Time

Paula here - Today, I wanted to share some step by step photo's of me just having a play with some Tim Holtz Distress paints, inks and stamps.....excuse the step by step photo's, they were taken on my ancient mobile phone, so the quality is a bit iffy....have to say I wasn't sure what I was going to do when I started to play but tried to take photo's of most of the process .

Step 1
I started off by cutting a tag shape out of some scrap mountboard


Step 2
Shake the Mustard Seed Distress paint bottle and partly cover the tag, as shown.


Step 3
Shake the Rusty Hinge paint bottle and add the colour at the bottom of the tag.....then lightly use a piece of paper towel to blend the colours together.

Step 4
Spritz some water over the tag while the paint is still wet, let it settle for a bit and then dab off with a piece of paper towel. Dry (either naturally or heat set).

Step 5
Take some Worn Lipstick Distress ink and blend along all the edges of the tag and then stamp the text, as shown.

This is where the step by steps finish.....got carried away and forgot to carry on taking photo's!

I then stamped some butterflies onto the tag and slightly smudged the ink.....I then used Picked Raspberry distress ink to go around the tag edges and added a touch of the ink randomly onto the tag too.
I stamped Gog Lin (the little goblin) onto a piece of paper, coloured and cut him out and adhered to the tag...finally, I added the sentiment and highlighted Gog Lin and the sentiment with an orange marker pen.


Ingredients for tag
Tim Holtz Distress Paints: Mustard Seed; Rusty Hinge
Tim Holtz Distress Ink Pads: Worn Lipstick; Picked Raspberry
Tim Holtz Stamp Sets: Way with Words; Papillon


16 March 2013

Brayer with Distress Paint

Paula here again, with a variation on the technique I showed the other day, this time using Tim Holtz Distress Paints.

First of all, shake the paint (I've used Mustard Seed and Rusty Hinge for this card) and place some on to a non stick craft sheet, roll your Brayer in to it and brayer straight on to a card front.


The next step was to just dab the paint top down on to the card.....I would recommend not to be too heavy handed when doing it. Finally, I stamped the images and hand drew a quick border around the brayered section.
 
The next set of photo's show that after I did the first card the paints beaded and slightly dried on top of the craft sheet, I took the brayer, quickly rolled it in to the paint and put it straight on to the card front.....I quite liked the effect it made.


The card above uses a Donna Downey Poppy embellishment, the stamped butterflies are from the Papillon stamp set by Stampers Anon/Tim Holtz and the wording is from the Stuff to Say stamp set by SA/Tim Holtz.
 
 
Finally, the last card shows another simple idea and that's to place some Distress Paint (the colour is Picked Raspberry) on to a non stick craft sheet and then pick it up with a paper towel and dab and rub the paint on to the card front.


Well, thanks for popping by and see you soon with some more quick and simple idea's.