Showing posts with label Magda. Show all posts

29 May 2015

Going Dotty

I love creating circles and dots and they do feature in a lot of my journal pages. For me there's something very comforting about circle shapes. My journal page this time is inspired by a trip I'm on as you read this to trek across part of the Tyrolean mountains with my best friend. If you don't hear from me again then I'm lost!!


After adding gesso to my pages the background was simply sprayed which gave the page some immediate colour and a touch of grunge. I sprayed through a home made stencil to add my circle shapes. Once they'd dried I drew in the circles again with a black pen but very loosely, more like a scribble.


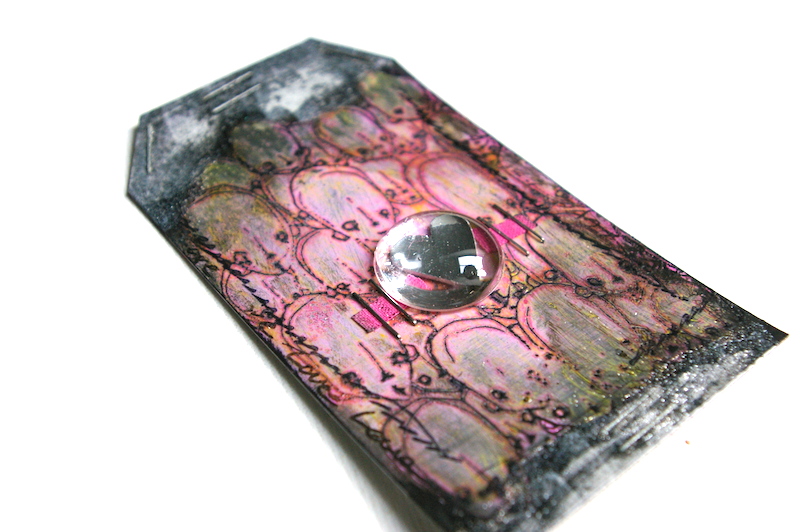
I love Magda Polakow's stamps with Stampotique and this one called Romek is so cute. A few pen lines up to some of the circles gives the impression he's flying with bubbles and a small shine line on each one helps to give that feeling.


The stenciling around the edge is created with Graphite texture paste by Finnabair which I think is my favourite at the moment. It has a slightly grainy texture when applied which dries with a beautiful sparkle.  It dries as hard as granite so you need to put your stencils in a bowl of water as soon as possible if you don't want to ruin them. The stencils I used are Tim Holtz layering stencil Dot Fade, Prima and Dylusions Number Jumble.

See you next time (hopefully) ;)

Jaine x


07 February 2015

Mixed media stripped back.


I had the urge recently to use my water colour journal, one I've not used since.......since......that long!!!

I love water colours, it's my favourite way to add colour but despite this usually my journal pages are full of mixed media goodness but in fact I thought I'd go simple for a change and really take it back a notch. Mixed media doesn't have to be about tonnes of different products and in fact if you've put two different media on a page you can call it "mixed media".


So with that in mind I masked off a border in my book and stamped Agatha Crown by Magda at Stampotique with a Waterproof ink.

I painted the whole page around her with clean water then using my Neo-Color crayons, I made pools of paint and dabbed this around the wet paper.

Once it had dried I went around it again with more watered down colour to make the paint darker. I painted in some of the image with my fine brush and used a skin tone alcohol marker for her face.

I simply added a few spots of paint and stamped the "When Pigs Fly" also from Stampotique next to her and gave her a little grounding with some MME washi tape. This one is a really shiny blue but its not easy to tell from my photo. At the moment I seem to be into ripping it in half and using little bits of it here and there. This photo taken later in better light shows the tape in all its shiny goodness.


Have a good day

Jaine x

12 October 2014

A bit of graffiti.

It looks as though Agatha Moon is dreaming of the future and what life has in store for her.


My page was kind of created by just adding stuff and doing what I fancied. No plan, just winging it so to speak. I slapped on a bit of paint here and there and used a few off cuts of paper as a collage element on the page. I then added some paste through a Crafters Workshop stencil and wrote my journaling with a paintbrush. Agatha who is designed by our own Magda, was painted with water colours as these are my favourite colouring media to use.

Happy crafty Sunday

Jaine x

02 August 2014

Magda's Stampotique stamps.

I absolutely adore these Stampotique stamps by Magda called Gucio and Agatha Bee. The cat especially is the cutest and the goofy expression reminds me of my own stupid cat.


I layered a few scraps of paper on the tag then wiped over Distress paints (Picket Fence and Salty Ocean) wiping the paints off again in a few places. I used Promarkers to colour the images and used some foam pads to give them a bit of dimension.

Jaine x

15 May 2014

Ignis and the gang

Hi everyone!

I have designed some stamps for Stampotique Originals! The stamps will be on a sprinkle of imagination shelves very soon! Stay tuned!

Ignis and Agatha...


I used:
- black gesso
- gel medium
- Posca pen - white
- crackle accents
- Ink Sprays
- Archival Jet Black
- Stampotique Originals stamps

Magda x

07 May 2014

linocut part 3

Hello!

Last time I have told you what materials you will need for your first steps in lino cutting. Today I will tell you how to start working with linoleum.

You will need clean and dry area when cutting the linoleum. If you purchased a size of linoleum you wanted you can start your work, if not, cut the linoleum to the size you want ( you will need a cutting mat and a sharp craft knife ).


If you have an idea what image you would like to cut then you win already. For the start use some simply designs.
There are three different ways to start the work.
1. You can use your sketch as your inspiration - drawing a design onto your linoleum using a pencil,
2. Use a black carbon paper to transfer your design onto the lino block,
3. Simply start to cut without any pencil lines in your linoleum.

Remember that it will be a 'mirror image' when you print it!

For some of you linoleum can be to hard. Put the lino block near a radiator or use a hairdryer to soft it. SoftCut is soft already, don't cut it in a full sun ( my mistake ) because the SoftCut will be oily in touch. Not a nice thing and smelly!

Ok, when everything is ready we can start cutting...


There is really only one and most important thing to remember - WATCH YOUR FINGERS WHEN CUTTING! Always cut away from you.
Other things which can help you:
- cut the lino block in small strokes,
- do not cut too deep - if you will need you can always cut more,
- rub out the pencil marks when finished cutting,
- and really obvious - areas you cut out won't print.

When your lino block is clean and smooth you can start printing...next time I will tell you about this.

Magda x

28 April 2014

linocut part 2

Hello everyone!

I have always loved prints. Every kind of printmaking! I thought that I would love to try. But where to start? I don't have a huge studio, no space for professional tools etc. That's why I have chosen linocut which is perfect for small spaces and which is really fascinating technique.

Today I will tell you where to start. What you need for the first steps and also give you some tips. I'm not a huge expert, only a few prints in my drawer but with gaining my experience I will write and share more with you.


MATERIALS
There is a lot of materials which probably you will find useful in the future but for now you will need only a few things.

Cutting tool you can find lino cutting sets or high quality linocut tools at shops. Of course for the start buy a cheap handle (plastic or wooden) with replaceable blades. They are good for learning and you will have an opportunity to get used to the different types of blades.
Never throw your blades together because you can damage them.

Lino block – you can buy linoleum in various sizes and thickness. You can buy bigger sheets and then cut them or buy small sizes. It really depends what you want the lino for.
At the shops you will also find SoftCut. The carving material is very smooth and easy to cut. Cleaning the SoftCut sheet is easier then traditional linoleum. It can be washed under a tap after use.

Roller – there are various sizes but for the start and not a big prints you won't need a huge one.

Printing ink – there are two kinds of printing ink: water-based and oil-based. I have chosen water-based for the start because they are easy to clean (using only water) and are safe to use. You will find that there are a lot of different brands of printmaking ink and prices also vary. When buying the inks for linocut always buy ink for relief printing NOT etching inks.

I bought a big tube of cheap ink for learning and smaller one which is more expensive to more advanced prints and of course to see a difference between the two of them. I bought only two colours black and red for the start (I didn't know if printmaking would be for me ;)).

When buying the inks for the first time I think it's enough to buy only a few colours, black and some of the primary colours (you can always mixed them). But for simple print you will need only one colour!

If you use oil-used inks remember to use gloves or special cream for protection. Also you will need a good ventilation. Don't confine yourself in a small room with a lot of oil-based ink ;)
If you are a messy person wear an apron.

Paper – for the start you can use whatever paper you want but I recommend cartridge paper (huge amount for only a few quid). First prints won't be perfect, don't waste you best paper. Remember to use a smooth paper for prints.

A tool for burnishing – you can find a special tool (baren) for that or you can use your hand but I have chosen a wooden spoon. Yes! I took the one from my kitchen drawer ;)

A surface for inking – I use a sheet of glass which I took from a picture frame. Easy to use and to clean. Put something under the glass if your desk is smooth, you don't want to hear this squicky sound when glass in moving when you ink your roller ;)

Cloth – for cleaning tools


I hope I have helped you a little with choices and I hope to see your first prints soon!

Magda x

17 April 2014

Power flower - linocut part 1

Hello everyone!
The weather has been fab in last few days! I can't sit and work in my studio that's why I try to work in my garden. Today I would like to show you my flowers. No! No gardening and flowers from my garden. But I used a cutting tool...

This is a very simple print. If you are a beginner it's something which you can make without any problem. If you are still thinking about lino printing but you are not sure where to start next time I will have for you some guides.

The first print is on a white cardstock.


The second one on a background which I prepared before using gesso and Dylusions Ink Sprays.


Magda


19 March 2014

Magic box

Hello!

Today I have for you a very easy and quick box in 5steps.

1st layer - Tim Holtz Distress Paint Picked Raspberry


2nd layer - tissue paper


3rd layer - Dylusions Ink Spray Fresh Lime


4th layer - Claudine Hellmuth Studio Black Gesso


5th layer - Liquitex Glazing Medium ( only on a lid - you can see the difference )

I also add Stampotique Originals stamps and printed quote.

Magda x

03 March 2014

new idea

 Hello
Today I have something different for you. I couldn't find an inspiration and I simply just sat and draw with glue some simple shapes. I like circles in my projects and now I need to try different shapes!


I used:
- Claudine Hellmuth Black Gesso
- Glitz Design Raven
- Posca Paint Pen White
- Distress Glitter
- Distress Paint - Picked Raspberry

Magda x

18 February 2014

Love my Vizsla

Hello,

Today I have for you a very easy and quick notebook made from Glitz Design Raven collection.


The Vizsla image is my own linocut print.

Magda x

12 February 2014

Strange city

Hello!

Today I have for you a very colourful project. I used No.12 Giant Tag as a background.


On a plain tag I sprayed some Dylusions Ink Sprays. Than I glued a pieces of Glitz Design Your Truly paper (hurry it's on sale now!!!) and Claudine Hellmuth Sticky-Back Canvas.


For more texture I used gel medium and The Crafter Workshop Template. When I was sure that the background is dry I sprayed Dylusions Inks once again.


I used my sewing machine for ''building'' houses. Than stamped Stampotique Originals stamps (you can buy some of them in really good prices!!!)  using Ranger Archival Ink. For last touches I used Crackle Accents, white acrylic paint and staples.


Magda x

03 February 2014

Two paths

Hello

Today I would like to show you my layout. I haven't made a lot of layouts in my life. Only a few.
I used Glitz Raven collection for my background. I like these collection for its great designs.

For the first two layers I used a stripes of masking tape and gesso.


I mixed gesso with orange ink and it gives me more fluid gesso. I applied it using the other end of the brush.


The last thing was to stick everything to my background. It's a little messy there but it seems that everything works.


I used:
- Darkroom Door Carved Birds Vol 1
- Glitz Design Raven
- Claudine Hellmuth Sticky-Back Canvas
- Bombay India Ink - Orange
- Sakura Micron Pen
- Prima Writers Tape
- gesso

Magda x

27 January 2014

Live.Dream.Love

Hello!


One more time something challenging for me. I made a project like this for the first time. I use a box from Prima Wood Icons in a Box. I painted the box using Claudine Hellmuth black gesso. Inside a small windows you can find pieces of Glitz Design Raven collection. 


I cut circles from Claudine Hellmuth Sticky-Back Canvas and used Hero Arts Ink Dauber and Ranger Archival Ink to colour them. 


Small clear drops are made from Ranger Crackle Accents and the dark ones from Ranger Liquid Pearls.


It was a great fun, I need more boxed like this!

I used:
- Prima Wood Icons In a Box
Hero Arts Ink Dauber
- Glitz Design Raven
- Claudine Helmuth Sticky-Back canvas
- Claudine Hellmuth Black Gesso
- Finnabair stamp - Doily
- Ranger Archival Ink
- Ranger Crackle Accents
- Ranger Liquid Pearls

Magda x

20 January 2014

out of a comfort zone

Sometimes Vicki sends me some stuff which I don't know or even have never heard about. This time it was Ranger Foil Cardstock.

I really didn't know what to do with it. It is shiny and slippery...it only means one...gesso, acrylic paint etc. will be easy to scratch. And it's true! I checked some acrylic paints and inks.

Ok...what now? I'm sure alcohol inks will be great for it but I haven't got any. How to make a texture? I haven't got embossing machine either but I found embossing powder in my drawer.

I used Stampotique Original stamp which is made from a good quality rubber and it's harder then acrylic stamps. I won't be able to smear it when I will push it too hard. I used Ranger Archival Ink for stamping. Than I applied some RangerDistress Paint. But...it won't be waterproof and I like waterproof things especially on slippery background. I mixed Liquitex Glazing Medium with yellow acrylic paint and applied it on a pink paint. Glazing medium gave transparency to the yellow paint and made my 'Heads' waterproof!

I wasn't sure this mirror-like look of the cardstock it was too much for me ;) I applied some ClaudineHellmuth Black Gesso and then using a tissue I removed some of it. It gave me some brighter spots. Still I wasn't happy that's why I used more embossing powder.

The result...


I was pushing myself out of my comfort zone. It's not my favourite project but it was really great fun to experiment with new products.

Magda x

13 January 2014

Be brave - mini album part 2

Hello

Today I would like to show you how I have made a front cover of my mini album and tags which I will  put to the mini album pockets.

The most important thing in this album is a texture of background. I love textures and colours that's why I always try to put this two things at the centre of attention. This story should be longer but maybe another time...

I applied some Liquitex gesso and put a tag on it.


I push a tag because I wanted gesso to stamp on my tag.


It's very easy technique but gives a fab results.


The same thing I did with a black gesso.


When the background dried I splashed orange ink which gives me contrasting colour on my background.


Than I stamped Prima stitch stamp using Rangel Archival Ink.

On a wood piece - Joy - I applied some colour using Hero Arts Ink Dauber. The first letters of the word and an arrow are stickers from Glitz Design Raven collection.


I use the same stuff on my tags.


I really enjoyed making my mini album, maybe it's the first one but for sure not the last one!

I used:
- Glitz Designs Raven collection
- Dr.Ph.Martin's Bombay India Ink
- Prima Stitch stamps - Lines
- Prima Wood Icons in a box
- Hero Arts Ink Dauber
- Ranger Archival Ink
- Liquitex gesso
- Claudine Hellmuth Studio Black Gesso
- masking tape

Magda x