Showing posts with label Crafters Workshop. Show all posts

03 March 2015

Layering stencils

There's nothing I love more than using stencils and layering them with different media makes for a wonderfully true touchy feely experience.

This is the page I ended up with, I just went with the flow and waited to see where the feeling would take me.


I started off by using two Crafters Workshop stencils, my favourites, Fleur de Lys and Mini Vine along with Golden crackle paste. I randomly sprayed the page with a few select colours to lay down a base.


Once this was dry I sanded the top of the texture which helped to bring out the crackles in the paste.


For my next layer I stenciled Dreamweaver Embossing paste in black (which is absolutely yummy) through Dylusions Letter Jumble and Tim Holtz Dot fade. I'm loving dot fade at the moment.


 For a third layer I used another Crafters Workshop stencil this time by Rebekah Meier and Rusty Hinge Distress ink.


The tree was a bit of an afterthought and I just decided to paint it on (like you do) while looking out of my basement window.


I love layering and if only you could touch it, the texture is amazing. 

Jaine x

08 December 2014

12 Brands of Christmas *Brand 4* Crafters Workshop

Welcome to day 8 and today we're featuring Crafters Workshop.

The shop stocks a range of 12x12 and 6x6 Crafters Workshop Templates. Crafters Workshop have a fabulous range of designs and they can be used with a variety of mediums to create some brilliant effects. 


Along with paints and mediums, one of my all time favourite tools to use in mixed media is a stencil and Crafters Workshop have some of the most beautiful stencils out there. This one called Fleur de Lis by Julie Fei-Fan Balzer is one of my all time favourites.  Here I've simply used paste with acrylic paint over the top then gently sanded back the paint to reveal the stenciled paste.


 Call back tomorrow for another talented Designer.

Jaine x

21 February 2014

Robe a la Francaise - GDT Riikka Kovasin


Happy Friday! It's soon weekend! Riikka here to share with you my third and last GDT piece. Hope you have liked my creations so far!

Who am I? My name is Riikka Kovasin, I'm a Finnish mixed media style scrapbooker with a passion to have my fingers inked on weekly basis. I'm happiest when I can get messy with different paint media and create a piece of memory keeping at the same time. What a perfect combination! My blog is called Paperiliitin. Please come and say hi!


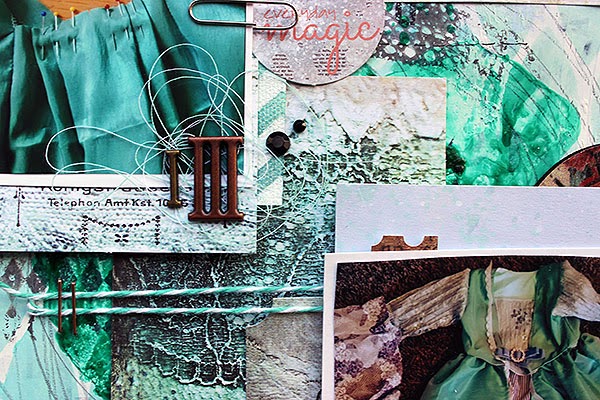
I'm more of a scrapbooker than anything else so I decided to do another layout for my last project. The spark for this layout was my a namesake of mine who asked me an advice over at Facebook for a layout she was working on. I really liked the composition she had going on there and asked her if I could do my version of the same. So here Riikka, is my take on the two photos and vertical title! 

The topic of the page is a princess dress I sewed for my 3-year-old as her birthday present. Her big sister got one just like it when she turned three so it's kind of a tradition. I used the same patterns for this dress than to the previous one, but the color is different. My older one wanted a yellow dress (her favorite color at that time) and my younger one chose turquoise (her favorite color). The dress has a flowing back piece, like the robe à la francaise has.


I started creating the layout by gessoing an area of the background paper where my main composition would go. Then I poured some Glimme Glaze to the paper and let it dry. After that I added some stamping, pencil doodling and inking through a TCW stencil. I also inked a piece of Prima Marketing resist canvas and used it later on in the layers behind the photos. I thought canvas and lacy details would really fit the subject of the page.

After the background was finished I then layered some patterned papers, stickers and other embellishments behind the photos. I used papers from 7 Dots Studio "9th Wave" collection as it fitted the color scheme so well. The embellishments are from that collection together with some from the "Domestic Goddess".

Thank you for taking a look - it has been a pleasure guesting here! Thank you for having me, Vicki! Hope to see you all around!


Supplies:


other: gesso, pencil, thread, twine, half pearls, stapler, correction tape

09 February 2014

Wish -tone on tone paint effects.

Hello!
I'm back to painty messiness today...and I want to show you how you can incorporate scraps of waste, but matching colours into your work.
I created a background using lots of layers, and added in some stencilling through some sequin waste, and splats of black UTEE. A few random painty lines too!
When I'm adding paint to cardstock, I always work on a base of white copy paper. This means when I go over the edges of the card, paint ends up on the paper. When I'm done, it means I have a piece of A4 paper with random painty mess on it too! In this case, I stamped the heart onto a section of the A4 paper, then cut it out and added it to the background using gel medium....
With a tone on tone effect like this, it can get a little lost, so I gave the heart a little shading around the edges. Everyone has their own favourite way of adding shadow, I like using a black pastel pencil and smudge with a paper stump. Whilst you want the heart to stand out, you also want it to blend in too, so it looks part of the piece and not just plonked down on the background. To do this I made sure my painty lines went across the heart too, and the UTEE splatters were on there as well!
The final touch was a simple stamped word....
You could always stamp onto tissue and glue down with Mod Podge if you're not that confident stamping directly onto the finished piece!!

Have a great weekend everyone!
Trish xx


07 January 2014

A little collage for the new year!

Hello!
New Years resolutions? Oh yes.....but just the one so it's manageable!
I'm determined to play around with crafting styles and techniques that I don't 'do' on a regular basis! Stop the 'go to' creating!!!!!
So, first technique I really should do more of...collage! Now, my initial idea was to use cut out magazine pics, but that was just a step too far and I got the stamps out instead!
Quick and easy painted background....just smear and brush on the paint, then add stencilling and doodling. Not too much thought, just go with it!
Random stamping..the Prima Finnabair stamps are perfect for this...
The stitched circle is another Prima favourite! I stitched the painted panel to a piece of black card, them got on with the elements for my collaged art doll.
She is created from a combination of stamped images and hand drawn/painted shapes. The wings are Stampotique hearts, stamped over some text...
Her body is a shape cut from painted cardstock...
Her legs and arms are scraps of card given the stripy treatment, with a little doodling added...
Her face is of course Stampotique again, LOVE these large heads! Perfect for art dolls. I've used hot glue to attach all the bits, I really like using hot glue as you can manipulate it it be a little 3D in places so your design isn't flat. In this case, her extended arm with the punched out star is standing proud, giving nice dimension. This may not be ideal if you are creating a journal page, but as this isn't destined to be squished together in a journal it works just fine!!!
See you soon
Love Trish xx


18 October 2013

Simple book making- part one!

Hello!
I thought I would take a little break from all the painty panels (and tags, ATCs and journal pages!) for a few weeks, and show you something that I really should do more of...book making! Loads of simple and easy ways to create books, and I thought I'd share a few...
Here is part one.... (also to be titled "It's really hard to take a decent pic of a finished book"")

 
I have kept things simple, only a few pages, and not loads of mess etc on the pages themselves. You can go as detailed as you fancy, of course!
OK... how to do it. Pages first. I've started with a masterboard, this one is a 12" by 12" sheet of card....
As you can see, I sprayed it with dye inks, and then did a little printing, stencilling stamping and splattering over it. Not over much, as we can finish off each page once its cut. I have then cut my card into 10cm by 10 cm squares....
A 12" by 12" sheet will give you nine squares. My book has three double sided pages, so I need six altogether. So, choose you favourite six squares, then sew them to a black 'base' card.
I've done a little extra stitching here and there too, as you can see! Now we have our pages, we can add a little extra decoration. Here is one of mine...
I, again, haven't gone overboard here. A bit of washi tape, white paint dots and a punched out star, along with my main image and stamped word. Once you have decorated your pages (or not, you may rather keep them plain for someone else to add photos etc), its time to actually construct the book. Once the black base card is added, my pages are now 11cm by 11cm. I've cut two more bits of card 11cm by 11cm, and then scored them down the middle, like so....
The card hinges need to be the same size as your pages, so it's easy to work out how big they need to be when you make books of varying shapes and sizes. Now we need to attach the hinges together. I use strong double sided tape, wet glue gets very messy! Like this.....
So, you have stuck one side from each hinge to each other, forming what is beginning to look like a book! If you want more pages, simply make more hinges and keep sticking them to each other! Adding the decorated pages to your hinges couldn't be simpler. Again, strong double sided tape all the way....
Decide which page is to be your cover, then stick the first bit of card in your hinge to it...
As you can see, the card hinge goes halfway down the page, giving a good strong bond. Now it's time to add page two. This gets stuck back to back with your cover, with the card hinge sandwiched in between. Like this...
As you go along, remember to keep checking you are not sticking the pages in upside down! Page three gets stuck to the middle hinge....
Page four to the back of page three.... (told you this was easy!)
One card hinge left. So, page five first....
Then the back cover (or page six!)....
As the page backgrounds and the hinges were cut from the same card, you now have a seamless finish!
Books that have lots of pages need a little extra finishing, as the card hinge will be much thicker and needs to be hidden! The book will also have issues staying closed too... I'll show you next week how to deal with this!
For now, here are a few closeups of my pages...
I've added glossy accents to the stars for the shiny look...

LOVE this new Ranger washi tape!
I've cut up one Stampotique image to separate my three little girls.....
Hope you like my book tutorial.... I'll have another technique next week!
Trish xxxxxx


09 October 2013

Hubble Bubble....

Hello!
Yep, still in a spooky place in terms of crafting! Not specifically Halloween this time, but more of a dark and sinister colour palette and a scary figure (which is much the same as I get when I look in the mirror, but I digress.....!)
Here is 'toil and trouble'...
I used a chipboard 6 x 6 square as my base, then covered it with gesso to make the colour layers pop. I then did a little stencilling with texture paste to give me my circle accents. Next, paint! That delicious sludgy green is 'green gold' by Golden, I smeared this all over the base, then added my stamping touches. Bo Bunny and Jenni Bowlin stamps...
I then added in a few smears of quinacridone violet, followed by printed lines of dioxazine purple. I then sprinkled the whole thing with a few grains of black UTEE. Top tip for doing this...spritz the background with water first. The tiny UTEE particles will stick to the water and wont blow away when you melt them! This only works for paint though....its waterproof! Waterbased inky backgrounds will react differently....
Anyway....once the black UTEE has melted into raised dots, they can be highlighted by dry brushing gold paint over them.....
The stencilled areas got the gold treatment too! My figure is of course a Stampotique one, no one quite does spooky like they do! Must admit, I find some images a little disturbing, but this one I love!
A little rub on phrase and it was done!
Hope you like her.....
Trish xxxxx


20 September 2013

Journal play


Here's a page which didn't take too long to do or much thinking about, it just happened.

I started out giving the page a coat of gesso, spreading and making marks in it as I went along. Once dry I used Caran D'Ache Neo colors to scribble all over the page and because the base was gesso and non-porous I could add water to activate the paint in the crayons and get it all to blend in nicely.  I glued down a few bits of paper and added more colour but that was about it. 
I cut the figure of a child from a magazine and pasted it onto a piece of black card, then fussy cut around the shape even getting into that little bit at the nape of her neck. It's fussy alright but so worth doing.  

The balloons were drawn on some coloured paper and cut out and details added later with a Sakura Micron pen. You can see on the silhouette, the more time you spend fussy cutting the better the detail will be. 


The flowers are Dylusions 'How does your Garden grow' and again my Micron pen was used for the stems and border details.


Have a good weekend.

Jaine x