26 February 2014

Daily Stories...

hello everyone. 


We're being inundated with new stock deliveries every day this week, but I thought I would just quickly share that the new Teresa Collins Daily Stories collection is now online. 


As usual with Teresa Collins this collection is packed full of goodies. Besides the 12x12 double sided papers, collection kits and paper pads, there are sequins, file folders, stamps, stickers, wood cuts, chipboard, gems,.. oh. the list goes on and it's worth a visit to check out all the elements. 


24 February 2014

Colour Challenge time!

Hello, hello. 

Firstly my deepest apologies to all those that entered Januray's colour challenge for this, rather late, annoucement of the winner.  I was so busy just before half term and then we went on holiday.  I did wake up one night and suddenly realise that I hadn't prepared the winner post or done the new challenge!  

Please forgive me. 

So, without further a do... the January challenge winner is 

Shilpa!!


You can find her entry on her blog here

Very many congratulations. Your voucher will be on it's way, by email, to you shortly! 

February's challenge is now live.  The closing date for this one is the 12th March. 
Good luck and Happy Creating!

Vicki 

23 February 2014

You are so worth it!

Hello!
A little inspirational message from me today....... with a stack of birds!
A colourful painty background, lots of layers..
A little washi tape and some melted in UTEE to give some splatters...
I stamped the birds onto tissue, then stuck them to the background using Mod Podge. Each one was done individually, to form the bird stack!
I used Prima stickers (Sun kiss) for the words....
Nice and bright and cheerful for a Sunday morning!
Have a great week everyone!
Trish xxx


22 February 2014

Image transfer techniques


 It was whilst trying out some printing without using a gelli plate that I came upon this technique for transferring an image.  I tried this on paper first but found the paper tore but on sticky backed canvas it worked better. Maybe if I'd given my paper a coat of gesso first it might have worked better but I have to experiment further to find out. 

Anyway, I started off with a background of texture paste, (of course, what else would you expect from me?) through a plain old paper doily and some spray inks.


 I chose an image from a magazine of just a head shot and lay a piece of plastic over it. I used one of those clear pockets from a file folder so raid your children's school supplies.

The small bottles of Claudine Hellmuth Studio paints have a very handy thin nib to squeeze paint out of and can easily be used like a pen. I used this to draw the outline of the design onto the plastic.


 I placed the painted image face down onto the background and burnished with my finger.


 I had enough paint left on the plastic to transfer the design onto a journal page although it wasn't as clear.


 For the second transfer technique I used sticky plastic book covering but you could also use clear packing tape. I covered the image with it and burnished well.


 I cut around the image.

I then soaked it in water and rubed off the paper backing. I kept soaking and rubbing until most of the paper had been removed from the back and only the image remained.


 I used some gel medium to glue it in place.


To finish my piece I use my sewing machine to doodle around the edges.


 and stamped some script over the image and added lettering with stickers.

Sticky canvas is great if you don't sew and takes any manner of mediums on top give it a go. I hope you give the transfer techniques a go too, they're easy.

Jaine x

21 February 2014

Robe a la Francaise - GDT Riikka Kovasin


Happy Friday! It's soon weekend! Riikka here to share with you my third and last GDT piece. Hope you have liked my creations so far!

Who am I? My name is Riikka Kovasin, I'm a Finnish mixed media style scrapbooker with a passion to have my fingers inked on weekly basis. I'm happiest when I can get messy with different paint media and create a piece of memory keeping at the same time. What a perfect combination! My blog is called Paperiliitin. Please come and say hi!


I'm more of a scrapbooker than anything else so I decided to do another layout for my last project. The spark for this layout was my a namesake of mine who asked me an advice over at Facebook for a layout she was working on. I really liked the composition she had going on there and asked her if I could do my version of the same. So here Riikka, is my take on the two photos and vertical title! 

The topic of the page is a princess dress I sewed for my 3-year-old as her birthday present. Her big sister got one just like it when she turned three so it's kind of a tradition. I used the same patterns for this dress than to the previous one, but the color is different. My older one wanted a yellow dress (her favorite color at that time) and my younger one chose turquoise (her favorite color). The dress has a flowing back piece, like the robe à la francaise has.


I started creating the layout by gessoing an area of the background paper where my main composition would go. Then I poured some Glimme Glaze to the paper and let it dry. After that I added some stamping, pencil doodling and inking through a TCW stencil. I also inked a piece of Prima Marketing resist canvas and used it later on in the layers behind the photos. I thought canvas and lacy details would really fit the subject of the page.

After the background was finished I then layered some patterned papers, stickers and other embellishments behind the photos. I used papers from 7 Dots Studio "9th Wave" collection as it fitted the color scheme so well. The embellishments are from that collection together with some from the "Domestic Goddess".

Thank you for taking a look - it has been a pleasure guesting here! Thank you for having me, Vicki! Hope to see you all around!


Supplies:


other: gesso, pencil, thread, twine, half pearls, stapler, correction tape

18 February 2014

Love my Vizsla

Hello,

Today I have for you a very easy and quick notebook made from Glitz Design Raven collection.


The Vizsla image is my own linocut print.

Magda x

14 February 2014

I Love You To The Moon - GDT Riikka Kovasin


Happy Valentine's Day! Riikka here again with another guest design post and I have a little present for you - a video.

Who am I? My name is Riikka Kovasin, I'm a Finnish mixed media style scrapbooker with a passion to have my fingers inked on weekly basis. I'm happiest when I can get messy with different paint media and create a piece of memory keeping at the same time. What a perfect combination! My blog is called Paperiliitin. Please come and say hi!


For my second post I created a Valentine themed layout about my two daughters. The picture is an old one, but I really loved the topic and the angle of it. It shows them playing an afternoon tea party. 

The quote from the 7 Dots Studio "Messy Head" collection suited the layout perfectly as I love them both to moon and back. I also used other patterned papers from the collection. As one of the journaling style cards I wanted to use on the layout was purple, I added some purple details to the layout. If you want to see how the layout came to life, please watch the video underneath.


Thank you for looking! I hope I have inspired you! 


Supplies:


other: pencil, buttons, cord, stapler

12 February 2014

Strange city

Hello!

Today I have for you a very colourful project. I used No.12 Giant Tag as a background.


On a plain tag I sprayed some Dylusions Ink Sprays. Than I glued a pieces of Glitz Design Your Truly paper (hurry it's on sale now!!!) and Claudine Hellmuth Sticky-Back Canvas.


For more texture I used gel medium and The Crafter Workshop Template. When I was sure that the background is dry I sprayed Dylusions Inks once again.


I used my sewing machine for ''building'' houses. Than stamped Stampotique Originals stamps (you can buy some of them in really good prices!!!)  using Ranger Archival Ink. For last touches I used Crackle Accents, white acrylic paint and staples.


Magda x

11 February 2014

Recycled and reused art.

 I was preparing a piece for this blog post and for one of those annoying reasons it just wasn't going to happen, I was having one of those days and no matter what I tried to do to rescue the situation, I just seemed to make it worse! 

I think everyone can identify with me here but the thing is don't give up and things will come good eventually.

I kept the offending work and came back to it a day later, cutting it up into chunks to try and amputate the worst parts. I actually ended up cutting the whole thing up to rescue and reuse the bits I really did like.


I made myself a totally new background, well actually, I recycled that too! I used one of my stencil  clean off sheets and covered it in clear gesso. The background had been sprayed with waterbased inks and if I wanted to work over this I was going to have to protect it from the mediums I would use over the top. I then drew circles with my Neo-Color crayons and painted over them with a damp paintbrush. I also used Bombay ink in yellow around the circles, letting it drip down the page.


The background done I added the figure and title which I'd cut from the earlier piece of work. The figure itself is texture paste through an Andy Skinner stencil, I'm loving this one can you tell?   The stencil was put back over the texture paste and I stamped a script stamp through the shape, all over. 

I turned to the Glitz Finnley alphabet and word sticker sheet for the titles and I also added a few stars in chipboard covered with stickles.


Don't give up on your disasters  it may surprise you to find that you'll see them in a new and unexpected way, you just have to know when to walk away.

Jaine x

09 February 2014

Wish -tone on tone paint effects.

Hello!
I'm back to painty messiness today...and I want to show you how you can incorporate scraps of waste, but matching colours into your work.
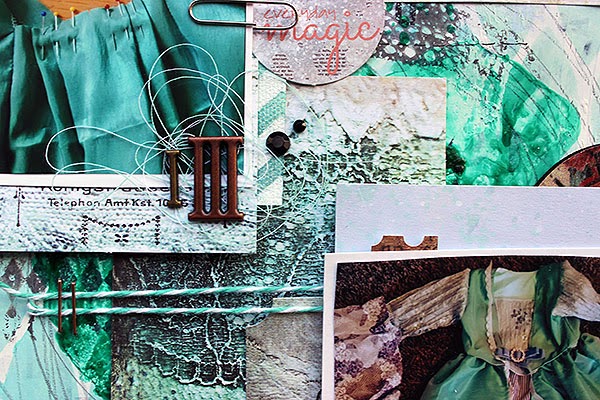
I created a background using lots of layers, and added in some stencilling through some sequin waste, and splats of black UTEE. A few random painty lines too!
When I'm adding paint to cardstock, I always work on a base of white copy paper. This means when I go over the edges of the card, paint ends up on the paper. When I'm done, it means I have a piece of A4 paper with random painty mess on it too! In this case, I stamped the heart onto a section of the A4 paper, then cut it out and added it to the background using gel medium....
With a tone on tone effect like this, it can get a little lost, so I gave the heart a little shading around the edges. Everyone has their own favourite way of adding shadow, I like using a black pastel pencil and smudge with a paper stump. Whilst you want the heart to stand out, you also want it to blend in too, so it looks part of the piece and not just plonked down on the background. To do this I made sure my painty lines went across the heart too, and the UTEE splatters were on there as well!
The final touch was a simple stamped word....
You could always stamp onto tissue and glue down with Mod Podge if you're not that confident stamping directly onto the finished piece!!

Have a great weekend everyone!
Trish xx


06 February 2014

Valentine's Cards - GDT Riikka Kovasin


Hello there! Riikka here with a few guest design creations - first of all these Valentine's inspired cards.

Who am I? My name is Riikka Kovasin, I'm a Finnish mixed media style scrapbooker with a passion to have my fingers inked on weekly basis. I'm happiest when I can get messy with different paint media and create a piece of memory keeping at the same time. What a perfect combination! My blog is called Paperiliitin. Please come and say hi!  


I created these four cards using the gorgeous 7 Dots Studio "Messy Head" collection. It's soft tones and pink shades are perfect for Valentine's Day themed creations! The card basis are cut from sheet of Bazzill's Card Shoppe papers.

The main pieces of the cards are cut from a 12x12" paper and then layered with pieces of other patterned papers and embellishments. All of the cards have a common background style, a piece of patterned paper stamped with Finnabair's doily stamp using Prima Chalk Edgers and Archival Inks. The other thing the cards have in common are splashes of pink Glimmer Glaze.


I used different kinds of embellishments in the cards. They all have a bit of thread underneath the embellishments, but then the different cards have different moods. I used Mechanicals in some, Prima wood icons in some and 7 Dots Studio stickers and die-cuts in others. Please see the supply list at the bottom of the post, after some of the detail shots.

Thank you for looking! 


Supplies:


other: thread, paperclips, half pearls, chipboard arrow, pencil