Showing posts with label Distress Paints. Show all posts

06 July 2016

More reasons to get crafty...

Good morning all


Just a quick post to let you know that there are even more products in our HUGE sale section
and a few special offers too!


10% off selected GOLDEN fluid acrylics


Some of the Distress family of products are either at a new lower price, or reduced to clear! 

&

If that's not even Tim Holtz goodness
we have also got a clearance event on selected


DYLUSIONS NEWS


yep, we have reduced to clear our remaining selection of

Not only that but we have 10% off Dylusions Ink Sprays too! 

So, plenty of sunshine crafting in the garden this summer.
You could even start planning your Christmas projects! 

Happy Creating!

Vicki 


17 April 2016

Index Card Art !!!!

Good morning gorgeous ones !!!

It's no secret that I loooove index card art, it was, after all how I got started in mixed media and it still holds very dear to my heart. 

I was lucky enough to teach a class last week on this very subject and think my addiction for these little beauties definately rubbed off on one or two or six of the lovely ladies that attended.....


We used lots of the fabulous Dina Wakley acrylic paints, they are definately one of my favourite go to paints, the colours are fabulous and the consistency thick and luxurious.....


I just love playing on these small cards, they are inexpensive and I can experiment on them with new colours and supplies without having to worry about the end result...


One of the other paints I like to use are the Ranger Distress paints. Although thinner in consistency the blend really well and the colours coordinate perfectly with Dina's heavy body acrylics so it's a real win win for me.....


It's so easy to create gorgeous projects with a pile of index cards, a mix of beautiful paints, and a black and white gel pen.....so what are you waiting for ????


Thanks for stopping by
Have a beautiful Sunday

Bright and painty hugs
Tracy
Xxx

21 March 2016

Easter Special Offers!

Hello!

Its almost Easter but what would you prefer the Easter Bunny to bring you... 

Chocolate or Art & Craft Supplies?? 


and 

Offer lasts until Easter Monday or stocks last. 

oh - and if you're interested...
 I'd have the chocolate with the craft supplies...  I'm greedy like that! 

Happy Creating

Vicki 

07 February 2016

Happy Anniversary


Happy weekend, folks!  Shirley here with a slightly grungy anniversary card for you.  February being the month of love, we're seeing plenty of hearts, pinks, reds - but rather than a valentine's card, I thought I'd make an anniversary card.

I started by colouring a piece of mixed media card with Barn Door Distress Paint.  Once that had dried, I applied Brushed Pewter Distress Paint to some bubble wrap and used it as a stamp onto the panel.  I used the Lawn Fawn Lawn Cuts Small Stitched Rectangles to trim the panel.


The 'happy' (diecut from glitter foam) and 'anniversary' are from the Hero Arts Happy Stamp & Cut set.


The red Distress Paint hadn't covered fully, leaving some of the paper texture showing, but I think that adds to the grunginess :)


The heart is made from Tim Holtz Grungepaper which had been sponged with Fired Brick Distress Ink then embossed to give it texture, and heat-set with clear embossing powder.  I attached it to the red panel with a heart-shaped brad which I found in my stash.

On a tent-fold white card, I 'painted' some Brushed Pewter marks with a credit card, added some more marks to the red panel, then adhered the panel to the card.

I hope I've given you some ideas for Valentine's or anniversary cards.  See you soon!

Shirley

14 September 2014

A holiday memory.


It's been a while but I'm back from a fabulous holiday in Portugal where the main theme was sun, sea and sand. Before the tan fades and it becomes a distant memory I wanted to try and capture a little of the magic.

Now I'm back and I'm pretty sure the holiday will be influencing my work for the next few weeks. In this piece I tried to capture a bit of the sea and even added a few shells brought back from the beach.


The base is simply a piece of cardboard and a few die cut letters.


After picking at the card and sticking on the letters I gave it a quick coat of gesso before my paint layer.


I wiped over some Distress paint in Tumbled glass and stamped the lace border across the letters using  the Lace and Doily set by Finnabair. I love this set and even though the stamping came out unevenly as you can see below, I wasn't too bothered as it just looked like torn lace.


I added the shells and some jute along with a dried piece of coral then wrapped wire and beads around the whole piece for a bit of bling.


It's now a reminder of a wonderful holiday and hopefully will keep me going until next summer.

Jaine x

02 August 2014

Magda's Stampotique stamps.

I absolutely adore these Stampotique stamps by Magda called Gucio and Agatha Bee. The cat especially is the cutest and the goofy expression reminds me of my own stupid cat.


I layered a few scraps of paper on the tag then wiped over Distress paints (Picket Fence and Salty Ocean) wiping the paints off again in a few places. I used Promarkers to colour the images and used some foam pads to give them a bit of dimension.

Jaine x

19 March 2014

Magic box

Hello!

Today I have for you a very easy and quick box in 5steps.

1st layer - Tim Holtz Distress Paint Picked Raspberry


2nd layer - tissue paper


3rd layer - Dylusions Ink Spray Fresh Lime


4th layer - Claudine Hellmuth Studio Black Gesso


5th layer - Liquitex Glazing Medium ( only on a lid - you can see the difference )

I also add Stampotique Originals stamps and printed quote.

Magda x

03 March 2014

new idea

 Hello
Today I have something different for you. I couldn't find an inspiration and I simply just sat and draw with glue some simple shapes. I like circles in my projects and now I need to try different shapes!


I used:
- Claudine Hellmuth Black Gesso
- Glitz Design Raven
- Posca Paint Pen White
- Distress Glitter
- Distress Paint - Picked Raspberry

Magda x

19 November 2013

Deck The Halls

Hello!
A little quirky modern Christmas project from me today....
The base for this is a fab Tando panel, just big enough to get plenty of detail on, but not so big it becomes an overwhelming pant job! I used white , red and green paint, and smeared and brayered all over. A sprinkling of white UTEE for the 'snow' splatters, and flicked black paint (to tie the background in colourwise to my embellishments) and it was done...
I used Prima clear pebbles for my baubles. I glued music paper to them, cut them out and then added them to my background...
Love the 3D domed look! The hangers for the baubles are simply black paint lines with doodled bits here and there. I also added a tiny bit of black tinsel twine to make a bold modern statement....
I used rub ons for my festive message...
As you can see, I doodled around the panel too!
A nice traditional Christmas colour scheme, but with a more modern look, I think!
See you soon,
Trish xxx


10 November 2013

Messy Monoprinting!

Hello!
I want to share an easy (but still messy and great fun!) way of creating backgrounds today!

 
Monoprinting is HUGE right now, and this is how I've created my painty background on this project. No expensive bits of kit though, just an acrylic block!
The block I used was the biggest I have, but of course smaller blocks work just as well for smaller projects!
I print in two ways.... firstly...
Put teeny bits of paint on the block. Then, brayer gently to mix...
Now, this is tricky to do without smearing. The block has a slick surface so the brayer can want just to slide rather than roll. Still, persevere and you'll get the hang of just how much pressure etc to use.
Quickly, before the paint dries, press your cardstock onto the block...
Then peel it off....
The thin layers of paint will have transferred themselves to the card...
It's an absolute doddle to clean the block, hot soapy water or babywipes get it pristine in no time.
Now, brayering thin layers can be a little subtle for me, so I tend to go for the more messy approach!
Smear the paint on with your fingers....
And then press on the card to get a print...
This method obviously uses more paint, and you will be able to get more than one print from the block. This is great if you are doing book pages etc, where creating similar backgrounds quickly is useful!
So...printing done, we can get on with the rest of the piece!
I did a little stamping..
Bo Bunny Dots, Prima stitched circles, Jenni Bowlin grids and text.....
I also did some stitching and splatting with black paint..
My Stampotique figure is coloured with the same paint using a waterbrush...
She stands on some washi tape, and I've added a phrase from a cut up old book to finish.
I think we all have an acrylic block in our stash....get it painty and try printing!
Trish xxx


24 October 2013

Bookmaking part two - Cover story!

Hello!
Part two of my short bookmaking series...and it's all about the cover!
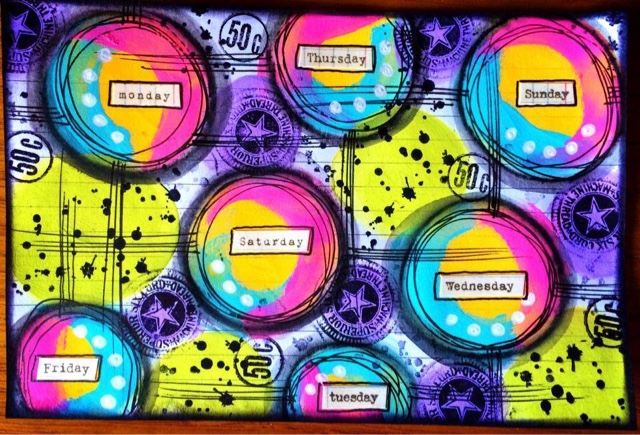
Remember last week when I showed you a book with just a few pages? This week we're moving on to a book with many more pages: how we close it, and how to incorporate a cover. Here is my finished book...


As with last weeks project, this is more about the 'how to make a book' process than what my actual book looks like, I'm sure you would spend waaaay more time on the pages than I have!
I started off in the same manner as my last book. I created a masterboard, chopped it up and added detail to each page before sewing to a black background....

This book has six spreads, so 12 panels needed. I decided to add the detail just to the right hand pages, the pages that face you when you open the book. So, six stamped, printed, sewed and glued panels as you can see above! Next, create the hinges as we did last time, and stick them together...
As you can see, this is going to need something to keep it closed when finished!
The next step is slightly different to last time. As we will be adding covers, the first panel we stick down will be the INSIDE left hand page. Like this....
(its a bit boring as its the left hand side!) This is the inside of the front cover. Carry on sticking the page panels in just as we did last time....
The final page you stick down will be the INSIDE of the back cover. If you look at the book from the other side at this point, it looks like this....
 Next choose something to use as a closure. I've chosen ribbon and eyelash yarn!
Stick the closure ribbons etc down using double sided tape. Doesn't matter if it's messy as it will be covered!
Make sure you leave enough hanging loose, or you won't be able to tie it together!
Now, covers. A little bit mathematical, I'm afraid! Close the book tightly, and measure how 'deep' your spine is, or to put it another way, how thick is your book?! Mine was just about 2cm thick, but this will vary depending on how many pages etc you have. The front and back are the size of one page panel, in this case 9cm by 9cm. So, the total length of card needed to cover everything  is 9cm (front) plus 2cm (spine) plus 9cm (back). Are you with me?
I cut a strip of card 20cm by 9cm, then scored it to give the 2cm wide spine shape. You can see what I mean by looking at the next pic....
The covers can then by stuck down, over the top of your ribbons. I always leave a 'glue free' 1cm or so next to the spine part, just to give a little flexibility. In the above pic, you can see the card to glued tightly up until that point!
Once you've done one side, flip over and stick the other cover too...
You can see from the top view how leaving that glue free section keeps the covers and spine in shape!
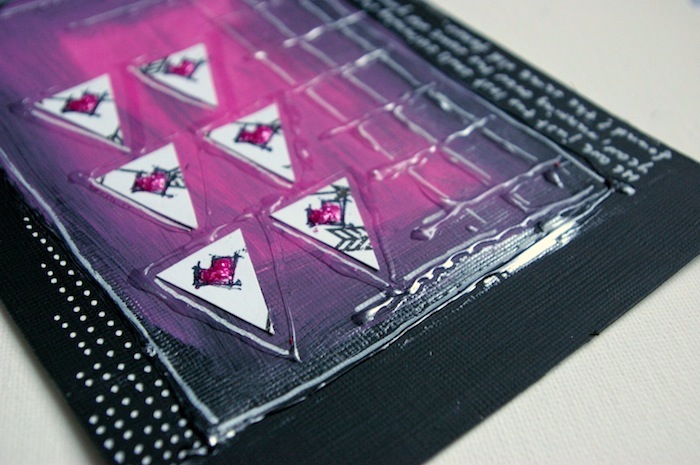
All that remains now is to add on a decorated panel to the front...
And tie the ribbons to keep it all together...
Now.... I have a question! Have you noticed my colour scheme??!! Yep, it's the colours of our very first colour challenge! Still plenty of time to enter, have a look here for all the details....
Hope that tutorial made sense, you know where I am if you have any questions!!
Next week, another fun way to make a book.....piano hinges!
Trish xxxxxxx