31 January 2014

Melting....

Hello!
Another blast from the past again today..... more playing with techniques I haven't done in an age!
This time its UTEE....Ultra Thick Embossing Enamel. I thought I'd share a little trick I learned a while ago, creating pendants using memory frames and UTEE.
First, you need to place your memory frame on a texture tread...
Just place it,no need for glue or anything to stick it down! You can use any rubber stamps for this too although they MUST be rubber, not clear polymer stamps. They would melt..... If you are using a stamp, the frame must be in complete contact with the stamp, not hanging over an edge. You'll see why.....

Next melt some UTEE in your melt pot and pour it into the frame, taking care to use enough to go into the corners..
If the frame was hanging over the edge of a stamp, you would have just poured hot UTEE through a gap and it would be all over the place!
(Don't forget to pour excess UTEE onto your craft mat and use cookie cutters to create embellishments! No waste here!)
Once the UTEE in the frame is cold and hard, peel it off the texture tread...
I like to highlight the raised bits with a little dry brushing of silver paint...
So...a cool pendant! You can add chain or ribbon through the loop, and you have created wearable, unique art!
Or..................................
You could use it for something else. These frames are fab, as you can undo them...
and remove the UTEE completely...
You now have a UTEE tile, ready to use on another project. These are wonderful on CAS cards, with maybe a few words underneath, very classy.
or........you could go a bit bonkers and use it as a body for an art doll....
Either way, its a nice technique to have a play with!
See you soon!
Trish xxxx


29 January 2014

10 minute journal page


After spending hours in my basement workshop trying to produce a journal page and failing big time I was getting a bit frustrated. I knew what I wanted to do and I knew I wanted to use this Andy Skinner stencil called Hippy Chick as I like to use silhouette figures in my pages. 

On my desk I'd also got my sheets of clean-off papers which I do keep for other projects. These are sheets from an A5 pad which I spray on or clean off stencils on and they themselves can become pieces of art work. 

I cut one down to fit my journal and glued it in.


I used a watercolour pencil to simply draw inside the stencil three times.

With a water brush I activated the pigment in the pencil and drew the paint in.

I could then write inside the shapes with my Micron pen. I wrote quickly and without taking the pen off the page so it isn't immediately legible but I know what was in my head at the time. The stars on the stencil I used the pen to draw inside too.

A few extra's like the letter stickers from the Finnley collection of papers and the Glitz washi tape along the bottom and it's finished. 

Try using a stencil simply without paint or ink and you might be surprised.

Jaine x

27 January 2014

Live.Dream.Love

Hello!


One more time something challenging for me. I made a project like this for the first time. I use a box from Prima Wood Icons in a Box. I painted the box using Claudine Hellmuth black gesso. Inside a small windows you can find pieces of Glitz Design Raven collection. 


I cut circles from Claudine Hellmuth Sticky-Back Canvas and used Hero Arts Ink Dauber and Ranger Archival Ink to colour them. 


Small clear drops are made from Ranger Crackle Accents and the dark ones from Ranger Liquid Pearls.


It was a great fun, I need more boxed like this!

I used:
- Prima Wood Icons In a Box
Hero Arts Ink Dauber
- Glitz Design Raven
- Claudine Helmuth Sticky-Back canvas
- Claudine Hellmuth Black Gesso
- Finnabair stamp - Doily
- Ranger Archival Ink
- Ranger Crackle Accents
- Ranger Liquid Pearls

Magda x

24 January 2014

Metal Heart....

Hello!
I'm still on my 'use techniques you haven't played with for a while' kick..... so today I want to share a little weathered metal...

(This entire blog post is also a frustrating exercise in how difficult it is to get a good picture of mirrored card...especially a picture that didn't have me reflected in the surface!)
Now, I usually do this with metal foil, never tried it with cardstock, so it was a bit of an adventure! Worked brilliantly though!
Here's how...
Cut a shape from sturdy chipboard or greyboard. I drew around a big wooden heart I have in my 'things to alter' box!
Cut this out, then get the mirror card ready. (This is Ranger foil card)
We need to stick it to the greyboard, but my usual glue n seal/ gel medium approach is not going to work this time. Wet glue will leave a dull, non shiny residue on the surface, however carefully we apply it. I used a sheet of double sided adhesive, Wonder Tape sheets work very well. Once the adhesive sheet is on the back, cut the card into squares and rectangles of varying sizes.
Next, stick the shapes to the big heart shape, making sure they overlap slightly.
(that pic *almost* has me in it at the bottom lol!)
Trim the edges, and add a large eyelet if you want a hole to hang it up!
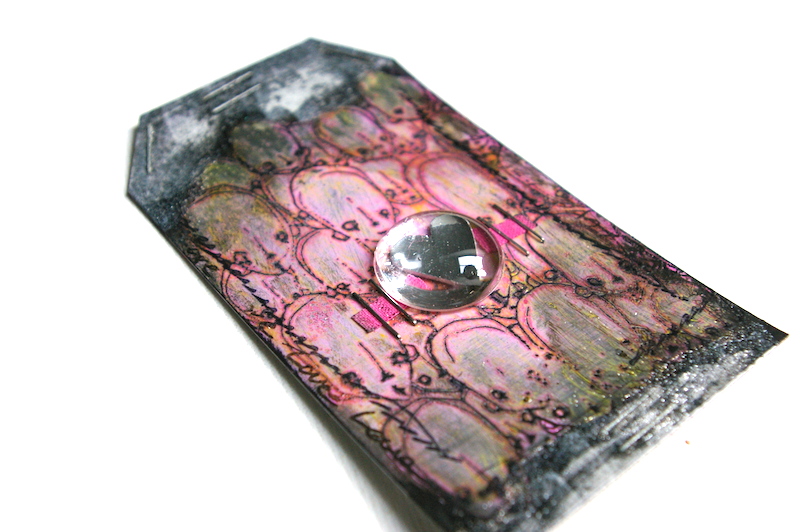
Next bit is where the 'magic' begins! Using a small balled embossing tool, press hard into the cardstock, and create dots and lines...
Scary bit time.... cover the whole thing with a layer of black alcohol ink...
Mine has a definite dark brown look....not a clue as to why, but I like it!
Next, take some wire wool (from the DIY shop), and rub away at the dried ink...
You will need a little elbow grease here, but remember not to rub too hard. This is cardstock remember, not actual metal! Once done, wipe down with a soft dry cloth to remove any wire wool residue...
So, background done! I've not gone overboard with the finishing touches as I wanted to show off the 'metal' not cover it up! A red clay heart....
and black cord tied through the hole...

So...get out that mirrored cardstock and give it an industrial look!
Trish xxx


20 January 2014

out of a comfort zone

Sometimes Vicki sends me some stuff which I don't know or even have never heard about. This time it was Ranger Foil Cardstock.

I really didn't know what to do with it. It is shiny and slippery...it only means one...gesso, acrylic paint etc. will be easy to scratch. And it's true! I checked some acrylic paints and inks.

Ok...what now? I'm sure alcohol inks will be great for it but I haven't got any. How to make a texture? I haven't got embossing machine either but I found embossing powder in my drawer.

I used Stampotique Original stamp which is made from a good quality rubber and it's harder then acrylic stamps. I won't be able to smear it when I will push it too hard. I used Ranger Archival Ink for stamping. Than I applied some RangerDistress Paint. But...it won't be waterproof and I like waterproof things especially on slippery background. I mixed Liquitex Glazing Medium with yellow acrylic paint and applied it on a pink paint. Glazing medium gave transparency to the yellow paint and made my 'Heads' waterproof!

I wasn't sure this mirror-like look of the cardstock it was too much for me ;) I applied some ClaudineHellmuth Black Gesso and then using a tissue I removed some of it. It gave me some brighter spots. Still I wasn't happy that's why I used more embossing powder.

The result...


I was pushing myself out of my comfort zone. It's not my favourite project but it was really great fun to experiment with new products.

Magda x

18 January 2014

Creating a blog banner.

I admit this is a little bit different from the normal type of blog post, but I had an urge to freshen up my blog header with a whole new look. As I was working it dawned on me that I could make it into a blog post on A Sprinkle of Imagination and maybe inspire some of you to do the same.


I started out with a piece of watercolour paper 30 x 10cms and used just the stars from an Andy Skinner stencil called Hippy Chick to spread texture paste through. 

Once this was dry I used watercolour to add the dreamy background. I simply add water to the paper first then touch the paintbrush loaded with paint to the wet paper and let it spread as it wants to. 


I am so in love with Ranger foil cardstock as it cuts beautifully. The shine on the butterfly and frame  is magical but sadly it was so difficult to capture that in my photography. The border along the bottom is Jenni Bowlin washi tape and it has a gorgeous lace pattern.

Once I was satisfied with my piece I put it into the computer and changed the size to 900 x 300px. I'm using blogger but you may need to check the size if you use a different blog host. 

I added the title and my name on the computer and hit save. Done! Now all you need to do is go into your blog dashboard and upload it onto the blog.

'Simples' as they say. 

Jaine 

17 January 2014

December challenge winner is…..

Thank you again to all those that joined in with our challenge.
As always we thoroughly enjoyed seeing what you all created and  having a good old nose at your blogs!  
I hope you also got a chance to take a look at all the fabulous entries.
Without further a-do, this Decembers winner is Sonja, with her art journal page.
A fabulous use of the colour palette.
ASOI Dec Colour Challenge 13 winner
So Congratulations Sonja! 
If you fancy winning a £10.00 voucher for yourself the January Challenge is up and running. 
You have until the 12th February to enter. 
Happy Creating!
Vicki


15 January 2014

new year, new challenge!

January's challenge is now live...

Hope you like this months palette. 
It's one, I think, that's quite calm after all that hectic Christmas and New Year  running around. 


The challenge is open, until the 12th February  so why not go take a look at what the design team have come up with using these colours. 

Enjoy! 
Vicki 

13 January 2014

Be brave - mini album part 2

Hello

Today I would like to show you how I have made a front cover of my mini album and tags which I will  put to the mini album pockets.

The most important thing in this album is a texture of background. I love textures and colours that's why I always try to put this two things at the centre of attention. This story should be longer but maybe another time...

I applied some Liquitex gesso and put a tag on it.


I push a tag because I wanted gesso to stamp on my tag.


It's very easy technique but gives a fab results.


The same thing I did with a black gesso.


When the background dried I splashed orange ink which gives me contrasting colour on my background.


Than I stamped Prima stitch stamp using Rangel Archival Ink.

On a wood piece - Joy - I applied some colour using Hero Arts Ink Dauber. The first letters of the word and an arrow are stickers from Glitz Design Raven collection.


I use the same stuff on my tags.


I really enjoyed making my mini album, maybe it's the first one but for sure not the last one!

I used:
- Glitz Designs Raven collection
- Dr.Ph.Martin's Bombay India Ink
- Prima Stitch stamps - Lines
- Prima Wood Icons in a box
- Hero Arts Ink Dauber
- Ranger Archival Ink
- Liquitex gesso
- Claudine Hellmuth Studio Black Gesso
- masking tape

Magda x

11 January 2014

Stargazing Hares...

Hello!
More paint from me today, but this time combined with a little 3D assemblage...and the use of a niche..
I started off with a box canvas, then flipped it over to use the back! The back of a canvas has a perfect niche, although different sizes and brands of canvases will be put together differently, and so have niches of varying shapes and sizes! The back of this canvas also had the very ugly 'fold the canvas sheet over and use a million staples to secure it' thing going on....not ideal! A great way of disguising this is to spread a layer of texture paste over it. I blasted the texture paste with a heat gun just to give the surface a bit of a 'skin', and then pressed bottle tops and sequin waste into it. This gives nice texture, as you can see...
I used loads of different coloured paint, simply smearing a layer on, then drying and going in with a different colour. I also stamped some dots onto tissue paper, and used Mod Podge to adhere it in places. Once dry, the Mod Podge is transparent and the dots look like they were stamped straight onto the background...
The fabulous hares (Crafty Individuals), were stamped onto scraps of blue painted card, then cut out. I stamped the head parts onto yellow painted card, cut out the crowns and added them to the blue hares. I covered them in Glossy Accents to give a 3D shine. Once dry, they were placed on a bed of thin, curled and twisted green cardstock.
My stars are suspended from a curve of wire...
I took three strands of wire, and twisted a little extra wire around the three strands to hold them together. I painted and then glued three stars onto the ends. The wires were then glued onto the side of the canvas.
I added two spools to the bottom...
And some cut up letters to form the word...
I had fun playing with niches again...I have a feeling I may be making some more soon!
Have a great weekend,
Trish xxx