Showing posts with label Tattered Angels. Show all posts

10 April 2014

LO by Tanya Privalova

Hi dear crafters!
My name is Tanya :)

Few words about me: My name is Tanya. I live in Ukraine. In scrapbooking I came 3 years ago.My favourite style..my real passion and inspiration is american, shabby and free style. I love create cards (especially mini-cards), layouts and mini-albums . Many details in work and layers...working with paper.. to do something very sweet and pretty ar very very unusual for me personally. there is the things what make me a real happy scrapper)))

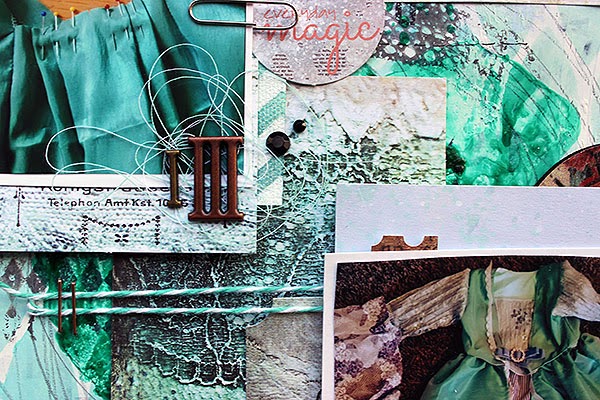
I created the LO))))One sweet day on the one of the favourite places in my city.
I used very tender paper by Glitz Design (Carpe Diem collection), Glitz Roller stamp Tattered Angels Glimmer Mist Seven Seas, mask Tando Creative - Sequin Waste, flowers by Prima, ribbon and chipboards.


I added some doodles near the chipboards. 


Have a nice day!
Tanya :)

21 February 2014

Robe a la Francaise - GDT Riikka Kovasin


Happy Friday! It's soon weekend! Riikka here to share with you my third and last GDT piece. Hope you have liked my creations so far!

Who am I? My name is Riikka Kovasin, I'm a Finnish mixed media style scrapbooker with a passion to have my fingers inked on weekly basis. I'm happiest when I can get messy with different paint media and create a piece of memory keeping at the same time. What a perfect combination! My blog is called Paperiliitin. Please come and say hi!


I'm more of a scrapbooker than anything else so I decided to do another layout for my last project. The spark for this layout was my a namesake of mine who asked me an advice over at Facebook for a layout she was working on. I really liked the composition she had going on there and asked her if I could do my version of the same. So here Riikka, is my take on the two photos and vertical title! 

The topic of the page is a princess dress I sewed for my 3-year-old as her birthday present. Her big sister got one just like it when she turned three so it's kind of a tradition. I used the same patterns for this dress than to the previous one, but the color is different. My older one wanted a yellow dress (her favorite color at that time) and my younger one chose turquoise (her favorite color). The dress has a flowing back piece, like the robe à la francaise has.


I started creating the layout by gessoing an area of the background paper where my main composition would go. Then I poured some Glimme Glaze to the paper and let it dry. After that I added some stamping, pencil doodling and inking through a TCW stencil. I also inked a piece of Prima Marketing resist canvas and used it later on in the layers behind the photos. I thought canvas and lacy details would really fit the subject of the page.

After the background was finished I then layered some patterned papers, stickers and other embellishments behind the photos. I used papers from 7 Dots Studio "9th Wave" collection as it fitted the color scheme so well. The embellishments are from that collection together with some from the "Domestic Goddess".

Thank you for taking a look - it has been a pleasure guesting here! Thank you for having me, Vicki! Hope to see you all around!


Supplies:


other: gesso, pencil, thread, twine, half pearls, stapler, correction tape

06 February 2014

Valentine's Cards - GDT Riikka Kovasin


Hello there! Riikka here with a few guest design creations - first of all these Valentine's inspired cards.

Who am I? My name is Riikka Kovasin, I'm a Finnish mixed media style scrapbooker with a passion to have my fingers inked on weekly basis. I'm happiest when I can get messy with different paint media and create a piece of memory keeping at the same time. What a perfect combination! My blog is called Paperiliitin. Please come and say hi!  


I created these four cards using the gorgeous 7 Dots Studio "Messy Head" collection. It's soft tones and pink shades are perfect for Valentine's Day themed creations! The card basis are cut from sheet of Bazzill's Card Shoppe papers.

The main pieces of the cards are cut from a 12x12" paper and then layered with pieces of other patterned papers and embellishments. All of the cards have a common background style, a piece of patterned paper stamped with Finnabair's doily stamp using Prima Chalk Edgers and Archival Inks. The other thing the cards have in common are splashes of pink Glimmer Glaze.


I used different kinds of embellishments in the cards. They all have a bit of thread underneath the embellishments, but then the different cards have different moods. I used Mechanicals in some, Prima wood icons in some and 7 Dots Studio stickers and die-cuts in others. Please see the supply list at the bottom of the post, after some of the detail shots.

Thank you for looking! 


Supplies:


other: thread, paperclips, half pearls, chipboard arrow, pencil

13 August 2013

Happiness

Hi everybody!

Today I'm going to show you a real easy to make canvas:-) I don't make a lot of them but sometimes I just have to do something different. I LOVE the beach or being at the sea shore, so I've made a little tribute to one of my favorite spots:-)


To make this canvas I first applied some snow writer medium to get a sand like surface. Than I sprayed with some Tattered Angels glimmer mist "Sandy beach".
I wanted this canvas to have a clean look and the new Writers tape from Prima was just perfect! I wrote the statement on the computer and printed it out on a regular paper. Then I glued the tape over and printed it out again.
Last I embellished the canvas with seashells found at one of my favorite places and some pearls.

Thank you for looking:-)

24 July 2013

repainted canvas


Hello everyone!

Today I want to show you my repainted canvas. I used an old canvas where I had glued some paper circles and thread a long time ago. Sometimes I repaint my projects because I don't like them anymore. The once I don't like are likely to be repainted.


As I have said I used an old canvas with paper circles. I used Liquitex Gel Medium to make 100% sure that the circles would be glued properly to the background. Than I put a lot of different acrylic paints to the background. In some places you can see Ranger Liquid Pearls covered by acrylic paints.


Around a few circles I applied Tattered Angels Glimmer Glaze. I also stamped Stampotique stamps using Ranger Archival Ink and in the middle of some circles I put drops of Dr.Ph.Martin's Bombay Indian Ink.


Between circles you can find dots which are made using Posca Paint Pens. The last touches – black gesso around the edges of the canvas.


Magda x

23 June 2013

How beautiful..

I really love challenges, especially color palettes and sketches. The challenge blog "Thats just so cute" have many different challenges and they have a color challenge every month. This time it was a really lovely palette! It's only a few days left to play along with this challenge but maybe you want to give it a go?


This time I made a page for my art journal. The text stamp says; "How beautiful the day is when touched by the kindness."This book will be filled with only good pages :-)

For the background I started out by applying molding paste trough a TCWS stencil. I also sprayed on some Goose Bumps. LOVE that medium! I than sprayed some glimmer mist on and started to mix up water colors to get the right shades. To finish the page of I used a rubbon from Tim Holtz. They are so beautiful and really easy to rub on:-)

I've used these product that you'll find in the shop:

15 May 2013

A chipboard ornament.


Next week is my Mum's birthday and I wanted to make her something special instead of just a card so I made this little ornament which will hang up to remind her that even though we're miles apart I'm thinking of her. 

The backing is a piece of square 4 x 4 chipboard by Tando Creative which I gessoed to create a neutral background to work on. Next I cut a smaller square of Glitz paper and inked the edges, a doily and a die cut frame and butterfly from more Glitz paper and layered it all together.  For detail, I used some Tattered Angels Glimmer Glaze and painted it on the butterfly to give a gorgeous shimmer along with some stick on Prima Crystals.  The packaging from the Crystals came in handy too as a backing for the frame and the mini tag which is tucked under the ribbon. Finally I added a little birdie paper clip by Prima on the bow.


I hope she likes it and I hope you do too.

Have a good week

Jaine x

26 April 2013

Tag-tastic by Gez

I am delighted to be sharing a project with you that I made using a large Tim Holtz tag, some scrummy stamps & inks..

here's a sneak peek!


For the base I used one of the large manilla No.8 {tags}

I squirted a generous blob of shaving foam onto my Ranger non stick {craft sheet}

and added a few blobs of Dr Ph. Martin's {Bombay Indian Inks} in Magenta & Teal

then set about swishing the tag through the foam..


To finish the background I added a few flicks of the Tattered Angels Glimmer Glaze, fine glitter paint to add some sparkle in {Paradise Pink}

The gorgeous flower stamp brand NEW from Stampotique Originals is called Dandelion Duo, it was stamped using Aged Mahogany {Distress Ink} pad and coloured with a Derwent Graphitint pencil in {Autumn Brown}, once dry I added blobs of {Glossy Accents} to each flower. I then stamped Jo Capper-Sandon's {Big Bee} stamp onto the background, coloured the body of each bee with Bombay Inks and added acetate wings.

The sentiment (Wildflower verse) is another new design along with {Mothloved} from {Stampotique Originals} Please note.. Vicki can order any Stampotique stamps simply drop her a line, if you can't see just what you are looking for..

I finished the tag by hand stitching around the outside edge and running the chevron {roller doodle} from Glitz Design down the right hand side using {Jet Black} Archival Ink.

Many thanks for calling today. Have a great weekend. Gez


18 February 2013

Experimenting with colours


Hello everyone!

Today I would like to show you how I've made a few pages for my art journal. I love experimenting with colours, I've always liked! First with pencils now with different mediums.

Do you remember my post with Jasio? I used the same journal made with brown envelopes.
First I put some gesso, I wanted a thick layer but also not very thin because I wanted to stamp circles - I used a tap of ink spray - and some lines using the other side of a thin brush. You can try different ordinary objects like a bubble foil, a bank card ( the old one! ;)) and many many more.


When gesso was still wet I sprayed a pink mist and added some purples - Tattered Angels Glimmer Glaze and Tattered Angels Glimmer Glam in few places.


The next step, I added a black paint around the pages. I allowed it to dry.


I wanted some more texture, I used a Stampotique stamp.


I draw a bird and leaves using Derwent Inktense and coloured using paint and a few drops of Tattered Angels Glimmer Glaze. I cut a crown from Glitz Design Truly Chevron paper and using a brush I sprayed a black paint.


Last step – I added some text.
I've done two pages, one with bird and second with house. I used the same products.


Magda x

30 January 2013

Home

Hello!
For my project to share with you all today, I thought I'd go a bit more 3D..... so I made a house on a spool. With wings. As you do......
The main item I've used to create my house is a small altered art matchbox from Graphic 45. These boxes are fab, so many different things you can do to them! I knew I was going to cover the whole of the outside with old book paper, effectively sealing it up, so I needed to work on the inside first!
The inside of my house has three Prima Genie Stones hanging from the 'ceiling'...
These were hung from wire, then I poked the wire through holes in the box. This pic shows things better...
 To create the roof shape, I simply cut some chipboard triangles, and stuck one to the front and one to the back of the box using masking tape. Some more chipboard to create the sloping sides,then book paper was stuck down all over to hide the tape and create a seamless look.
 All of my house was coloured in the same way, using Tattered Angels Glimmer Glaze, in Island Spring . I love this lots, although I wouldn't call it a paint by any means, despite what it says on the bottle! I also wouldn't use the word 'glimmer' either, whilst you can see the mica shimmer in the bottle, once the product is applied its so subtle you can't really see it! It DOES give a gorgeous glossy translucent glaze effect, and the little brush applicator (think nail varnish bottles!) is absolutely perfect for creating splats! Everything got a coat of the glaze as you can see, and the splats were blasted with a heat gun so they bubbled up to give a teeny bit of texture.
I also stamped a harlequin (Jenni Bowlin) using black ink here and there, just to add a bit of distressed detail.....
My figure, (Midge, by Stampotique) was stamped onto card, cut out and then glued to a bead so she would be seen! If I had put her directly on the floor of the box, half of her would have been hidden, she needed that extra bit of height the bead gives.
Once I'd added the spool and wings to my house, the finishing touch was this fabulous Prima Type Bulb embellishment...
I removed the word that was printed on the bulb (it just scratches off), and glued on a word cut from the book pages.
So, a blue book paper house, on a spool, with wings and dangly bits inside. Just what you need to look at on a Wednesday! I'll be back soon with something a little more sane perhaps!!!
Love Trish xxx


27 January 2013

You + Me = Us

Hi there, it's Arnlaug with you today:-)

A quick post today to share a way of dressing up this great Kraft Classine Envelope from Tim Holtz.
I've never tried this product before and must say I love it! It's got a great look and quality and I'm sure you can find many ways of using it.


For my envelope I started out culing it a bit before gluing some cheese cloth down using multimedium and gesso. Then I dropped some turquoise Bombay Indian Ink and some Orange Crush Glimmer Glaze. I just love the two colours together!

I embellished my envelope using some Glitz Design Whatnots from the Yours truly collection. I also added some Prima Say it in Crystals - Rounds and a Art tile also from Prima.

I love how it all came together and find it perfect for hiding a special message or maybe a concert ticket for someone special:-)

Supply list:

Tim Holtz - Kraft Classine Envelope
Bombay Indian Ink - turquoise
Tattered Angels - Glimmer Glaze Orange Crush
Glizt Design - Yours truly Whatnots
Prima: Say it in crystals Rounds and Art tile.

19 January 2013

Play! Step-by-step

Yey! Finally ready to share my first project as DT member for A sprinkle of Imagination! I'm super excited and love the variety of the products:-)

 It is also my first time making a layout with a step-by-step instruction:-) I just have to appologize for the poor photos but I guess you all know how it is to photograph in the dark winter afternoons..

When I do a layout I tend to have a plan to begin with, but most of the time I change my plan as it goes and let creativity rule:-)

First I grab my photo and choose a backgroud paper. Here I've used "Yours Truly Polka" from Glitz design.

  I often use pattern papers for my background. Also choose what kind of mist and paints you want to use.

At this project i started out with Glimmer Glaze - Orange Crush from Tattered Angels glimmer mist. I just love the shiny look of it! I used a straw to blow the color out to look like flames.


I also used Tim Holtz, Adirondack Color wash Butterscotch and Sunset Orange to bring more life to my "splatter". I made some Gesso a little thinner using water and dripped it around the page. I also used this as a mist to get some bigger white splatters. 

Then I took my supply of washi and made a "frame" for my photo. I also made some strips from the paper
Yours Truly Chevron (front and back) from Glitz design to frame the page.
 I also used a few different stamps for my background.


Then I placed my embellishments, some nice tags from Jenni Bowlin for journaling, and a light bulb and a flower from Prima. I also found a few matching Cabochons flowers.


For my title I used Jenni Bowlins "Grey Skinny Alpha". To make the title stand out on my messy page I sprayed some white gesso on and also used some masking tape.


And here is my final result. I love the playfull feel of the page and think the theme goes well with the photo. Hopefully you're all tempted to play with mist and paint on your projects:-) And don't you just adore that little elephant in the corner?


Supply list:
Glitz design: 
Yours Truly Chevron (front and back)
Yours Truly Polka

Tattered Angels glimmer mist:

Tim Holtz:

Jenni Bowlin:
Printed Flag Tags
Printed Tags

Prima:
Junk yard findings - light bulb

Cabochons flowers

Washi Tape

Gesso

Various stamps