Showing posts with label Collage. Show all posts

07 August 2015

Lets face it journal page


I have to face up to the facts that I need to use glasses more often these days. Text has shrunk, the computer becomes fuzzy and late night crafting is almost impossible. It happens.

Just for fun I documented this change in my journal. For my background I stamped my own face stamp which I cut previously from Softcut. You can see my original blog post here where I cut the stamp.  I layered over that the Tim Holtz stencil Eye Chart of course. The circles were cut from a piece of paper left over from my Gelli plate printing play. I like the contrast it makes on the page. I found some glasses images and letter stickers for my title and it was finished.

Jaine xx

13 May 2015

Collage "Hi there!"

Hello my friends!
This week I have prepared a mixed media collage.


I used as the base an old paper craft that was a folder before.
I began to apply different templates using Prima Color Bloom Sprays with White Gesso. I caught a herbarium and I glued it with Finnabair Art Basics: 3D Gloss gel. To create more contrast I put some freehand Background stamps and added a few drops of color.


I also cut a cardboard frame and covered it with Finnabair Art Extravagance: Gold CrackleTexture Paste. To fasten it, I turned to the stapler instead of glue. I love the effect of an old framework, with the already worn paint.


To decorate, I took a bit of lace, newspaper, raffia, flowers Prima Marketing among other things. For title I chose letters of different sizes to provide visual interest. To give an uniform finish and integrate all the elements, I went over with white gesso brush and Finnabair Art Ingredients Glass Glitter - Gold Rush.
It is an easy work, so I hope it has inspired you to create your own fantastics projects! :)))
Thank you very much and see you soon!
Much kisses. xxx

10 April 2015

TUTORIAL. Collage "A lovely girl".

Hi averyone!
Today I want to share with you my resycled collage, made with some different materials :) I have used a broken wood box, color papers, a picture of a model from a magazin and the other mixed media products.

I have at home a desktop with  two broken drawers table. So, the other day, making the cleaning I decided to throw them away but at last moment I thought: "Hey, I could use these boards for some of my mixed media projects," So, they were saved until their "final judgement" :)) Here is the result of using of one of them as the basis for this collage.

First of all, I glued some papers with Finnabair Art Basics: Clear Gesso above the table (size 25 x 40 cm). These papers were half broken and crumpled, ready as well to throw them away :))) I also put below a white embossed paper from a chocolate box :) 
Then I painted over with Prima Chalkboard Paint - Plum  and glued the paper with a few sentences and a circles wich were cut with the Cameo. I think these leftover papers are interesting to reuse them in other works as templates and chipboards for example.

The next step was to apply  Finnabair Art Basics: 3D Matte Gel, transparent using Dylusions 5x8 Stencil: Blocks and then I covered some parts with Finnabair Art Basics: Black Heavy Gesso.

Finally,  it was time to use my favorites Prima Color Bloom Sprays, make a little flower composition like a hat on the model´s head and add some details using Finnabair Art Ingredients Glass Glitter - Gold Rush,  Finnabair Art Extravegance Glitter Set Ebony & Ivory and gold paint. All products you can find in the store of  A Sprinkle Of Imagination here. Some freehand stamps were very appropriate too.


I leave you some more pictures with the details. Enjoy them:)


That is all at the moment :)) I hove it was useful and inspiring for you.

See you later and have a lovely day :))

Much hugs and kissis.
xxx


01 February 2015

Ruby Tangerine

Hello!
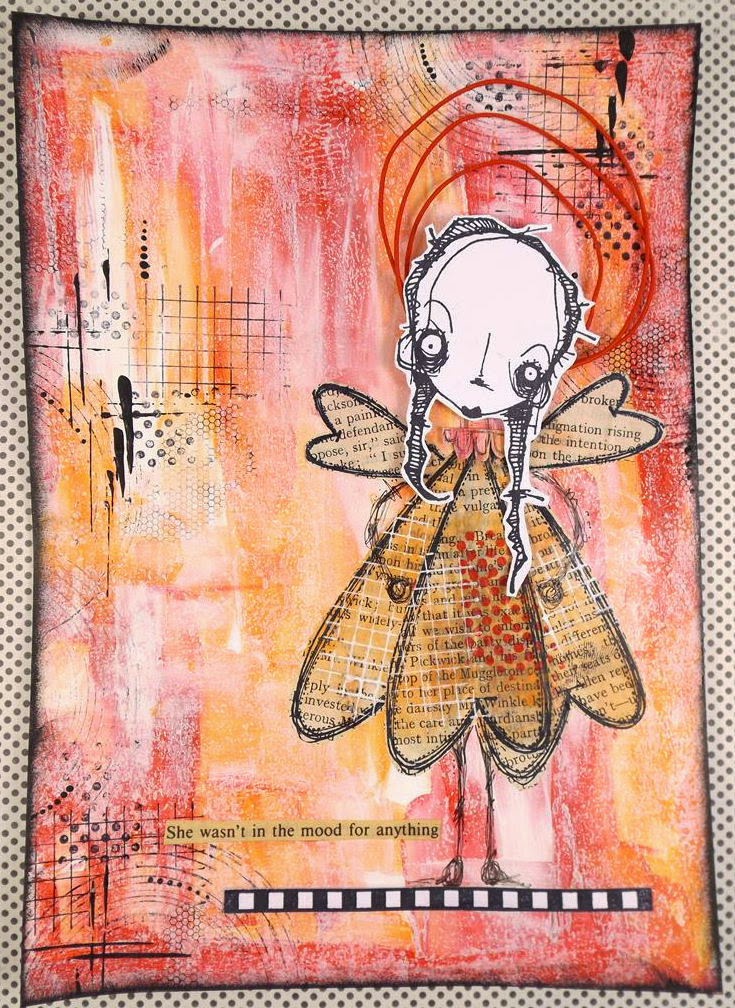
Another 'challenge myself' project today...create a project that looks really colourful but has a minimal colour palette. I chose to use just two colours, red and orange, alongside black and white. Both paints from Dina Wakely, Ruby and Tangerine....
I used my 'go to' technique of the moment to create the background...smearing paint. Watch this space for a smearing tutorial video....this weeks challenge for myself is to finally get into the video tutorial field!!
Anyway....smeared paint, with a brayered layer of white to take the edge off the colour, as otherwise the figure won't 'pop' enough from the background. A little collage stamping...
The figure is created using Stampotique stamps...hearts in two sizes, and a quirky face...
I added a halo effect using red Prima wired thread. Fab stuff, gorgeous colours and keeps its shape wonderfully...
As is usual with my projects, it wouldn't be finished without a random bit of book text..
Hope you like her!
Trish xxxxx


24 January 2015

Calm Cat

Hello!
I'm back again with my fist DT project of the year, so happy 2015 everyone!
Along with lots of you, I have a few goals that I want to achieve this year...pushing myself into getting better at things I'm scared of! One of those is embracing my own handwriting. Hate it, think it looks rubbish....which is precisely why I need to do it more! My creation today has handwriting on, and more than a little washi tape! Another 'goal' - use up my stash!
Here it is...
I've got lots of step by step pictures for you to look at....
Going along with the theme of 'use what you have', my substrate for this page is something I'm sure you all recognise...
A good coat of gesso later and you're all ready to start..
Gather up your washi tape, any colours and designs, the more the merrier! Tear strips, and then start to add them to the page.
Save even the tiniest ripped bits, as you can use them at the end to fill in any gaps. Create a colourful washi background...
Now, I'm going to be adding lots of wet media on top of the tape, so it really needs to be all sealed. I have given the whole thing a thick coat of clear gesso...
I used a thick coat because I wanted to scribe into it, creating more texture...
The thick coat means it dries a little more opaque than a thin coat would, but once dry it is pretty much clear!
As a comparison, the pic below shows a before and after...
   No gesso..............................Dried clear gesso!

The gesso gives a great 'tooth' for the media you are about to start layering up!
Add a bit of paint..
I have smeared tiny amounts on with my fingers, trying not to obliterate the washi tape, but adding colour in the blank spaces. A little white paint blends things nicely, and tones down the stark clashing washi colours so the whole page looks more cohesive. I added a little stamping and printing...
This is the basic background finished.... any doodling and edging will be added after the image/words are in place!
I collaged my weird quirky figure using a mixture of stamped images and hand cut shapes...
Once she was glued in place, it really looked like she was meditating...so I thought the word 'calm' would be a good one to use! I practiced on scrap paper before drawing it on lightly in pencil, then used acrylic ink in a waterbrush to actually write the final version. 'Calm' was SO not the feeling actually using the ink directly on the page!
The washi background shows through wonderfully, giving colour and pattern in a funky but understated way....


So..... there it is, first one of 2015!
Hope you like it!
See you soon,
Trish xxx