31 December 2013

Our favourites from 2013: Jaine & Trish

Hello everyone, Jaine here with my top three favourite projects from this year. I've chosen two journal pages and a mini album. 
The first journal page I chose as it was made during a low point of my year but the process of creating it lifted me up thanks due to the kindness of friends. I loved the colour, the bubbles and the Doolally Dorris Angel.


 The second journal page shows my favourite technique of using texture. I adore texture and creating a collage on a page plus the fussy cutting of silhouettes from magazine images is something I've been doing in my journals for years, now everyone does it!


The third project is a one page mini book. I'm not really a 12 x 12 scrapper, prefering instead to make mini albums which is a true passion of mine. 


Thanks for looking 
******************
Hello! Trish here with my top three...
It won't surprise you to know I have chosen painty projects as my favourites of 2013!
First up is this pink creation from September...
http://asprinkleofimagination.blogspot.co.uk/2013/09/so-beautiful.html
This was an exercise in restraint for me, and I loved the challenge! Only one colour to play with, and leave a big blank space? I think it worked out quite well!
Next, another challenge for me..Yellow and orange!
http://asprinkleofimagination.blogspot.co.uk/2013/06/oh-my-dear.html
My third favourite of the year goes back to my comfort zone colours, blue and red. A tag this time!
http://asprinkleofimagination.blogspot.co.uk/2013/05/blue.html
I really liked how the red of the paint stayed so vibrant when mixed with the texture paste!
So, those were my favourites of 2013, can't wait to see what 2014 will bring!


22 December 2013

Christmas journal

For the past couple of years I've kept a Christmas journal but I'd decided early on that this year I wouldn't bother. I've seen friends posting pictures of their December daily's and journals and actually I felt quite jealous. 

As you can see I gave in and decided to make one at the last minute. As this is posting (hopefully) I'll be in the car on my way to England for Christmas and the journal will be with me. 


The inside pages are simple sewn watercolour paper and the covers are hard cardboard with binding tape. 

I used the Glitz Design Finnley collection to cover the book and cut the decorative elements. This is an absolutely gorgeous collection of papers, so bright and funky yet one or two of the papers like this red rose paper and the grungy green are perfect for Christmas layouts. I used some Ranger silver foil card to cut the frame and the stickers also come from the Finnley collection. The stamp in the frame is from Christy Tomlinson and is from the Create Your Canvas Words collection.


I think I may have gone a bit over the top with the glitter but it is Christmas, right?

Have a wonderful Christmas and I look forward to catching up in 2014.

Jaine x


20 December 2013

and the winner is....

Thank you to everyone that joined in with our second challenge!  
Once again we thoroughly enjoyed seeing what you all created and generally having a nose at your blogs!  
I hope you also got a chance to take a look at all the fabulous entries.


Our November challenge winner is Deb, with this gorgeous mixed media panel. 


So Congratulations Deb! 

If you fancy winning a £10.00 voucher for yourself the December Challenge is up and running. 
You have until the 12th January to enter. 

Have a Great Christmas!

Hello!
For my last project before the big day, I want to share a Christmas themed piece, but not in traditional tones!
Lots of bright colours, and some text shapes as Christmas trees.
I painted the card with bold streaks of colour, then sprized with water and blotted off whilst still wet. This led to a happy accident! The paper towel I was using to blot just happened to be embossed with dots. Some  have squares or other shapes, but this one happened to be dotty. When I gently pressed on the background to blot, some paint transferred itself to the towel, so when I moved it about I was in effect using it as a large stamp! I noticed tiny white dots first...
and then when I looked closer, I saw blue and green dots too!
I may have to look closely at the paper towel design before I buy them from now on!
I gave the background lots of layers, printing and stamping and splatting along with all the paint...
The trees were cut roughly from French text, then sewed on.....yes, you can see where the machine jammed slightly!!!
The trees had spindly stitched trunks, and then a little black printing just to 'ground' them on the page.
A little rub on greeting and it was finished!

Have a fabulous Christmas everyone, and I'll see you back here on New Years Eve with my top three projects of 2013!
Trish xxxxx


19 December 2013

Be brave - mini album part 1

Hello

I have my half an hour mini album to share today. This time I will show you only a few pages, after Christmas I will show you more...few more pages and also I will have for you step by step tutorial how I have made a cover.


I used:
- Glitz Designs Raven collection
- Darkroom Door stamps: Carved Birds 1
- Hero Arts Ink Dauber
- gesso
- black paint
- masking tape

Magda x

17 December 2013

Should you get bored with Christmas...

Decembers Challenge is now live! 

Hope you like this months palette. We've had some fabulous sunsets and sunrises recently so this fits perfectly for me. No snow yet though, except for those of you up high in the UK. 


I know, a couple of days late posting it, but I'm hoping your house is a mad as ours is right now. A gazzillion Christmas performances to attend and make sure the kids are ready for. That and the kids are getting overly excited that the end of term looms but that that means presents (yeah - IF they tidy their rooms it does!) 

Go take a look at what the design team have come up with using these colours. 

The challenge is open, until the 12th January, so you can take some well earned crafty me time once the kids have gone back to school, or even hide away from the chaos while everyone is distracted with what they did, or didn't get for Christmas. 

Enjoy! 
Vicki 

13 December 2013

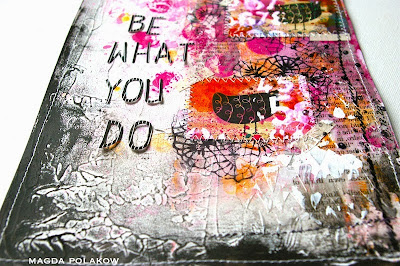
Be what you do...

Hello

Today I would like to show you my two art journal pages. I used recycled pages. What does it mean? When I use mists or inks very often I sprayed them around and all my craft mat is dirty. I use another clean paper sheet to 'stamp' the waste stuff. I don't want to waste any mediums. I do the same with gel medium or gesso which always give fab effects.


The first page was really full of 'waste' stuff. You can see that this page is really messy.  There are many bright colour spots. They are not smooth which is great because it gives some textures to the project. I had some marks which I wanted to cover that's why I used stripes of masking tape. I applied black paint on the pieces of masking tape.


The background is a mix of Dr.Ph.Martin's Bombay India Ink, Hero Arts Ink Dauber, Ranger Distress Paint and Dylusion Ink Spray. But it was not enough for me and I made a transfer using newspaper and gel medium. For a next layer I used gel medium and The Crafter's Workshop Navaho stencil.


I added an old piece of paper with stamped birds ( Darkroom Door stamps: Carved Birds 1 ). I had made that piece a few weeks ago for another project but didn't use it. I stamped birds on Jenni Bowlin paper. The paper was already dirty from Dylusions Ink Sprays and I put some modeling paste using Dylusions stencil. I cut the paper with birds on four pieces which I sewed to my background.


Before sewing I stamped Prima Finnabair Dolly stamp and stuck the pieces with birds to the background using canvas tape. For the last touches I stamped Stampotique Originals stamp. I also used Sakura Micron pen to draw some doodles.


The second page is very similar in terms of making it. I built the same layers using the same materials and techniques. The only difference is that on my 'waste' page was a layer of gesso.


On this page a pink glitter is more visible.


I added more black paint around the page. I applied the paint using my finger.


Letters on both pages are from the Glitz Designs Raven.


Magda x

11 December 2013

Pretty in pink

 After creating a house in a jar I've now created a tree on a plate. A pink tree too, well why not?

Underneath that pink frosting is a plain bottle brush from a Tim Holtz Idea-ology Woodlands pack. I sprayed it with Dylusions Bubblegum pink spray and Mr Hueys Color Shine for some sparkle. To give it some extra sparkle I touched the fronds with some glue and rolled the brush in Ranger Distress Glitter in Picked Raspberry. It's so sad I couldn't get a good picture with the glitter because it really does shine beautifully.


To trim my tree I took a cheap decoration and cut off the little beads, using gel medium to stick them to the tree. 


I used Idea-ology Tinsel Twine to wrap around the tree and base and finished off with a chipboard star from Tando.


I stood my little tree on an old wooden cotton reel and finished with a pink bow.

We've all fallen in love with these trees here and I'm sure you will too. 

See you soon

Jaine x


09 December 2013

Festive Merriment!

Hello!
I have a Christmassy painty panel to share today.....
Do you remember a hanging 'thing' I showed you way back in the middle of September?
This one....
Well, it's hanging on my wall, and as I was just daydreaming into space, it suddenly occurred to me that if the rolls of paper were trimmed, it could be Christmas tree shaped! So, the idea for my panel was born!!!!
I used a chipboard sheet as my base, and Claudine Hellmuth paints as my colour (Classic Teal, Landscape Green and Dash of Red). The paints were simply  brushed messily and quickly over a layer of ( still wet) white. This way, a little colour blending occurred here and there. Once the paint was dry, I did a little stamping using Archival Ink...
Prima dots and checkerboard designs. Red and teal ink to complement the paint colours! I then punched out some circles from text paper, then glued them on with matt gel medium. A little medium both under and over the paper makes sure no edges will lift up, and the 'matt' finish means you won't see the glue at all!
Once the gel medium was dry I started with the doodling. Around the circles and a border around the edge.....
The tree was then constructed from rolled up French text paper...
A punched star to adorn the top...
(and at this point I realise some of the text is upside down!!! oops!)
So, this goes to prove you can carry on with all the messy paintyness, and still turn it into a Christmas themed make!!!
Have a great week everyone!
Trish xxx


05 December 2013

Over planning kills magic...

Hello

Today I would like to show you another project using Tando chipboard. I used a few different mediums. It's not easy for me to tell you how I made 'step by step' this project that's why I've made a video for you.


I used:


Magda x

03 December 2013

Follow The Star: A Christmas Fairy!

Hello!
Today I want to share a little seasonal assemblage.....an Art Doll Christmas Fairy!


Now this may look a bit complicated.....but it really isn't! To prove it, I'll take you through the whole process, so grab a cuppa and get comfy, there are a lot of pictures to share!

The main body of my art doll is a Tando chipboard arch. Great shape for a body, and a nice sized niche to put things in! We need to use the arch as a guide to sketch out the legs for the fairy...


Nothing fancy, just a rough sketch on a bit of thick card. Cut the legs out, and paint them. The legs for my fairy are stripy, with turquoise glitter shoes! The legs need to be attached to the arch in the first stages of this make. There are five layers in the completed arch, so glue two together, then glue the legs on top...


Now glue the on the other three layers, making a leg sandwich!


Don't worry about messy glue at this point, its about to get covered! Now, we need to turn our attention to the inside of the arch, as this will be near on impossible to get at properly once the back is on! Cover the inside with torn up music paper...


Then decorate. I have given the paper a wash of white paint, smeared on a little turquoise paint then sprinkled with white UTEE. Once melted, this looks like snow showers!


We can now concentrate on the back of the arch. This is much easier to decorate before you glue it together! I have covered the arch with music paper and given it a wash of white paint....


Then smeared on a little turquoise....


I then silver embossed a flourish, roughly stamped a few snowflakes and added more UTEE 'snow'!


This can now be glued onto the arch frame....


The outside of the arch now needs our attention! Cover the lot with more music paper, making sure to go right around onto the reverse, as this will also make the back of the arch more secure...


Decorate this as well......


We can add in all the bits and bobs to the niche at this point! I've used a small Idea-ology tree (with the round base removed) along with a couple of tiny vintage trees I had in my stash. The twinkly stars are also Idea-ology...


We can work on the wings next. Bend and shape some wire into oval wing shapes..


Glue these to music paper using Glossy Accents....


Once dry, cut out....


Next, carefully fill in the oval frames with more Glossy Accents, sprinkling a little distress glitter over them too....


You will need six of these if you follow my design....but two can be just as effective! Once dry, group the wings together and twist the wire 'tails' so they are joined....


Whilst you have the wire out, you need to make arms too! Bend and twist the wire to do this, you may need to practice a few times to get the length and shape just right!


Once you have the wings and arms ready, you can glue them to the back of the arch body....


We also need to glue the support 'post' to the back of the arch whilst we're at it! This will help the fairy stand upright on her plinth. I've used a wooden chopstick for this. Cover with music paper and a wash of white paint..... (do the same to the driftwood plinth whilst you're at it!)


Once dry, it can be glued to the back along with the arms and wings...


Now, this is clearly a huge mess of hot glue and untidy edges! To rectify this, decorate the back just as we did the front and sides! Music paper, paint and melted white UTEE...


Much better!
Next, stamp a head (Stampotique) and colour her face...


Colour a large Idea-ology star with alcohol ink....


Glue the star to the head, and add to the fairy body...


Now we can glue the whole thing to the base. This needs lots of hot glue, and don't forget you'll need to hold it in place until it sets hard!


The falling stars being held by the fairy are more Idea-ology mirror stars, simply stuck to a strip of acetate.


The acetate is glued around the fairy hand at one end...


and to the base at the other end....


All the hot glue mess on the base needs some attention....so cover it up with large flaked white glitter, and a few polystyrene balls (from an old beanbag!) to look like snowballs!
The starry base...


The fairy now looks like she is standing in a small snowdrift....


The fairy is all finished!!!!
Lots of little details to draw the eye..... Christmas songs on the musical wings....


Turquoise glitter on the trees...


The clear acetate making the falling stars look suspended in mid air...


and a little typed phrase to finish it all off nicely...


Phew...that was a photo marathon and a half!
I had a ball making her, and I hope you like her too!

Love Trish xxx