Showing posts with label Claudine Hellmuth. Show all posts

17 October 2014

Courage my friends.

Oh I do love it when something comes together so effortlessly like the page below called "Courage",


Working in my big journal I had already used the Prima 12 x 12 flower stencil to add a base layer of texture paste. I painted over that totally with Claudine Hellmuth Studio paint in Classic Teal which is an absolutely gorgeous colour. Once this was dry I took a sanding block and gave the whole page a gentle sand to take off the top layer of paint and reveal the beautiful stenciled image below.


That all done I seriously didn't want to cover it up and would have been quite happy to leave it like that but that doesn't make much of a page really, so I clustered a few off cuts, a piece of glittery tape from My Minds Eye, a bit of journaling and I stamped and embossed the lace border by Prima and Finnabair taking a paintbrush to flick off some of the powder to give it a tattered look.


I think that's all it needed as I wanted to leave plenty of "white space" as they say.

See you soon

Jaine x

21 September 2014

acrylic paint sale...

We still have a selection of Claudine Hellmuths Studio Line paints,
in both pots, mini bottles and kits still available. Some colours are now running low stocks.

These paints have always been one of my favourites with the creamy texture of these highly pigmented artist quality acrylic paints. With a collection of 15 semi-gloss shades you can create an endless palette of colours by mixing them without them going muddy.

We do still have some stocks left of the multi-mediums and extra-time as well and you can find those here
We are now running on very low stocks of the Jenni Bowlin Dabbers which were recently added to our sale section at a bargain price. As with the Claudine Hellmuth paints once these have sold out we will not be able to restock them. 

28 May 2014

Be Still

Hello!
I love using stencils, but more often than not find myself scraping some kind of paste or medium through them to give loads of texture. I decided to challenge myself to use a stencil as a focal point, but with no texture!
I came up with this....
This falling leaves stencil is fab, love the heart shaped look! I've done a step by step so you can see how it all came together.
First, add the background colour. This was done by quickly brushing on stripes of green, red and purple Studio paint (with a little white added in!)
Once dry, I added a little more detail in the same colours, sponging through some sequin waste..
Black stamping next..Jenni Bowlin and 7 Dots stamps..
Next, the focal stencilling. I used white paint.
As it's acrylic paint we're using, even a lightly sponged layer of white will be opaque enough  to cover the darker colours beneath! I wanted to emphasise the leaves further though, so I doodled around them...
Once the basic background is done, you can see where you might want to add a few more details. I thought the black stamping was very 'blocky' on the left hand side, it seemed a bit isolated. I felt it needed a few extra black accents to draw it down into the lower part of the page...
I added printed lines, dots and a few more doodles here and there.
Next, add the images and text...
A stamped fairy, and some rub on words!
So.... adding multiple stamped images together, but only using small parts of them, creates a fab collaged look...
Fine line doodling can make designs 'pop'....
I hope you like it...have a great day!
Love Trish xxx


05 March 2014

You looking at me?

Hello!
A little bit of 3D assemblage from me today.... made from the packaging from some wood shapes!
(I think I must have been listing slightly when I took that pic....put your head on one side and it'll look better!)
I painted the box (it is a Prima Icons box) with a wash of white paint, then edged it slightly with black ink.
I stamped some text onto card, then cut it into squares to fit the back of the squares in the box. Lots of trimming needed as the squares aren't actually square!!! I stamped some Stampotique ladies and coloured them with markers, keeping to a red theme!
The heart is also Stampotique, I stamped it onto red painted card, then added the text (Stampotique again) before cutting out. A good coat of Glossy Accents gives the shiny look...
The box is standing on button stacks..
(bit of a blurry pic there, I'm beginning to think I was a little tipsy during this photo session!)
I added another stack to the top..
A nice way of using packaging to create more art!
See you soon,
Trish xxx

22 February 2014

Image transfer techniques


 It was whilst trying out some printing without using a gelli plate that I came upon this technique for transferring an image.  I tried this on paper first but found the paper tore but on sticky backed canvas it worked better. Maybe if I'd given my paper a coat of gesso first it might have worked better but I have to experiment further to find out. 

Anyway, I started off with a background of texture paste, (of course, what else would you expect from me?) through a plain old paper doily and some spray inks.


 I chose an image from a magazine of just a head shot and lay a piece of plastic over it. I used one of those clear pockets from a file folder so raid your children's school supplies.

The small bottles of Claudine Hellmuth Studio paints have a very handy thin nib to squeeze paint out of and can easily be used like a pen. I used this to draw the outline of the design onto the plastic.


 I placed the painted image face down onto the background and burnished with my finger.


 I had enough paint left on the plastic to transfer the design onto a journal page although it wasn't as clear.


 For the second transfer technique I used sticky plastic book covering but you could also use clear packing tape. I covered the image with it and burnished well.


 I cut around the image.

I then soaked it in water and rubed off the paper backing. I kept soaking and rubbing until most of the paper had been removed from the back and only the image remained.


 I used some gel medium to glue it in place.


To finish my piece I use my sewing machine to doodle around the edges.


 and stamped some script over the image and added lettering with stickers.

Sticky canvas is great if you don't sew and takes any manner of mediums on top give it a go. I hope you give the transfer techniques a go too, they're easy.

Jaine x

27 January 2014

Live.Dream.Love

Hello!


One more time something challenging for me. I made a project like this for the first time. I use a box from Prima Wood Icons in a Box. I painted the box using Claudine Hellmuth black gesso. Inside a small windows you can find pieces of Glitz Design Raven collection. 


I cut circles from Claudine Hellmuth Sticky-Back Canvas and used Hero Arts Ink Dauber and Ranger Archival Ink to colour them. 


Small clear drops are made from Ranger Crackle Accents and the dark ones from Ranger Liquid Pearls.


It was a great fun, I need more boxed like this!

I used:
- Prima Wood Icons In a Box
Hero Arts Ink Dauber
- Glitz Design Raven
- Claudine Helmuth Sticky-Back canvas
- Claudine Hellmuth Black Gesso
- Finnabair stamp - Doily
- Ranger Archival Ink
- Ranger Crackle Accents
- Ranger Liquid Pearls

Magda x

09 December 2013

Festive Merriment!

Hello!
I have a Christmassy painty panel to share today.....
Do you remember a hanging 'thing' I showed you way back in the middle of September?
This one....
Well, it's hanging on my wall, and as I was just daydreaming into space, it suddenly occurred to me that if the rolls of paper were trimmed, it could be Christmas tree shaped! So, the idea for my panel was born!!!!
I used a chipboard sheet as my base, and Claudine Hellmuth paints as my colour (Classic Teal, Landscape Green and Dash of Red). The paints were simply  brushed messily and quickly over a layer of ( still wet) white. This way, a little colour blending occurred here and there. Once the paint was dry, I did a little stamping using Archival Ink...
Prima dots and checkerboard designs. Red and teal ink to complement the paint colours! I then punched out some circles from text paper, then glued them on with matt gel medium. A little medium both under and over the paper makes sure no edges will lift up, and the 'matt' finish means you won't see the glue at all!
Once the gel medium was dry I started with the doodling. Around the circles and a border around the edge.....
The tree was then constructed from rolled up French text paper...
A punched star to adorn the top...
(and at this point I realise some of the text is upside down!!! oops!)
So, this goes to prove you can carry on with all the messy paintyness, and still turn it into a Christmas themed make!!!
Have a great week everyone!
Trish xxx


10 November 2013

Messy Monoprinting!

Hello!
I want to share an easy (but still messy and great fun!) way of creating backgrounds today!

 
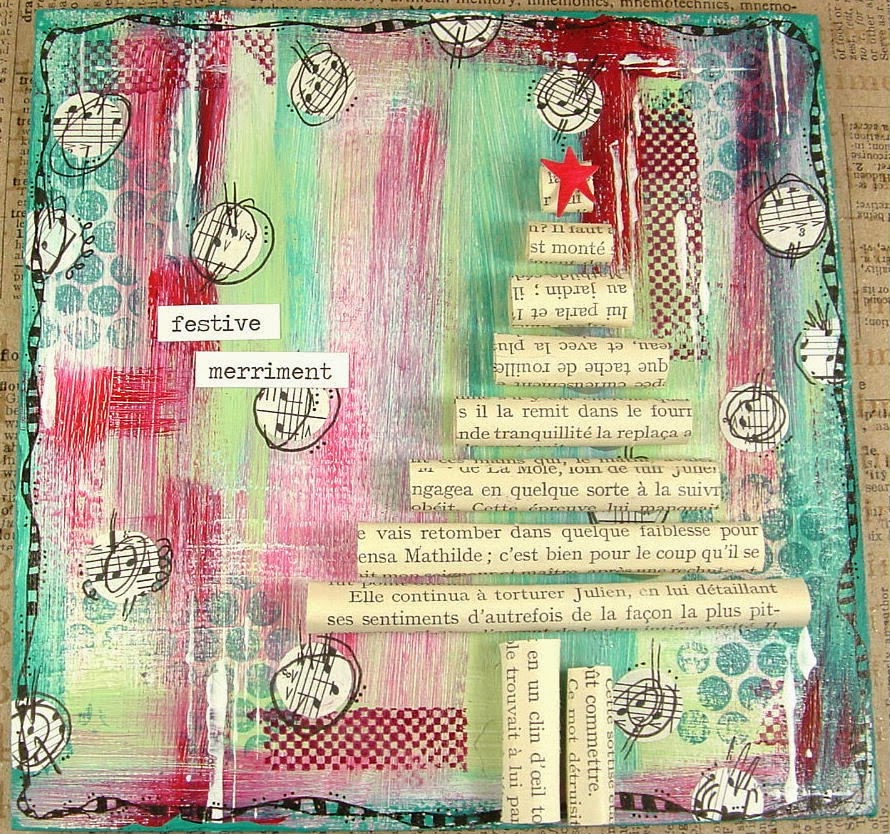
Monoprinting is HUGE right now, and this is how I've created my painty background on this project. No expensive bits of kit though, just an acrylic block!
The block I used was the biggest I have, but of course smaller blocks work just as well for smaller projects!
I print in two ways.... firstly...
Put teeny bits of paint on the block. Then, brayer gently to mix...
Now, this is tricky to do without smearing. The block has a slick surface so the brayer can want just to slide rather than roll. Still, persevere and you'll get the hang of just how much pressure etc to use.
Quickly, before the paint dries, press your cardstock onto the block...
Then peel it off....
The thin layers of paint will have transferred themselves to the card...
It's an absolute doddle to clean the block, hot soapy water or babywipes get it pristine in no time.
Now, brayering thin layers can be a little subtle for me, so I tend to go for the more messy approach!
Smear the paint on with your fingers....
And then press on the card to get a print...
This method obviously uses more paint, and you will be able to get more than one print from the block. This is great if you are doing book pages etc, where creating similar backgrounds quickly is useful!
So...printing done, we can get on with the rest of the piece!
I did a little stamping..
Bo Bunny Dots, Prima stitched circles, Jenni Bowlin grids and text.....
I also did some stitching and splatting with black paint..
My Stampotique figure is coloured with the same paint using a waterbrush...
She stands on some washi tape, and I've added a phrase from a cut up old book to finish.
I think we all have an acrylic block in our stash....get it painty and try printing!
Trish xxx