Showing posts with label Arnlaug. Show all posts

21 December 2014

12 Designers of Christmas *Designer 11* Arnlaug Koppang


What a treat to have Arnlaug join us for this Christmas design marathon. She was with us on the team at the very beginning and her scrapping style is an absolute feast. I can't begin to tell you how scrumptious I find this layout and she's given us a million gorgeous close ups too for us to drool over.


On her background, Arnlaug used gesso and  texture paste as well as some splashes of red alcohol ink and Glimmer Mist.


Don't forget to leave a comment here and on the other Designers blogs to be in with a chance of winning a fabulous prize of goodies.


13 August 2013

Happiness

Hi everybody!

Today I'm going to show you a real easy to make canvas:-) I don't make a lot of them but sometimes I just have to do something different. I LOVE the beach or being at the sea shore, so I've made a little tribute to one of my favorite spots:-)


To make this canvas I first applied some snow writer medium to get a sand like surface. Than I sprayed with some Tattered Angels glimmer mist "Sandy beach".
I wanted this canvas to have a clean look and the new Writers tape from Prima was just perfect! I wrote the statement on the computer and printed it out on a regular paper. Then I glued the tape over and printed it out again.
Last I embellished the canvas with seashells found at one of my favorite places and some pearls.

Thank you for looking:-)

04 August 2013

Drive fast!

Hi everybody! It's been a while since my last blog post, but now I'm back scrapping away after a great vacation:-) It's been over a month without scrapping so this time I really had to get messy and just play!
I have to girls and got them some pink princess pages. But I have to say I'm glad that my girls can be real tomboys sometimes so they will get some cool, messy pages to:-)

This page is made mainly from Jenni Bowlin products, but I've used a few others to. For my background I used a TCW stencil and dabbed on some Prima Chalk Fluid Edger - Fall leaf.
Then I layered a few of the Jenni Bowlin Modern Mercantile papers. I also added some washi tape also from Jenni BowlinTo make the papers blend more together I used some gesso on a babywipe:-)


To finish my page of I embellished it with different stamps, chipboard stars, metal gears and arrows and a rubon from Tim Holtz. LOVE those rubons, they go on perfectly no matter what the background is!
And I also used a few Jenni Bowlin products to make the page come together. A sticker flag banner, postage stamp sticker and a Vintage Decks card. That rooster card was just perfect I think! 

I also used a sketch from a Norwegian sketch blog called Skissedilla. Followed the sketch loosely this time. Pop in if you want to play along this week:-)


Wishing you all a great sunday:-)

23 June 2013

How beautiful..

I really love challenges, especially color palettes and sketches. The challenge blog "Thats just so cute" have many different challenges and they have a color challenge every month. This time it was a really lovely palette! It's only a few days left to play along with this challenge but maybe you want to give it a go?


This time I made a page for my art journal. The text stamp says; "How beautiful the day is when touched by the kindness."This book will be filled with only good pages :-)

For the background I started out by applying molding paste trough a TCWS stencil. I also sprayed on some Goose Bumps. LOVE that medium! I than sprayed some glimmer mist on and started to mix up water colors to get the right shades. To finish the page of I used a rubbon from Tim Holtz. They are so beautiful and really easy to rub on:-)

I've used these product that you'll find in the shop:

14 June 2013

C&S

Most of the time I have a lot going on on my pages. I love color, pattern, paint, inks etc. But I also LOVE the clean&simple style of scrapping. Today I'm showing you a really simple, yet striking way to show of a favorite photo.

For this page I used a large Ranger tag as a base for my photo. I also added two copies of the photo to make it stand more out. The card with the text on it is from Glitz Design: Color Me Happy Bits & Pieces. To give the page a little extra I added a sticker text and a little bird paper clip from Prima.

So there you have it - made in minutes:-)  


(sorry about the really bad picture. Not easy to get a clear photo on a grey, rainy day;-) )


31 May 2013

Little sailor - step by step

Happy friday everybody! The summer has finally arrived here in Norway and we can start to enjoy life at sea;-)

Today I'm going to show you a layout step by step. Hope you have time and patience because there's a lot of photos here:-) First a little sneek peek of the final layout;-)


Step one: Start out by spraying a lot of water on your page, then use the mist of your choice and blend together using more water. I guess I used a bit to much water here and forgot to put the page inn press, so it really curled up. But I knew there were suppose to be many layers on top so I didn't mind starting over.
You should note that the page will curl a bit most of the times, but once placed in the album it will look great either way:-)

Also create some drips of mist by tapping it on to the paper.


Step 2: cut up your papers. By layering them on top of the background you choose the size you like. For this project I used papers from Glitz design Uncharted Waters and a piece of Bazzill Antique Book Paper.


Step three: for this page I made some embellishments from an old book page. Doodle and use some stamps to make them stand out. I also saved the product strip on my pattern paper since it really fits the theme. 


Step four: adhere your pattern paper to the background. I like using staples, then I can sneek in more elements between the layers. I also stapled the background to another cardstock to make it curl less. 


Step five: paint your bookpage embellishments with ink and water.

 
Step six: Add molding past trough a stencil and also some paint on top before removing the stencil. Here I have used a stencil from The Crafters Workshop. Also add more mist in drips and paint some of the paper with mist and water. 


 Step seven:  Add embellishments like the bottle from Tim Holtz, the boat from Studio Calico and the book paper embellishments.


 I really wanted to use these wooden letters but didn't have any S left, so then a reversed Z had to do the job;-)


So are you still with me?

Here is my final result! A bright, fun and happy page just like the first summer day of the year when a shoot the picture:-)


Thanks for looking:-)

22 May 2013

Mr. Toad

Hello everybody! Finally we had a beautiful weekend with a taste of summer in Norway, and me and my girls were out gardening for a whole day:-) Sometimes gardening can get pretty exciting for little girls, especially when Mr. Toad shows up! My oldest was ready to get a zoo started, but after a while we came to the understanding that Mr. Toad had to go out in the woods to find Mrs. Toad;-)

I loved how the pictures turned out so I just had to scrap them right a way. And what papers could be more perfect than Glitz Design: Color Me Happy Bits & Pieces. I cut up the paper to make small cards and I also had a sheet from the Color Me Happy 8x8 Paper Pad


I placed a bunch of tags around the page, some from Ranger and some from an unknown manufacturer. The page is simply embellished with a few buttons and some sticker words.


Hope you've enjoyed my page:-)

14 May 2013

Printer tray for memory keeping

I've had this Printer tray from Tando Creative sitting on my desk for a while, and finally I found the perfect use for it! Last year we had a family vacation to Spain and the girls are still taking about it! I've made a bunch of layouts but I needed to make something special to keep this great memory:-)

I startet out by covering all the pieces with gesso before gluing them together. Then I've used different types of acrylic paint and some crackle paint from Claudine Hellmuth. I glued down some cheese cloth to add a little texture and used a stencil from The Crafters Workshop to make the birds. To give the finishing touch I used some Tattered Angels Glimmer mist.


 This is a small printer tray but it was perfect to keep small treasures in the small spaces:-)


On the front cover I added some texture using a stencil and molding paste. I then used a lot of different glimmer mists. The alphas, sun and clouds are coloured with the same colors. I also used some seashells on the front. To close my "book" I used a bracelet I bought in the town we stayed.


Hope this inspired you all to give the printer trays a closer look. This is perfect for memory keeping:-)


22 April 2013

Flying high


This time I've had some fun messing around with paint, stencils and mist:-) I also made my page using a Prima Build-A-Page Sketch and a beautiful colorpalette from the Color Room:-) I love challenges and they often give me the kick in the back to get started:-)


To make this page I started out by almost covering my background paper with gesso and paint to match the colors in the palette. I used some masks and stencils aswell. Then I glued down some regular tissue paper and some strips of Bazzil Antique book paper (LOVE!), and layered a few different Ranger tags on top. I continued by painting over the paper here and there and then I used a lot of mist to make it all come together:-)

To embellish the page I based it on my Prima products, both old and new. The flowers and the butterfly is from my own stash but in the shop you can get the Lady Bird paper clip, the Finnabair Vintage Machanicals
and the zipper metal trinket that are all from Prima. I also used a Prima stamp on the side of the photos.

Some closeups:


The sketch:


April 2013 BAP Lene


The colorpalette:

Picture

17 April 2013

She loves food! A glitz design layout.

My youngest girl really LOVES food! And spaghetti is especially fun to eat;-) 

On this layout I mainly used Glitz design papers from the Color me happy collection. I first cut up the paper; "Color me happy bits & pieces, and layered them on a "floor" paper I had saved for a while. The "hello" strip at the top is also from this sheet. I then used my Glitz roller doodle stamp and a few Studio Calico stamps for my background.

These papers are so colorful and fun that they don't need much embellishments. But I had some Jenni Bowlin vintage decks cards I thought would fit in and also some cabochons flowers.

Hope you like my page:-)


10 April 2013

A tag for him and a tag for her..

Today I'm sharing a quick post with a tag for him and a tag for her.. I've used Ranger tags that you can find in a variety of sizes and colours in the shop.

The tags are actually made using leftover paint and ink from my art-journal. Can't waste anything;-)

First a tag for him;


On this tag I first smudge some gesso on, then I rolled over a crackle roller stamp. When it had dried up I used a few Tim Holtz stamps and a studio Calico stamp for the background. Then I added a bit of Tim Holtz tissue paper to the edges. Finally I added some tickets to embellish the page a bit more.

 In the background you can get a glimpse of the Glitz Design Roller Doodle stamp. Love it and will show it to you more in a later post:-)

And then a tag for her;

This tag is made just by "picking" up the last drops of distress ink and water from my work surface. Then I added two staps from Tim Holtz to finish it. I loved how the background turned out so I would'nt hide it.

Hope you all like my tags. I have some plans for a bigger project later this month;-)

27 March 2013

Atumn.. a layout step-by-step

Ok, I know it's spring now, but in the progress of making this page it turned out an autumn page:-)

This was suppose to be a step-by-step on how to make your own background, but my camera is not my friend these days so the first steps are missing..

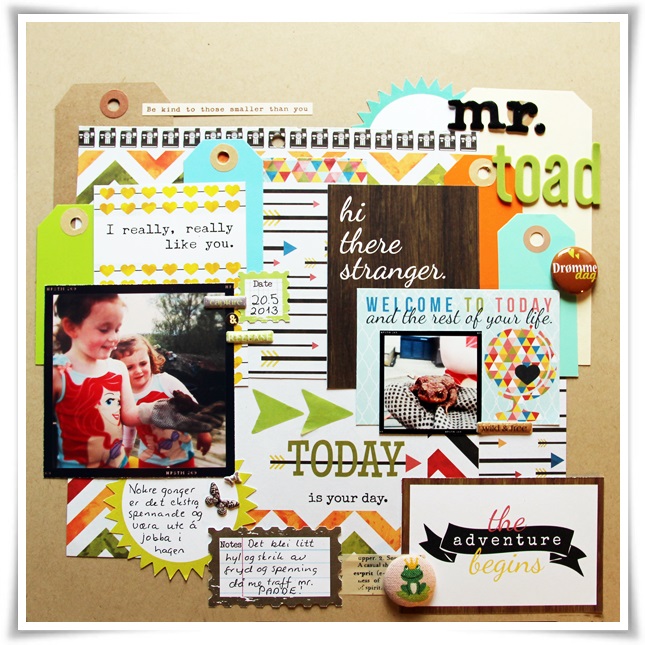
First take your background paper and spray it with water and different spray inks. I've used Dylusion on mine, LOVE the viberant colors they give. The page will curl up but once in the album you wont even notice it;-)

I started drying the page with a heat gun, and during the process of doing that I turned my page a few times dabbing it in the leftover ink on my work surface. This gives a cool droplet effect:-) When the background was dry I took a Dylusion stencil and dabbed on some Ranger Acrylic paint dabber - gold.

 Before I move forward I have to give some credit to the one inspiring me to do the page. The february winner at Skissedilla, Marie-Josee, made an incredible page, and I just had to try the idea with the tags:-)

My three tags are made by spraying water and various ink sprays on and then letting them dry. I then covered the tags with Claudine Hellmuth Multi medium matte to seal of the background. Then I took some stencils from the Crafters Workshop and added some molding paste. I also stamped with Perfect medium adding some Perfect Pearls on the orange tag, on the red/dark tag I stamped and embossed it with Tim Holtz Distress embossing powder. On the green tag I sprayed over with white Dylusion.


Now over to putting the page together. I've used scraps of Glitz design Yours Truly papers and layered them on my background.  Then I added some various washi tapes.


I looked trough my stash of old flowers and chose a few orange and yellow. Then i gave some of them a touch of orange spray ink. In the centre I put some flower centers from Prima. 


To finish the page of I added a few journalling tags, the photo and the title. The letters are made of plain chipboard letters, coated with gesso and spray inks. 

Hope you've enjoyed this somewhat incomplete step-by-step, and that you'll have a great easter:-)

22 March 2013

Enjoy transition

Spring is finally getting closer but winter is still trying to hold on. This morning the car was covered in a thin layer of snow.. But later in the day the sunbeams slowly warmed up the world.. I am so looking forward to the first day of real spring now!

Today I thought I'd make a card that could reflect this transition between winter and spring. The card is made all from scraps from Teresa Collins and Glitz design papers.

The background was inspired by this fabulous turtorial by Paula! Here I've used Dylusion sprays and a brayer, added some water and voila! A perfect background:-) On top I layered some scraps of paper and some lace. Took a bit of gesso here and there and added some spray here aswell. I gave the front the finished touch using Prima crystals.


The inside of my card is really simple. Same tecchnique with the spray ink and brayer and a stamp from Dylusions was all it took:-)


I'm taking easter vacation from work next week and hope to get plenty of time creating then:-)
Wishing you all a great weekend:-)

17 March 2013

9 months

This time I've made a simple page describing my youngest daughter at 9 months:-) The page is simple in design with some stencils and scrap papers as basis.
I wanted to make plenty of room for my journaling and chose a pretty simple design:-)

I've used stencils from Prima and The Crafters Workshop as the backdrop for this page. I've sprayed with Dylusions bubblegum pink and lemon zest, the black numbers I've also used Dylusions but here I've dabbed it on to get a more clear image.

Then I've layered some scraps of papers, used a few stamps from Studio Calico and embellished with some washi tape, cabochon flowers and the cutest little elephant I found buried in my stash:-)