Showing posts with label Dylusions. Show all posts

06 July 2016

More reasons to get crafty...

Good morning all


Just a quick post to let you know that there are even more products in our HUGE sale section
and a few special offers too!


10% off selected GOLDEN fluid acrylics


Some of the Distress family of products are either at a new lower price, or reduced to clear! 

&

If that's not even Tim Holtz goodness
we have also got a clearance event on selected


DYLUSIONS NEWS


yep, we have reduced to clear our remaining selection of

Not only that but we have 10% off Dylusions Ink Sprays too! 

So, plenty of sunshine crafting in the garden this summer.
You could even start planning your Christmas projects! 

Happy Creating!

Vicki 


21 March 2016

Easter Special Offers!

Hello!

Its almost Easter but what would you prefer the Easter Bunny to bring you... 

Chocolate or Art & Craft Supplies?? 


and 

Offer lasts until Easter Monday or stocks last. 

oh - and if you're interested...
 I'd have the chocolate with the craft supplies...  I'm greedy like that! 

Happy Creating

Vicki 

20 December 2015

The 12 Designers of Christmas - Designer #10 Shirley Bampton

Hello!  As promised yesterday, I'm back with some sloshing and splattering - my favourite way of using Distress Inks!

I was inspired by a pin on Pinterest to create a couple of cards:


I stamped the bird from Dina Wakley Scribbly Birds, then stamped a hat from Dylusions Couture Collection Mini Couture.  I drew some holly on top of the hat, sloshed some Distress Inks onto the image, then added some splattering.

For the sentiment panels, I dragged some card through the inks on my palette, then stencilled the sentiment using Tim Holtz Schoolhouse.

A few drops of Ruby Red Liquid Pearls for the holly berries, then I sponged the edges of the panel with Peeled Paint, distressed the edges and mounted the panel onto my base card.

He's looking rather dapper, don't you think?  And here's his lady friend:


Same process, just stamping a different hat, drawing some holly again, using Platinum Pearl Liquid Pearls for the berries.  She's rather sweet, isn't she?

Don't forget to comment on all the Designer posts and Brand posts to be in with a chance of winning a mixed media goody bag :)

23 October 2015

Happy Dylusions... and half term

Hello there!

Just a quick post to let you know that we have reduced a selection of our Dylusions Stamps Sets


And.... On a slight side note,  it's now half term 
here in sunny Yorkshire, 
so any orders placed will now be dispatched from 
Monday 2nd November! 

Happy creating and have a fun filled week!

Vicki 

16 July 2015

Dylusions offer!


Look at that!  The sun is out!! 
 (fingers... and toes crossed it stays for a while)

To celebrate, we bring you Dylusions stamps sets at 30% - 40% off! 
The offer ends on Monday 20th July 2015.

No fancy codes needed, prices are already reduced
on the website so go grab yourself a bargain. 

Happy Creating!

Vicki 

10 April 2015

TUTORIAL. Collage "A lovely girl".

Hi averyone!
Today I want to share with you my resycled collage, made with some different materials :) I have used a broken wood box, color papers, a picture of a model from a magazin and the other mixed media products.

I have at home a desktop with  two broken drawers table. So, the other day, making the cleaning I decided to throw them away but at last moment I thought: "Hey, I could use these boards for some of my mixed media projects," So, they were saved until their "final judgement" :)) Here is the result of using of one of them as the basis for this collage.

First of all, I glued some papers with Finnabair Art Basics: Clear Gesso above the table (size 25 x 40 cm). These papers were half broken and crumpled, ready as well to throw them away :))) I also put below a white embossed paper from a chocolate box :) 
Then I painted over with Prima Chalkboard Paint - Plum  and glued the paper with a few sentences and a circles wich were cut with the Cameo. I think these leftover papers are interesting to reuse them in other works as templates and chipboards for example.

The next step was to apply  Finnabair Art Basics: 3D Matte Gel, transparent using Dylusions 5x8 Stencil: Blocks and then I covered some parts with Finnabair Art Basics: Black Heavy Gesso.

Finally,  it was time to use my favorites Prima Color Bloom Sprays, make a little flower composition like a hat on the model´s head and add some details using Finnabair Art Ingredients Glass Glitter - Gold Rush,  Finnabair Art Extravegance Glitter Set Ebony & Ivory and gold paint. All products you can find in the store of  A Sprinkle Of Imagination here. Some freehand stamps were very appropriate too.


I leave you some more pictures with the details. Enjoy them:)


That is all at the moment :)) I hove it was useful and inspiring for you.

See you later and have a lovely day :))

Much hugs and kissis.
xxx


20 October 2014

'Old School' 3 -Salt!

Hello!
Another old favourite inky technique today, although this time I've only used bits of the background created on my final piece! My finished creation is this page...
The bright red poppy heads are the product of todays spotlight technique: Salt backgrounds!
Adding rock salt to wet ink is a great way to create fab texture and interest, and it's really simple too!
Step1: Prepare! The is messy, so put your card down on a wipe clean surface.
Step 2: Spray! (or drip...) Any drippy ink will work for this, acrylic inks, ink sprays, stains, you name it. I knew I was going to use the result for a poppy head, so I sprayed in just the one colour. You can go as bonkers with the colours as you want!
Step 3: Reactivate the inks with a little more water so the surface is nice and wet...
Step 4: Add on the rock salt...
Step 5: Spray with a little more water to make sure the salt has a nice wet bond with the surface..
Step 6: Now you can go one of two ways. Leave it to dry by itself, or blast with a heat gun. Drying naturally gives nice results...but for the impatient.....Blast with the heat gun!
Step 7: Once ALL the ink is dry, wait until the cardstock and salt is cool. It's really quite surprising how hot salt gets! Once cold, rub off the salt...
Step 8: Admire the fab textures and design the salt creates!
I then cut circles from my salty background, and added seed beads to the centres to give me my poppies.
I typed straight onto an old book page to give me my title...
Which was very apt, because I wanted to doodle my way around the rest of the piece, no stamps at all. I was a bit hesitant about letting go and creating the stems and leaves of my poppies, so really needed to believe in myself!
I *think* it worked, but need a lot more playing about until I'm confident!
Have a go with the salt, its a really nice technique!
See you soon,
Trish xxxxx


08 March 2014

It's the simple things.

I'll admit to being a pretty simple gal on the whole and it's the little things in life which give me the most pleasure. When I first saw Dyan Reaveley using this ink spray pad at winter CHA I thought it such a cool idea and couldn't wait to get my hands on one.  If you haven't seen it before it's basically an ink pad without ink! The idea is you use it to spray your inks directly onto the pad thus creating an ink pad with your own custom colours. It's washable too so you don't need to buy one for every spray colour you own.  It's not a small thing either and at a whopping 15.5 x 10.5 for the pad it'll ink up those massive background stamps easily.

 I thought I'd keep my project simple too just to show you the effect. Here I've used a black tag rather like the Ranger ones in the shop and simply stamped this Darkroom Door Birds 1 stamp using my pad and Dylusions White Linen ink directly onto the tag. The image isn't perfect but I wasn't looking for perfection. I also used the pad to create simple marks with a credit card and bottle caps and used the ink directly from the bottle to add some ink spots.


If you love your ink sprays and long to use them to stamp with, I highly recommend you get yourself this stamp pad. You'll love it.

Jaine x

12 February 2014

Strange city

Hello!

Today I have for you a very colourful project. I used No.12 Giant Tag as a background.


On a plain tag I sprayed some Dylusions Ink Sprays. Than I glued a pieces of Glitz Design Your Truly paper (hurry it's on sale now!!!) and Claudine Hellmuth Sticky-Back Canvas.


For more texture I used gel medium and The Crafter Workshop Template. When I was sure that the background is dry I sprayed Dylusions Inks once again.


I used my sewing machine for ''building'' houses. Than stamped Stampotique Originals stamps (you can buy some of them in really good prices!!!)  using Ranger Archival Ink. For last touches I used Crackle Accents, white acrylic paint and staples.


Magda x

13 December 2013

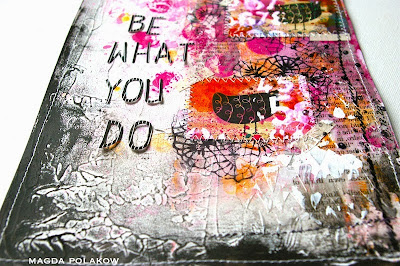
Be what you do...

Hello

Today I would like to show you my two art journal pages. I used recycled pages. What does it mean? When I use mists or inks very often I sprayed them around and all my craft mat is dirty. I use another clean paper sheet to 'stamp' the waste stuff. I don't want to waste any mediums. I do the same with gel medium or gesso which always give fab effects.


The first page was really full of 'waste' stuff. You can see that this page is really messy.  There are many bright colour spots. They are not smooth which is great because it gives some textures to the project. I had some marks which I wanted to cover that's why I used stripes of masking tape. I applied black paint on the pieces of masking tape.


The background is a mix of Dr.Ph.Martin's Bombay India Ink, Hero Arts Ink Dauber, Ranger Distress Paint and Dylusion Ink Spray. But it was not enough for me and I made a transfer using newspaper and gel medium. For a next layer I used gel medium and The Crafter's Workshop Navaho stencil.


I added an old piece of paper with stamped birds ( Darkroom Door stamps: Carved Birds 1 ). I had made that piece a few weeks ago for another project but didn't use it. I stamped birds on Jenni Bowlin paper. The paper was already dirty from Dylusions Ink Sprays and I put some modeling paste using Dylusions stencil. I cut the paper with birds on four pieces which I sewed to my background.


Before sewing I stamped Prima Finnabair Dolly stamp and stuck the pieces with birds to the background using canvas tape. For the last touches I stamped Stampotique Originals stamp. I also used Sakura Micron pen to draw some doodles.


The second page is very similar in terms of making it. I built the same layers using the same materials and techniques. The only difference is that on my 'waste' page was a layer of gesso.


On this page a pink glitter is more visible.


I added more black paint around the page. I applied the paint using my finger.


Letters on both pages are from the Glitz Designs Raven.


Magda x