Showing posts with label Glimmer Glaze. Show all posts

21 February 2014

Robe a la Francaise - GDT Riikka Kovasin


Happy Friday! It's soon weekend! Riikka here to share with you my third and last GDT piece. Hope you have liked my creations so far!

Who am I? My name is Riikka Kovasin, I'm a Finnish mixed media style scrapbooker with a passion to have my fingers inked on weekly basis. I'm happiest when I can get messy with different paint media and create a piece of memory keeping at the same time. What a perfect combination! My blog is called Paperiliitin. Please come and say hi!


I'm more of a scrapbooker than anything else so I decided to do another layout for my last project. The spark for this layout was my a namesake of mine who asked me an advice over at Facebook for a layout she was working on. I really liked the composition she had going on there and asked her if I could do my version of the same. So here Riikka, is my take on the two photos and vertical title! 

The topic of the page is a princess dress I sewed for my 3-year-old as her birthday present. Her big sister got one just like it when she turned three so it's kind of a tradition. I used the same patterns for this dress than to the previous one, but the color is different. My older one wanted a yellow dress (her favorite color at that time) and my younger one chose turquoise (her favorite color). The dress has a flowing back piece, like the robe à la francaise has.


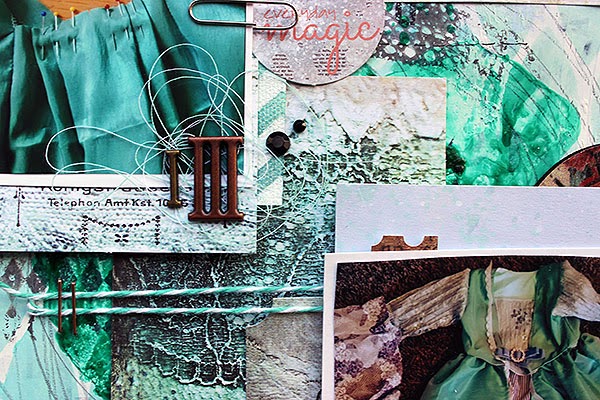
I started creating the layout by gessoing an area of the background paper where my main composition would go. Then I poured some Glimme Glaze to the paper and let it dry. After that I added some stamping, pencil doodling and inking through a TCW stencil. I also inked a piece of Prima Marketing resist canvas and used it later on in the layers behind the photos. I thought canvas and lacy details would really fit the subject of the page.

After the background was finished I then layered some patterned papers, stickers and other embellishments behind the photos. I used papers from 7 Dots Studio "9th Wave" collection as it fitted the color scheme so well. The embellishments are from that collection together with some from the "Domestic Goddess".

Thank you for taking a look - it has been a pleasure guesting here! Thank you for having me, Vicki! Hope to see you all around!


Supplies:


other: gesso, pencil, thread, twine, half pearls, stapler, correction tape

06 February 2014

Valentine's Cards - GDT Riikka Kovasin


Hello there! Riikka here with a few guest design creations - first of all these Valentine's inspired cards.

Who am I? My name is Riikka Kovasin, I'm a Finnish mixed media style scrapbooker with a passion to have my fingers inked on weekly basis. I'm happiest when I can get messy with different paint media and create a piece of memory keeping at the same time. What a perfect combination! My blog is called Paperiliitin. Please come and say hi!  


I created these four cards using the gorgeous 7 Dots Studio "Messy Head" collection. It's soft tones and pink shades are perfect for Valentine's Day themed creations! The card basis are cut from sheet of Bazzill's Card Shoppe papers.

The main pieces of the cards are cut from a 12x12" paper and then layered with pieces of other patterned papers and embellishments. All of the cards have a common background style, a piece of patterned paper stamped with Finnabair's doily stamp using Prima Chalk Edgers and Archival Inks. The other thing the cards have in common are splashes of pink Glimmer Glaze.


I used different kinds of embellishments in the cards. They all have a bit of thread underneath the embellishments, but then the different cards have different moods. I used Mechanicals in some, Prima wood icons in some and 7 Dots Studio stickers and die-cuts in others. Please see the supply list at the bottom of the post, after some of the detail shots.

Thank you for looking! 


Supplies:


other: thread, paperclips, half pearls, chipboard arrow, pencil

05 December 2013

Over planning kills magic...

Hello

Today I would like to show you another project using Tando chipboard. I used a few different mediums. It's not easy for me to tell you how I made 'step by step' this project that's why I've made a video for you.


I used:


Magda x

28 October 2013

Halloween skulls

Hello!

Few more days and children will knock to our doors screaming 'treat or trick', I hate this! But I like carving pumpkins and eating 'halloween limited edition' sweets hiding in a dark room pretending I'm not at home ;)))

I found Andy Skinner skull mask in my drawer which is perfect for this week projects. I made a page on a piece of cardboard. I will use it later for an art journal cover or for something else.


I put a layer of white gesso on the cardboard. Than I used black gesso for the skull mask. When gesso was dry I put a thin layer of gel medium where the skulls are to protect them from other mediums. I waited few minutes and used three different colour of Dylusion Ink Sprays. I like to use red, pink and turquoise which are always blend and I have few more colours on my project. I also used Ph Dr Martin's Bombay Indian Ink - orange and Tattered Angles Glimmer Glaze.


Once again I used gel medium but this time with Dylusions stencil. When each layer was dry I stamped some Stampotique stamps using Ranger Archival Ink. For last touches I used Posca White Paint Pen and white acrylic paint.

Magda x


02 September 2013

We should dance!

Hello!

Recently I was experimenting with a technique which I had shown you last time. It was a great fun and the best is...more to come! Today I have for you a quick art journal page.

As always I used a lot of different mediums for my background. Background is a mix of mists, Glimmer Glaze and inks including Ph Dr Martin's Bombay Indian Ink. I also put some modelling paste for a first layer.


I stamped Stampotique Originals stamps from a new release and Glitz Roller Doodle using Ranger Archival Ink.


 I drew blue spots using Posca Paint Pen. For last touches I used Sakura Pigma Micron Pen and black gesso.


Magda x

27 August 2013

eureka!

Hello everyone!

Today I wanted to show you my inchies but I had started making them and half way through I thought 'disaster'. I didn't like them and wanted to bin them. But I hate wasting mediums which are still wet! I printed them to a piece of white paper and shouted 'eureka!' ;) The effect was great. Usually I print only wet inks but this time I  had different mediums which gave different textures. I love playing with resin and this is very similar - you never know what you receive at the end!

I only used a few mediums but I need to try more! With gel mediums, pencils, paints etc. will be fun!

This time I used orange Bombay India Ink, turquoise Glimmer Glaze and opal Liquid Pearls
The one with spots


And the other one

Here I used two colours of Dylusions Ink Sprays, Liquid Pearls and turquoise Glimmer Glaze
Picture before printing
The effect

This is what has been left on my original piece of paper


A few more prints


Magda x

24 July 2013

repainted canvas


Hello everyone!

Today I want to show you my repainted canvas. I used an old canvas where I had glued some paper circles and thread a long time ago. Sometimes I repaint my projects because I don't like them anymore. The once I don't like are likely to be repainted.


As I have said I used an old canvas with paper circles. I used Liquitex Gel Medium to make 100% sure that the circles would be glued properly to the background. Than I put a lot of different acrylic paints to the background. In some places you can see Ranger Liquid Pearls covered by acrylic paints.


Around a few circles I applied Tattered Angels Glimmer Glaze. I also stamped Stampotique stamps using Ranger Archival Ink and in the middle of some circles I put drops of Dr.Ph.Martin's Bombay Indian Ink.


Between circles you can find dots which are made using Posca Paint Pens. The last touches – black gesso around the edges of the canvas.


Magda x

08 July 2013

Small bird

Hello everyone!

I hope you are enjoying the summer!
Today I have for you my experimental ATC. I made this project in two steps.
First I made a first layer of background using The Crafter's Workshop Balzer Designs stencil and gesso. Than I put some acrylic paint and sprayed Dylusions Spray Inks to a foil ( 12x12 papers package ) and printed colours to a piece of paper ( to my dry gesso). You can see how fab textures are!


After this stage I put on my ATC...
- Dr Ph Martin's Bombay India Ink
- Tattered Angels Glimmer Glaze
- Claudine Hellmuth black gesso
- Posca Pen - white
- Ranger Liquid Pearls
- sticky-back canvas
- Stampotique stamps
- Ranger Archival Ink Jet Black

...and received this effect


Magda x

27 May 2013

Beauty&Silence


Hello!

Today I have for you two ATCs. I love this small form and after a few months break I am back to make them.

There is not a lot to say about these ATCs because I can't tell you what I used first and what second. There are a lot of different product and one of my favourite is glue+paint technique.


I used an old envelope for a background. I sprayed some Dylusions Spray Inks using Donna Downey Studios stencil and The Crafter's Workshop Balzer Designs stencil. I glued some pieces of paper including Bazzill Basics Paper – Antique Newsprint and Tim Holts Tissue Paper.


I stamped some Stampotique stamps and Glitz Roller Doodles using Ranger Archival Ink Jet Black. I also used Ranger Liquid Pearls – white dots, Tattered Angels Glimmer Glaze – for turquoise dots and Dr.Ph.Martin's Bombay India Ink – orange dots and circles. At the edges of my ATCs I put a black gesso from Claudine Hellmuth.

ATCs are a great fun and you can swap them with people around the world!

Magda x

24 May 2013

Experimenting tag


Hello!

Today I will show you a very easy tag, my small experiment. This time I wanted to try some products on my tag, especially white pens and Derwent pencils. I wanted to see how they cover a brown tag and what differences are between them.


As a background I used Ranger Tags - Kraft. I glued a piece of Glitz Design paper using it for a hill. I draw houses ( I will tell you about this in a moment ) and for roofs I used Bazzill Basics Paper – Antique Newsprint.

The left house I draw using Montana Acrylic Marker. As you can see white is bright and you can see it very clearly. For the right house I used a Posca Pen. The tag is absorbing the colour from a pen. I drew lines twice to achieved this effect. If you use dots to draw the line the effect will be better. For the fence between houses I used Sakura white pen.


First time I used Derwent Graphitint and I love it! It's a great pencil. I drew clouds using White (24) Derwent Graphitint and trees using Storm (18) Derwent Graphitint. For drawing leaves I used Tattered Angels Glimmer Glaze. This Glimmer is turquoise (All That Jazz) but the background is brown, so the colour of medium has changed.

For the windows and other blue details I used Light Blue Posca Paint Pen. It's really great, very bright colour.

I love all these products!

Magda x

24 April 2013

Inky Pinky


Hello!
Today I would like to show you my tag. It's a large size of #10 Manila tag by Ranger. It's a project with a few layers. It looks complicated but it isn't and the best – there are no rules! I used a lot of stuff and really don't remember what I used. Unfortunately my hubby didn't come to my studio (yet) and didn't 'steal' my project (as usual).


For the first layer I used: masking tape, white paint, Bazzill Basics Paper – Antique Newsprint and Glitz Design Yours Truly paper.
For the next layer I used: Dylusions Ink Sprays, paints and a black gesso from Claudine Hellmuth. For the third layer I used: Tim Holts Tissue Paper and Stampotique stamps. I also used Glitz Roller Doodles.

The fourth layer: white paint+glue, thread, tissue paper and Tattered Angels Glimmer Glaze. Almost there!

Magda x

08 April 2013

Man in Black


Hello everyone!

Man in black...Maybe a man's skull maybe not, we should ask Andy Skinner ;)
I'm not a skull person, it was a challenge for me! I always have problem how to use skull mask/stamps/or whatever but I like Andy Skinner's mask and wanted to try it.

I decided I would stick with a tag. Not a big form of expression if something will go wrong I can tell - this is how I wanted. Easy peasy... Of course I wanted to use my Glitz Roller Doodles not in a straight line ;) Never mind.


On my Ranger tag ( I love it! ) I glued pieces of Bazzill Antique Book Paper and an old brown envelope. I added some masking tape pieces and more pieces of Bazzill Basics Paper. Than I paint it using white paint. After few minutes when the paint was dry I sprayed Tattered Angels Chalkboard.

And than...if you haven't got a black gesso from Claudine Hellmuth – buy one! First time I had it in my hands and I fell in love. I use it for my skull – a mask from Andy Skinner. After that I added some drops of Glimmer Glaze and splashes of orange Dr Ph. Martin's Bombay India Ink.

And the best thing...my POSCA marker...it's amazing! I draw a few spots and than I used it for Stampotique stamps. For the last touches I drew a few lines using Glossy Accents.

Magda x

20 March 2013

travel - art journal


Hello everyone!

Today I would like to show you a page from my travel art journal. Last year I had an opportunity to go to Ireland to meet some crafty friends. I had a lovely time! Some of photos I put to my art journal to remember this trip.


I sprayed Dylusions Ink Sprays to a yellow piece of paper which I had prepared some time ago. I used Crafter's Workshop Balzer Designs stencil and Prima Donna Downey mask – I love them! Than I stamped some Stampotique stamps using Archival Ink Jet Black.
Because the picture is without Dublin buildings or famous places and my memory is not so good to remember where the picture was taken, I wrote 'Dublin' using Jenni Bowlin Grey Skinny Alphas. Than I added a few drops of Glimmer Glaze and I used a black marker to add some doodling.

Magda x

05 March 2013

Canvas Atc's.. by Gez


For sooooooo long....... I have wanted to try out the Sticky-Back Canvas Atc's by Claudine Hellmuth and I am excited to share my results with you! I wanted to throw lots of different products at these to see how they reacted.

I used the white sticky back canvas atc's and cut some plain white card for the reverse sides.. slightly smaller than the canvas.. stuck one to the other and set about fraying the edges!


 I used Distress Ink pads on the first atc and applied them with a piece of Cut n Dry foam for the background. Adding some flicks from a bottle of Paradise Pink, Tattered Angels, Glimmer Glaze (it comes with it's own brush!)


The main image is a Resist Canvas Bird by Prima.. coloured with Distress Stains in Dusty Concord & Broken China.. gotta LOVE those colours together!

This little birdie is merrily singing soooo he just had to stand on a scrap of music paper!! The word is computer generated and I think you can just see on the photograph in the background some silver acrylic circles using the paint and the lid from a bottle of Ranger's metallic paint dabber. The gorgeous little gems are by Prima (505506) Say It In Crystals

Success! I love how this Atc turned out!

    ~♥♥~

The background for the 2nd atc was created using Dylusions Ink Sprays straight from the bottle onto the canvas.. with more blobs of the Paradise Pink Glimmer Glaze.. and silver acrylic circles..


More music paper used for the flower, and gems along with another computer generated word.. I wanted all my Atc's to tie in together as a set.. same but different.. if you know what I mean!!

 ~♥♥~

I think I saved my favourite atc until the last to show you.. I had a mini brainwave amidst the chaos going on in my head! What if... I could decant some of my lovely Dr Ph Martin's Bombay Indian Inks into some of the little Mini Mister bottles with some water.... YES! It worked lovely for the background!!

Before I misted the background.. I stamped a text stamp using gel medium onto the canvas... and QUICKLY, cleaned the stamp!


I have to admit to being a little impatient waiting for the gel medium to dry & used the heat gun! Becareful, if you don't any bubbling, let it dry naturally!

    
 Time for some spraying.. (and inky fingers!)
                    

More flicking with the Glimmer Glaze! Gems & stamped circles using Jet Black Archival Ink

The heart was cut from some plain white cardstock and covered with Washi Tape and mounted onto 3D foam pads.

PHEW! Hope you are all still awake!!!

Thanks for calling today. Gez oxox

 ~♥~