Hello!
So.. where were we? oh yes, Inktense pencils!
Yesterday I went on a bit about these, letting you all know just how much I like them!
I thought I would give you a little 'how to' on the shades of Inktense I used to colour the face on the whimsy girl in today's project.... but first, here she is in her finished state!
My usual skin tones are a bit paler and more 'burn the second you see the sun' , but I really like changing things up sometimes! So.... lets begin!
Obviously we need to sketch out our girl first! As we're using watersoluble pencils, we will be using water.... :) So, you will need to work on watercolour paper or card. As there are so many brands out there, I would recommend trying a few to see which you like best? My 'big' tip is to work on HOT press paper, as it's smoother than cold press. Unless you want a more textured look, of course!
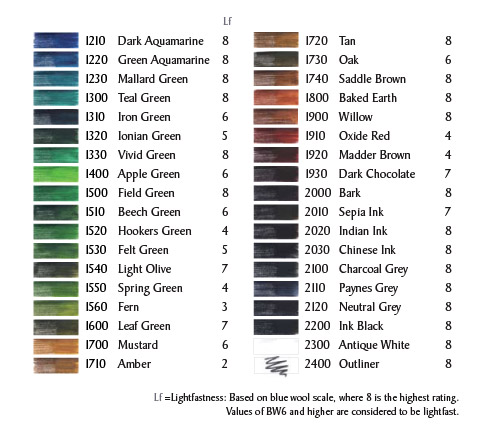
The first colour used is baked earth...
As you can see, I coloured a line all around the edge of the face, adding a little extra around the cheekbones and above the eye sockets. Next, take a waterbrush or wet paintbrush, and go over the whole face, moving the colour released once the pencil is wet into the centre...
The idea is that the most intense colour is around the edges, getting paler towards the middle around the nose and between the eyes. I dry this off with a heat gun before going in with the next colour.
Which is...... Willow.
A darker shade, do the same as you did with the baked earth, but less of it! Again, use the waterbrush to dissolve the pigment and blend it..
This looks quite dark, once the hair in in place the dark shadow around the hairline will make more sense!
The third colour is Fuschia. It looks a bit dark when you draw it on...
But it will be very pink once the water is added! Use a little under the eyes/on the top of the cheekbones, and a little more over the outside edge of the eyes. Blend using your waterbrush, make sure there are no harsh pink lines anywhere!
The next addition seems to bring the whole thing together...
A touch of white in a rough triangular shape works wonders! Start at the tip of the nose, and work upwards and outwards to a wider area on the forehead...
Eyes next... I chose blue. Draw a thick line around the pupil...
The water will spread the colour throughout the iris, giving a shaded effect...
You may notice I've also added a dot of pink in the corners of the eyes too! The lips were coloured with red pencil, then I used a couple of 'non Inktense' products! Black fineliner pen for the pupils, and to outline the top of each eye, and a white paint pen to add in the tiny highlight dots...
She still looks a bit odd with no hair as the shading doesn't really work.... it looks better when hair is coloured in!
The background was kept very simple, just a wash of blue and some music paper stars..
Her dress was red pencil, with white dots...
Fingers crossed that was a little bit helpful?!
Don't forget, to be in with a chance at winning the mixed media bundle up for grabs, you need to leave a comment on the posts of all 12 designers during this whole extravaganza! I'm designer number 5... so go back and add any you may have missed!
We will be back tomorrow with another spotlight on an exciting brand!
Have a great day,
Trish xxxxx