Showing posts with label Liquitex. Show all posts

09 February 2015

Charade....

Hello!
Right...take a deep breath and be brave! (that's me talking to myself btw.....but if it applies to you as well this morning, consider yourself told!)

Today I'm sharing a first for me.... I made a video tutorial! (well, I made three, but more about that in a minute!)
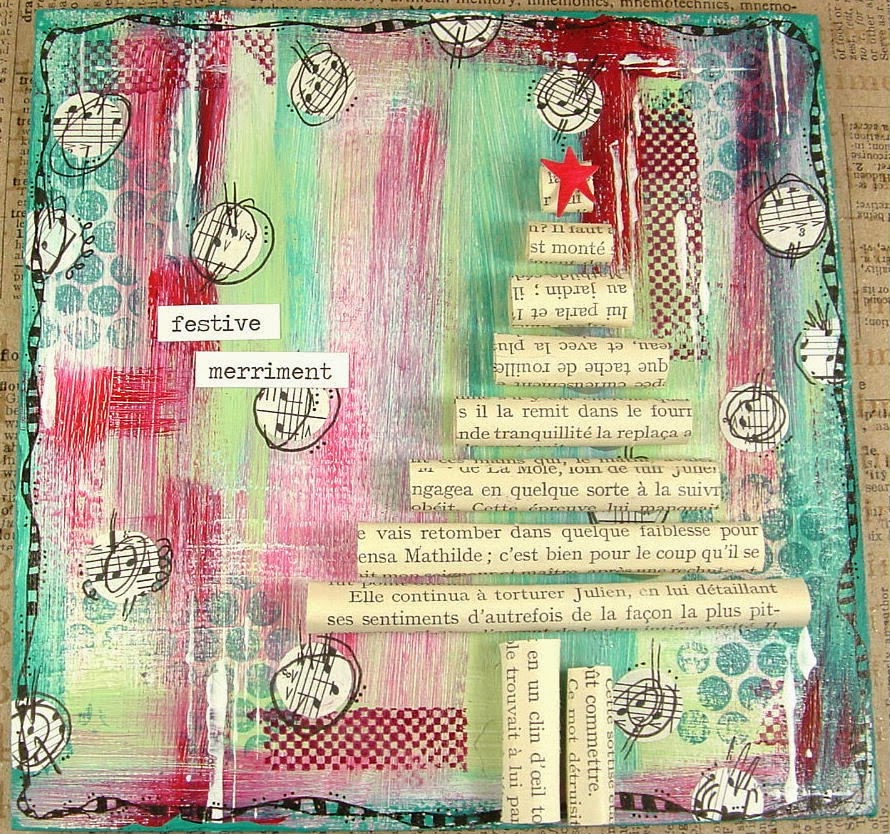
I created this page using loads of colourful paints... with a few background stamps thrown in too...

Lots and lots of layers...

and a quirky figure too!

I videoed the entire process, and then split it up into three separate tutorials. The smeared paint background, the secondary layers (stencilling/stamping etc), and lastly adding in the figure.
The whole process lasts less than an hour, but it's much more accessible in three 'chunks!'

The first video is below...the other two can be found today over on my blog HERE, or you can watch them all via Vimeo (just search for Trish Latimer!)
I really hope you like them...


01 December 2014

12 Designers of Christmas : Day One: WELCOME!

HELLO!
It's December 1st...so that means.....drum roll...... the start of our 
HUGE,
 MASSIVE, 
GINORMOUS,

 12 Designers at Christmas blog extravaganza!

Right up until Christmas Eve, we will be featuring a fabulous project by a guest designer, or showcasing an exciting big Brand every single day! Yep, you read that right.. 
Every. Single. Day!
So, bookmark the blog and check back often, we have loads to share in the run up to Christmas 2014!

Right..best get on with it then.....

I've drawn the short straw (!!) and I'm up first! Now, I need you to be gentle with me today, this is the first time I've shared one of my 'people' with the world. Up until now they have been creations for my eyes only, but I thought I should get a grip and show you lot as well! Here is my Sprinkle Fairy...
 My background is a simple painty creation. I gessoed my cardboard base, then whilst it was still wet, smeared on some blue and green. More gesso stencilling, and printed on gesso dots for snowflakes. I used a Posca paint pen to draw on some flakes too!
Then, on to the figure. Sketched out roughly, then coloured with a mixture of Neocolours, paint and watercolour pencils. A little fineliner black pen to highlight a few details, and my Sprinkle fairy was born....

ASOI products used:

And now the exciting bit! As well as our 12 designers, we will be showcasing 12 brands this December too. We have a large prize box all ready and waiting, containing one product from EACH of those 12 showcased brands! To win this box of fabulousness, all you need to do is leave a comment on EACH of the blog posts of our 12 designers. My blog post today is the first, you'll need to comment on the post of each of the eleven designers that will be coming along every other day until the 23rd. The posts will be open for comments right until the end of the month, then a name will be randomly chosen and announced as the winner on 12th Night (6th January)

So.....we're up and running! Don't forget to check back tomorrow to see which big brand is being showcased!
Have a fabulous week!
Love, Trish
 xxxxxxxx


25 September 2014

Stuffed Heart!

Hello!
You may have noticed the heart I created as a sample for the Colour Challenge....
(You didn't??? All the challenge details are HERE!)
Today I thought I would share how I created it!
Finished heart looks like this:

This is a nice and simple way of creating some unique home decor items!
Sketch out a shape on some fabric, then sew around your shape, leaving a gap for stuffing. Add your filling...
I had run out of wadding, so I used dried out baby wipes to stuff the heart! Waste not, want not and all that!
Sew up the gap once your shape is stuffed...
Now, I wanted to paint my stripes straight onto the heart, but as fabric is porous, the paint will bleed out slightly, leaving a blurred edge. I would recommend giving any home decor fabric piece a good coat of gesso before you paint on to it, that way you have a good surface on which to add your painty detail...
Once the gesso was dry, I painted on my stripes..
Yes they are wonky on purpose!
I thought it needed a few extra doodled details...
The embellishment is a chipboard circle, a button, a punched out heart and some dots!
A hole in the top bit is perfect for threading ribbon through, so your heart can be hung up!
I love making these, great for Christmas decorations too!
Have a lovely Thursday!
Trish xxxxxxx


11 January 2014

Stargazing Hares...

Hello!
More paint from me today, but this time combined with a little 3D assemblage...and the use of a niche..
I started off with a box canvas, then flipped it over to use the back! The back of a canvas has a perfect niche, although different sizes and brands of canvases will be put together differently, and so have niches of varying shapes and sizes! The back of this canvas also had the very ugly 'fold the canvas sheet over and use a million staples to secure it' thing going on....not ideal! A great way of disguising this is to spread a layer of texture paste over it. I blasted the texture paste with a heat gun just to give the surface a bit of a 'skin', and then pressed bottle tops and sequin waste into it. This gives nice texture, as you can see...
I used loads of different coloured paint, simply smearing a layer on, then drying and going in with a different colour. I also stamped some dots onto tissue paper, and used Mod Podge to adhere it in places. Once dry, the Mod Podge is transparent and the dots look like they were stamped straight onto the background...
The fabulous hares (Crafty Individuals), were stamped onto scraps of blue painted card, then cut out. I stamped the head parts onto yellow painted card, cut out the crowns and added them to the blue hares. I covered them in Glossy Accents to give a 3D shine. Once dry, they were placed on a bed of thin, curled and twisted green cardstock.
My stars are suspended from a curve of wire...
I took three strands of wire, and twisted a little extra wire around the three strands to hold them together. I painted and then glued three stars onto the ends. The wires were then glued onto the side of the canvas.
I added two spools to the bottom...
And some cut up letters to form the word...
I had fun playing with niches again...I have a feeling I may be making some more soon!
Have a great weekend,
Trish xxx


09 December 2013

Festive Merriment!

Hello!
I have a Christmassy painty panel to share today.....
Do you remember a hanging 'thing' I showed you way back in the middle of September?
This one....
Well, it's hanging on my wall, and as I was just daydreaming into space, it suddenly occurred to me that if the rolls of paper were trimmed, it could be Christmas tree shaped! So, the idea for my panel was born!!!!
I used a chipboard sheet as my base, and Claudine Hellmuth paints as my colour (Classic Teal, Landscape Green and Dash of Red). The paints were simply  brushed messily and quickly over a layer of ( still wet) white. This way, a little colour blending occurred here and there. Once the paint was dry, I did a little stamping using Archival Ink...
Prima dots and checkerboard designs. Red and teal ink to complement the paint colours! I then punched out some circles from text paper, then glued them on with matt gel medium. A little medium both under and over the paper makes sure no edges will lift up, and the 'matt' finish means you won't see the glue at all!
Once the gel medium was dry I started with the doodling. Around the circles and a border around the edge.....
The tree was then constructed from rolled up French text paper...
A punched star to adorn the top...
(and at this point I realise some of the text is upside down!!! oops!)
So, this goes to prove you can carry on with all the messy paintyness, and still turn it into a Christmas themed make!!!
Have a great week everyone!
Trish xxx


13 November 2013

Dance.Love.Sing.Live

Hello!

Today I would like to show you how I have made my tag. The weather is dull that's why I used a lot of bright colours!

I used Ranger tag Manila for a background. I put some gesso using painting knife. Firstly I put a smooth layer and than moving painting knife up and down (movement a little like beating eggs ;)) I received great texture (you can see in picture 2).


I sprayed Dylusions Ink Sprays - Bubblegum Pink and Vibrant Turquoise. I like them because they are mixed together nicely. I have only 3 colours of them but I can received much more. Mixing pink and turquoise gave me violet.


I cut some hearts ( if you have a puncher it will be much quicker ) from Glitz Yours Truly paper and used a gel medium to glue them.


For more texture I used Andy Skinner stencil. I didn't use all the skull only a part of it.


Once again I used gel medium, this time using Dylusions stencil. Before it I added more gesso & inks.


I added white glitter...


...and eyelets.


Here is a result...


Magda

05 October 2013

Texture and stencils

I lurve stencils and it's a little bit obscene how many I have. I also love to mix up what I put through my stencils so I wanted to show you here just a few of the ways I use them on these two 4 x 4 inch panels.


My base was the obvious Dylusions inks sprayed through Dylusions letter jumble stencil and checkered spots.  I then used gesso to add more letters (I used my finger to spread the gesso - messy). 


The die cut circles are cut from another piece of
 watercolour paper also sprayed and stencilled. 

Here I've put texture paste through a Balzar Designs Punchinella stencil then when that was dry I went over the top with more paste and the Letter jumble stencil. To pick out the detail I skimmed over the top with a lime Pie fluid edger ink pad by Prima


 I put more texture paste through the Punchinella stencil and when that was dry I put the stencil back over the top and added Rock Candy Distress Crackle paint to it. 


This is just the crackle paint with the Punchinella stencil.


Here I've added Claudine Hellmuth Teal Studio paint to the texture paste and used the edge of the Letter Jumble stencil. I love the colour of the texture paste it didn't water down the paint colour at all and I mixed it one to one.


Here you can just about see the original gesso stencilling underneath.


This is the finished card. At the last minute I used a pen to scribble through the Punchinella circles too just because I could.


I hope I've inspired you to get out the stencils and see what you can put through them. Why not try a 4X4 size, it's less intimidating than a full sized journal page and a great size to experiment on.

Jaine x