Showing posts with label canvas. Show all posts

20 September 2014

Butterfly Doll

Hello!
When is an Art Doll not an Art Doll?..... um.... when it's a butterfly attached to a canvas on legs?!
My project today is a variation on a theme...yes it's a doll, but this one isn't a free standing piece by itself, it's an embellishment..

I'll show you how I made her...
The three main bits are made from clay. As I wanted holes through them, I poked a bit of wire through in the appropriate places! 
The clay then got painted and stamped a little...
The easiest way to get a detailed design on a curved surface is to use stamped tissue paper. I stamped everything, then made sure the ink was dry...
(I stamped two faces as I wasn't sure at this point which one I was going to use!)
The stamped images were then cut out and glued onto the clay using Mod Podge..
It's really useful having holes in the clay, as the wire can be pushed through again and rested on something whilst the Mod Podge dries!
Once the Mod Podge has dried, we can start to assemble the doll.
You'll need lots of craft wire for this! Cut two pieces, then thread both through the horizontal hole...
Make spirals at the ends of the wire (you can always fiddle about at the end and make these smaller or larger if you need to)
 Next, make a loop at one end of a long strand...
Thread on the large 'body'..
Thread on the 'head'
Tightly coil the remaining wire around and around the top of the head, both creating a design feature and securing the head and body of your doll...
I wrapped more wire around her neck...
Now, adding on the 'bead' at the bottom requires a bit of jewellery making technique... but really, just practice making loops and wrapping wire around things. We're not making jewellery, so it doesn't matter if it's not perfect!
Thread a bit of wire through the hole in the bead, and bend like so...
Make sure one 'tail' is a lot longer than the other at this point. Make a loop with the shorter tail, and join it onto the loop under the body...
Wrap both ends loads of times around the wire and the top of the bead. Messy is good!
Now for the wings! Stamp the Stampotique wings twice, once onto acetate, and once onto painted cardstock...
Cut out, bend the acetate then glue together....
Once the glue is dry, glue on the clay body...
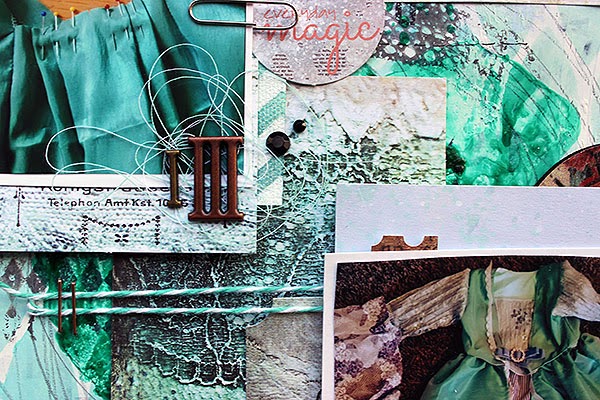
Now the butterfly doll is finished, it can be attached to whatever you fancy!
I painted a canvas, stamped it with dots (Darkroom Door) and glued the doll to the front..
The doll gives a fabulous 3D look to your work..
I used painted spools as legs..
and added thick wire as a hanger. More thin craft wire was wrapped around to echo the wire elsewhere on the piece, and a cut out word added...


Phew...! Hope you like her!
Trish xxxx


21 February 2014

Robe a la Francaise - GDT Riikka Kovasin


Happy Friday! It's soon weekend! Riikka here to share with you my third and last GDT piece. Hope you have liked my creations so far!

Who am I? My name is Riikka Kovasin, I'm a Finnish mixed media style scrapbooker with a passion to have my fingers inked on weekly basis. I'm happiest when I can get messy with different paint media and create a piece of memory keeping at the same time. What a perfect combination! My blog is called Paperiliitin. Please come and say hi!


I'm more of a scrapbooker than anything else so I decided to do another layout for my last project. The spark for this layout was my a namesake of mine who asked me an advice over at Facebook for a layout she was working on. I really liked the composition she had going on there and asked her if I could do my version of the same. So here Riikka, is my take on the two photos and vertical title! 

The topic of the page is a princess dress I sewed for my 3-year-old as her birthday present. Her big sister got one just like it when she turned three so it's kind of a tradition. I used the same patterns for this dress than to the previous one, but the color is different. My older one wanted a yellow dress (her favorite color at that time) and my younger one chose turquoise (her favorite color). The dress has a flowing back piece, like the robe à la francaise has.


I started creating the layout by gessoing an area of the background paper where my main composition would go. Then I poured some Glimme Glaze to the paper and let it dry. After that I added some stamping, pencil doodling and inking through a TCW stencil. I also inked a piece of Prima Marketing resist canvas and used it later on in the layers behind the photos. I thought canvas and lacy details would really fit the subject of the page.

After the background was finished I then layered some patterned papers, stickers and other embellishments behind the photos. I used papers from 7 Dots Studio "9th Wave" collection as it fitted the color scheme so well. The embellishments are from that collection together with some from the "Domestic Goddess".

Thank you for taking a look - it has been a pleasure guesting here! Thank you for having me, Vicki! Hope to see you all around!


Supplies:


other: gesso, pencil, thread, twine, half pearls, stapler, correction tape

11 January 2014

Stargazing Hares...

Hello!
More paint from me today, but this time combined with a little 3D assemblage...and the use of a niche..
I started off with a box canvas, then flipped it over to use the back! The back of a canvas has a perfect niche, although different sizes and brands of canvases will be put together differently, and so have niches of varying shapes and sizes! The back of this canvas also had the very ugly 'fold the canvas sheet over and use a million staples to secure it' thing going on....not ideal! A great way of disguising this is to spread a layer of texture paste over it. I blasted the texture paste with a heat gun just to give the surface a bit of a 'skin', and then pressed bottle tops and sequin waste into it. This gives nice texture, as you can see...
I used loads of different coloured paint, simply smearing a layer on, then drying and going in with a different colour. I also stamped some dots onto tissue paper, and used Mod Podge to adhere it in places. Once dry, the Mod Podge is transparent and the dots look like they were stamped straight onto the background...
The fabulous hares (Crafty Individuals), were stamped onto scraps of blue painted card, then cut out. I stamped the head parts onto yellow painted card, cut out the crowns and added them to the blue hares. I covered them in Glossy Accents to give a 3D shine. Once dry, they were placed on a bed of thin, curled and twisted green cardstock.
My stars are suspended from a curve of wire...
I took three strands of wire, and twisted a little extra wire around the three strands to hold them together. I painted and then glued three stars onto the ends. The wires were then glued onto the side of the canvas.
I added two spools to the bottom...
And some cut up letters to form the word...
I had fun playing with niches again...I have a feeling I may be making some more soon!
Have a great weekend,
Trish xxx


25 August 2013

It's my job.....

Hello!
A 5" by 5" box canvas to share today....lots of paint and a different colour palette from me....
A bit more 'earthy' in terms of colour, browns, olives and a touch of claret and gold!
Lots of smeary paint layers....
A little texture..
And lots of stamping!
Don't forget to do the edges..
And to colour your figure to match your painty scheme....
Have a great day!
Trish xxx


24 July 2013

repainted canvas


Hello everyone!

Today I want to show you my repainted canvas. I used an old canvas where I had glued some paper circles and thread a long time ago. Sometimes I repaint my projects because I don't like them anymore. The once I don't like are likely to be repainted.


As I have said I used an old canvas with paper circles. I used Liquitex Gel Medium to make 100% sure that the circles would be glued properly to the background. Than I put a lot of different acrylic paints to the background. In some places you can see Ranger Liquid Pearls covered by acrylic paints.


Around a few circles I applied Tattered Angels Glimmer Glaze. I also stamped Stampotique stamps using Ranger Archival Ink and in the middle of some circles I put drops of Dr.Ph.Martin's Bombay Indian Ink.


Between circles you can find dots which are made using Posca Paint Pens. The last touches – black gesso around the edges of the canvas.


Magda x