28 July 2015

You brighten my day!

Hello!
A little panel from me today... packaging materials giving nice texture!


The cardboard looked particularly  ridged for some reason, which is great...


I used paint as usual on the base, smearing colour along with white to give a blended look.

The flower was created from stamped images, a heart for the flower head, and a curl for the stem. Both are Stampotique..


The words are from the new stamp set I told you about last time, the Hero Arts one with the die included..


I did a little doodling to finish..


Have a fabulous day!
Trish xxx


27 July 2015

DT CALL!

DT CALL NOW CLOSED! THANK YOU TO ALL THAT APPLIED.

DT CALL!

Are you a scrapbooker, journaller or mixed media artist? 
Do you love creating with papers, playing with paint or getting messy with inks and mediums?
Yes? Then this is the team for you!

We are looking for a dedicated team of crafters who reside within the EU, who will share their amazing creations twice a month on our blog and over social media, using product that can be found in the shop over at A Sprinkle Of Imagination. The DT term will be six months long, from September 2015 until the end of February 2016.

In return, we will:
*Promote YOU and your blog on social media
* Give you a £15 ASOI voucher bi-monthly, to spend on supplies for your projects!

 DT members are also entitled to a 10% discount on any regular order they make from ASOI during their DT term.

 Sounds good? We would love for you to join us!
To apply:
Email 3 pictures to us, showing off work that you consider to be typical of your own style, plus links to your blog and any other social media platforms you use when sharing your work.
Email us a short bio, letting us know your style and favourite media to use when crafting.
Please email everything to:
 ASOI.dtcall@outlook.com
 making sure you include 'DT Call' in the subject line.
The DT Call will be open until AUGUST 15TH, and we will notify successful applicants by Tuesday 18th August.

Good Luck!

Best Friends Layout - 7 Dots Studio

Hello

Georgie here :)

Another layout to share using 7 Dots Studio Cold Country papers! :)


Then some yummy Copper Crackle Paint from Finnabair though The Crafters Workshop Harlequin stencil. Had to be patient here - not my strongest point with art - but it crackles far better when left to dry naturally. 


Then some 7 Dots Cold Country 6 x 6 paper cut and ripped in to strips and layered using pop dots.

7 Dots Cold Country and Illumination Word Stickers around the edges.

Buttons!! Yes - lots of buttons from my large stash and used them to peep out from the layers. To allow them to blend in I mixed Finnabairs Mica Powder in Rust with Art Basics Clear Gesso and swiped some colour over. After that, more playing with Finn products, I went in with her Mulberry Mica Flakes and Copper Micro Beads on top of Art Basics 3D Matte Gel.


The title for the page Happiness, because my pups are happiest when they are together, is from Prima's Junkyard Findings.

Oh, and can't forget some fabulous Derwent Intense pencils - oh.. my.. gosh.. overtime I use them I swear I fall more in love, they are just beautiful to use. Colouring like pencil but as soon you blend with water it's like silk... I swear!! I sound lovey-dovey but, yep, they have in me their thrall :)


That's it for me, have a lovely start to the week my lovely happy crafty people ;) 

Hugs
Georgie 

25 July 2015

Back to the small journal.


I'm back creating in my hand made 15 x 15cm journal for this piece. I find the size so much easier to work on sometimes plus I found my small Crafters Workshop Stencils were just the right fit on the page.


The colours I've chosen for my background are not ones I'd normally reach for but I'm trying out my Dylusions paint and loving the vibrancy of colours.

For my background here I used a brayer to cover the page with this London Blue. The blue was so bright I thought why not add some red on there and see what it looks like so I did another thing I don't normally do and  used the stencil like a stamp. I just brayered the Postbox red onto the stencil and printed it down onto the page intead. What I ended up with was not only the negative but a much more distressed and grungy finish like I'd just sanded some of it back. 


This piece of doily has been in my stash for ages now and tearing it apart seemed like the most natural thing to do with it.


To finish it off I cut the word Courage from a piece of silver Foil card stock by Ranger and added a circle of Prima's wire thread. I raised the word up on foam pads to give it more depth.


See you soon

Jaine x

23 July 2015

Guest Designer (part 2!) : Katy Leitch

Hello!
We have another wonderful project to share with you all today by our July Guest Designer:

Katy Leitch
So without further ado..... over to Katy!

Tea is Good for the Soul by Katy Leitch


Hello again everyone – good to be back! For today’s post I’ve been at those lush Finnabair stamps again! I was in a bit of a quandary about what to do for this guest appearance – I knew I wanted to work with these stamps but also wanted to create something a little bit different with them. I came up with this journal page celebrating that most humble but most comforting of British traditions – a cup of tea.
Looking in my drawers it struck me that the beautiful coloured Archival Inks are something (I think) people don’t use enough when they are creating. So I challenged myself to use only these inks and some stamps. I also decided to dig into my scrapbooking embellishments as they are not something usually used on journal pages. The result is bright and fresh and it makes me happy – I hope it makes you smile too!

Here’s a brief how-to for my journal page:

1 To create the teacups, swipe coated cardstock with Archival Ink (Rose Madder, Viridian, Chrome Yellow). Quickly rub each colour as you apply it with a clean cloth to get a nice smooth effect. Dry and over-stamp with the teacup image in Jet Black Archival. Create the heart in the same way. Stamp the spoon onto uncoloured card.
2 Stamp some of the circle images with the same Archival Inks. Stamp the words using a mix of the Finnabair phrases and an alphabet stamp set.
3 For the tag, stamp the cloth background in Cornflower Blue Archival and the lines in Watering Can – use the second impression for the grey ink to get a lighter colour. Work out where you’d like the tag on your journal page and stamp the cloth image again across the background so it will line up with the stamping on the tag.
4 Background stamp lightly around the edges with the Finnabair Peeled Paint clear stamp and black Archival Ink. Embellish the tag with baker’s twine and layer all the elements as shown, using a teabag tag and flair button to add further embellishment.

So that’s me done and dusted – off for a cuppa!
Katy x


Thanks Katy... I love how you've used the Finnabair stamps for this project, most of the time these are used in grungy creations so it's lovely to see something so bright and happy!


Materials available from A Sprinkle of Imagination:
Finnabair Prima stamps: Tea on the Deck; Trust the Magic; Now is the Right Time
Archival Ink: Cornflower Blue; Rose Madder; Chrome Yellow; Viridian; Jet Black; Watering Can

22 July 2015

My little treasure casket.

Hi my friends!
How are you today?  We're in the middle of July and it is so hot on the street!!! Here in Valencia, Castellón (Spain), the temperature of water in the sea is +37 ° degrees! The truth is that you don't feel like going out, with air conditioning is fine inside :)) And what can be done at home meanwhile? Correct! Making scrapbook! :)
So I have prepared a  treasure casket for a little Princess :) Made in Shabby Chic style, with much glitter and flowers. This project is for A Sprinkle Of Imagination, an online store where you can buy everything you need for your Mixed Media projects.
  The top is decorated with beautiful Chipboard & Paper, all are in blue tones, very fresh and romantic :)  Different flowers serve as embellishment.
 The brightness above the flowers has been applying the Finnabair Art Ingredients Art Sugar with Finnabair Art Basics: Soft Matte Gel . I love this effect!

A Metal Charm, the  key adds a Shabby effect and underlines the significance of the functionality of the box, which is to save the Princess treasures :)


 I love this column, Resin Embellishment from Prima Marketing, it is so elegant, does'n it?


 To create the texture with Finnabair Art Basics: Modeling Paste and Buckground stencils, previously hitting a white Ribbons & Trims.
Golden Fluid Acrylics  paints and Crackle Paint, Liquitex white Gesso, Prima Color Bloom Sprays, are some of the materials that I used to get this relief. The blue middle perls give it a special touches and the estamping with Tim Holtz Distress Ink Pads creates a little more contrast. 

 Well, it is all for now. I hope you liked it and I will wait impatiently your valuable comments. A very big kiss. See you soon!
xxx

20 July 2015

A little triptych

Back in the day shall we say, I created a few triptyches (that's so difficult to say) and I'd forgotten how much fun they were.

I decided to recreate that amusement with a quirky and colourful triptych for this months challenge.


I started out with three chipboard pieces from Tando which were in my stash. I didn't have three the same size but in the end I don't think that really matters. I painted the background with Dylusions paints in Turquoise and cut grass, using a foam roller to blend the paint. I used the same paint colours to stencil through Tim Holtz layering stencils which just helped to add some depth to the background.


The adorable fishes are Dylusions stamps and I used Derwent Inktense pencils to colour them in.


To really make their little eyes pop, I added a dot of enamel accents in the centre. I loved the look of the dots so much I used the white one to add the bubbles here and there.


If you fancy joining in the challenge this month just go to the challenge page here and link up to the linky gallery.

Jaine

18 July 2015

Quirky Dylusional Character !!!

Morning everyone, Tracy here with today's post....

I've been playing around a lot lately with the new dylusions paints and I have to say I have really fallen in love with them. The colours are fabulous and they dry super quickly (which is good for me as I'm so impatient when I'm creating !!!)

I love all the quirky character stamps out on the market at the moment but unfortunately they are never big enough for me. I like to work in my large dylusions journal and I want my characters to fill the pages so I decided to create my own......


I started by painting the background with the dylusions paint in turquoise and red. I always use Dina's brushes when painting and they are perfect for the dylusions paint as well. I used some of Dyan's stamps with black archival ink and stencils with white dylusions paint to add interest to the background. 


Once the background was dry I sketched a basic outline of my character and then filled in the outline with Dina's White gesso to give a good base for the drawing. 


Then it was on to the best bit of actually creating my character. I took a mix of inspirations from the Internet, cobbled them together to bring her to life. I did some very basic face shading using dylusions pink, orange, red and white, with the gorgeous turquoise (my favourite) for the eyes, and black for the hair. 


The dress was painted in dylusions yellow and then once dry I went around all of the outlines with a black waterproof pen in a scratchy scribbly style. I love my newly created character and at approx 11 inches high she is the perfect size for my page. 

Thank you for stopping by

Bright and painty hugs
Tracy
Xx

16 July 2015

Dylusions offer!


Look at that!  The sun is out!! 
 (fingers... and toes crossed it stays for a while)

To celebrate, we bring you Dylusions stamps sets at 30% - 40% off! 
The offer ends on Monday 20th July 2015.

No fancy codes needed, prices are already reduced
on the website so go grab yourself a bargain. 

Happy Creating!

Vicki 

14 July 2015

Monthly challenge winner


Thank you so much once again for the response to the monthly challenge, I'm so sorry for leaving it so long to post the winner but we've had a look at all of your entries and chosen a winner who for the month of June is:

No. 11 Pamellia

Well done Pamellia. You can visit the blog My Little Crafty Things here. 

Send a mail via the link and say you're the winner from the June challenge to claim your prize.

A new challenge will be out tomorrow.


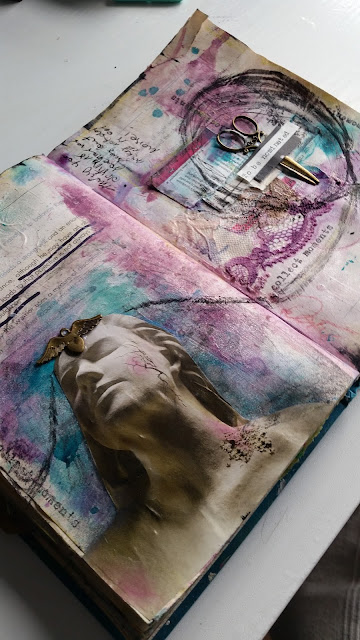
Back to Art Journaling - feel it...


So I am back with another Art Journal page in my beloved emotional and free style. Hope it doesn't scare anyone...;)
This spread is a combination of collage, inks and paints plus some metal embellishments. I don't really plan particularly the page as said before I just wait for the process to indicate me what to do and what direction to move, so that page came out somehow out of the blue...But I like it as it's authentic and free.


I started with white Dina Wakley gesso as this is an ordinary book and even after gluing pages together the paper is not the best for wet mediums. Then I used Dr Ph.Martin's Bombay India Inks in few different ways:

  • dropped them directly on the page 
  • splashed water on them
  • sprayed water on them
  • moved page around to let them mix
  • let dry a little bit and rubbed into page


I also used some Dina Wakley acrylic paint and spread it with a credit card.

The busy right side page was built by gluing random bits of paper, tickets and other papers plus a scrap of lace.Once I chose the image I thought that it would go perfectly with a crackled background, so I used Distress Crackle Paint to paint some areas. Here is the close up:


I also used some black pens and few different ink pads to add more colour. The stamp "collect moments" is from the latest Finnabair collection that is just sooo tempting...


The final touches were attaching the metal elements with Dina Wakley gel medium and adding some text from a vintage book.

Hope you enjoy that page!
Honorata


13 July 2015

'Messy' Tags

Hello Everyone!

Georgie here with you today :)

This time round I'm sharing some 'messy' tags. Sometimes just letting go and getting messy is just what the doctor ordered!!


I used Ranger Kraft Tags as my base but backed them on to chipboard so that they could take the Art Basics Heavy White Gesso and Prima Bloom Sprays without the paper buckling too much. I decided to keep the background light but use splashes of contrasting colour.


I love the Art Ingredients Glitter Glass, not just to add extra texture but colour too, check this Violet shade, it gives such a gorgeous pop to your projects!


Prima Wood Icons - Words to centre stage for the sentiment and Finnabair Borders for the background. Light stamping with Finnabairs new stamp range - I just adore the Net and Wire set!!


Splatters of Distress Paint in Black Soot and Picked Raspberry finished up the look.

Have a lovely day!
Hugs
Georgie

11 July 2015

Obsessions?

Hello!
Am I weird? (well clearly yes in a general sense, but I mean about one specific thing today!) I get obsessions.... Crafting ones. I decide I like the idea or look of something, then have to go and either buy lots, or do it over again! I'm not even talking about my 'lets draw figures all the time' thing... I have a NEW obsession! Die cut scripty words..... I love adding titles to things, and a bold word is nearly always perfect....So I'm on the hunt for more! Here is one I used earlier (!)


The 'hello' is a die cut word...


AND... the best thing about this die cut word is that it come with a set of stamps too!


LOVE this set by Hero Arts! 
So, as well as cutting the 'hello' from black card to add to my project, I also stamped one of the phrases from the set and added that too!


My figure was drawn, coloured then attached to the background. A very simple ombré style green paint wash, then a circle stencil...


 I doodled around the dots with a black fineliner pen, just to make it a bit more scribbly and random.

I *may* have purchased more die cut words.... so watch out for them on a blog near you soon ! :)

Love Trish xxxx


09 July 2015

Guest Designer - Katy Leitch


Hello!
We have another very talented Guest DT today on the blog, the fabulous:

Katy Leitch


Now…. By Katy Leitch


Hello everyone – I am very honoured to have been asked back for a second stint as Guest Designer here at A Sprinkle of Imagination. I am amongst some rather prestigious company!
I fell in love with the Finnabair stamps from Prima as soon as I saw them but this is the first time I have got around to having a play. My piece is inspired by artist Gustav Klimt and, of course, by Finnabair herself. I’ve created a little wall hanging made with quite simple materials – stamps, inks and a few co-ordinating embellishments.
Below is some more detailed info on the process. I hope you enjoy my make today – looking forward to being back with another creation towards the end of the month.


Here’s how I made my piece:

1 Randomly swipe a piece of glossy card with Distress Inks in Mustard Seed, Ripe Persimmon and Picked Raspberry, starting with the lightest colour. Rub with a dry clean cloth as you go to blend a little (note - they won’t blend a great deal). Trim to the size you want.
2 Stamp the figure from Now is the Right Time off centre. Add some tone-on-tone stamping with the same Distress Inks used for the background. Add some stamping around the edge with the background from Now is the Right Time (Watering Can ink) and the top edge of the main figure image (Jet Black).


3 On off cuts of the card from Step 1, stamp the figure’s head, the heart, the circle and the word ‘now’ from the smaller phrase stamp (Now is the Right Time set). Stamp the face onto white card. Cut out the heart, staple one of the ‘now’ words to it and add with 3D foam. Cut out the head and layer with the face – add a touch of ink to shade the face. Punch out the other ‘now’ to fit the Idea-ology charm.
4 Embellish as shown with pearls, seed beads, gems, resin flowers and Idea-ology pieces, arranged in clusters. Add some highlights with a white gel pen.


5 Cut a panel of black mountboard to fit the piece. Punch two holes and add a length of florist’s wire, adding the charm dangle and twisting at the back to secure. Cut the circle from Step 3 in half and stick top and bottom to the back of the piece as shown. Finally glue the stamped panel in place and finish with decorative metal corners.

If you’ve enjoyed my make today please do take a little look at my blog: postcardsfromtheattic.blogspot.co.uk
Happy stamping!
Katy x


Thanks Katy.... love the bright zingy colours and all the detail... wonderful! Can't wait to see what you come up with later in the month! 

 
Products available from A Sprinkle Of Imagination:
Prima Finnabair stamps: Now is the Right Time; Old Town