31 March 2013

Chunky ATC using Graphic 45 Paper


Paula here again.....can you believe it's the last day of March, where has this month gone too?
Anyhow, the little project I'm showing today is a chunky ATC - if you haven't heard of an ATC before, then they are pieces of art which are created on a base measuring 3.5"x2.5", they are then swapped with other crafters/artists - so, a chunky ATC is a 3d base to work on (my base is a piece of wood) measuring the usual 3.5"x2.5" but is 1.5" in depth.
For this Chunky ATC, I've cut the images and papers from a Graphic 45 "Olde Curiosity Shoppe" 8x8 paper pad - and apart from the feet, red handle and some word strips that's it.

30 March 2013

The Mad Feeling....

Hello!
I have a painty messy project to share today...in step by step format so brace yourselves for a few *cough* pictures! Here is the finished piece....
Let me take you through the 'manufacturing process' !!!
Firstly, cover a Tando Chipboard sheet with Ranger Tissue wrap. Crumple the tissue first, and make sure it stays creased when you glue it down. We want the texture!
The texture is the main reason we've used this tissue, but the music will still hopefully show through in places as well! Base colour next, just smeared on with a sponge..
I've used Seedless Preserves Distress paint for the next colour. I've found dabbing the colour onto your craft sheet, then picking it up with a sponge to apply gives you more control over the coverage than if you use it straight from the bottle using the dabber top...
Next step is printing using junk! I've used the lime paint to give continuity...
I used sequin waste in two sizes as a stencil. Seedless Preserves paint again...
The next step was to stamp various background stamps using black ink...
The messy bit comes now! Scrape black gesso through a stencil (Prima)...
I edged the panel with black too....
At this point, the background was supposed to be done, but I thought it was missing something.... More colour?
That's better!
Lots of texture with the paint highlighting the wrinkled tissue....
I broke the habit of a lifetime and coloured my image...all of her, even the skin! (pass the smelling salts!)
A fab Stampotique lady, as you can see!
She was coloured with Distress Stains mostly, with a dash of turquoise paint and Promarkers for the skin.
My words are from my little box of cut up Mills and Boon books!
So a nice painty mess to finish up this months projects from me....

Next month I'm going to be concentrating on jewellery, so stay tuned for something completely different!
Trish xxxxxxxx


28 March 2013

Print and stitch - it's magic!


Before I say anything I just want it to be known that this blog post is in no way condoning the use of magic mushrooms, it was only after I'd finished the page and taken the photo's that it was pointed out to me that it could be taken the wrong way.....so now that's off my chest.....I'll continue :) Phew!!

I decided for this post, to come back to the sticky backed canvas by Claudine Hellmuth. It's amazing, versatile stuff and as I've said in a previous post it stands up to a lot of abuse. One of the brilliant things you can do with it is to put it through your printer. Imagine your family photo's, something you've scanned into the computer or printed text.

Here I've chosen to use a photo I've been wanting to use for ages (the offending mushrooms). I cut a piece of canvas to the size of regular photo paper and put it into the printer tray making sure it was the right way up to print on the canvas side.  For me that's upside down but I only say that because I've printed before on the wrong side so it happens.


I trimmed the photo down and enhanced the colours with some Promarker pens. After layering my photo on a journal page which I'd sprayed and stencilled using Dylusions sprays and stencils, I used my sewing machine as if I was doodling with a pen.

A little tip, if you a have letter stickers which are the wrong colour for your project (I had Jenni Bowlin alpha stickers but in red) simply colour them in with a marker pen and don't forget to use up those negative spaces either if you've run out of letters. That way you get a lot more mileage out of your stickers.


I cut a flower using a Sizzix die and sprayed it with inks.  I stuck this down too along with a few threads and stitched over the centre.


I finished the mushrooms off with some sticky gems and used up a small strip of canvas by stamping on it using a border stamp from Dylusions and sewing over that too.

Jaine x

27 March 2013

Atumn.. a layout step-by-step

Ok, I know it's spring now, but in the progress of making this page it turned out an autumn page:-)

This was suppose to be a step-by-step on how to make your own background, but my camera is not my friend these days so the first steps are missing..

First take your background paper and spray it with water and different spray inks. I've used Dylusion on mine, LOVE the viberant colors they give. The page will curl up but once in the album you wont even notice it;-)

I started drying the page with a heat gun, and during the process of doing that I turned my page a few times dabbing it in the leftover ink on my work surface. This gives a cool droplet effect:-) When the background was dry I took a Dylusion stencil and dabbed on some Ranger Acrylic paint dabber - gold.

 Before I move forward I have to give some credit to the one inspiring me to do the page. The february winner at Skissedilla, Marie-Josee, made an incredible page, and I just had to try the idea with the tags:-)

My three tags are made by spraying water and various ink sprays on and then letting them dry. I then covered the tags with Claudine Hellmuth Multi medium matte to seal of the background. Then I took some stencils from the Crafters Workshop and added some molding paste. I also stamped with Perfect medium adding some Perfect Pearls on the orange tag, on the red/dark tag I stamped and embossed it with Tim Holtz Distress embossing powder. On the green tag I sprayed over with white Dylusion.


Now over to putting the page together. I've used scraps of Glitz design Yours Truly papers and layered them on my background.  Then I added some various washi tapes.


I looked trough my stash of old flowers and chose a few orange and yellow. Then i gave some of them a touch of orange spray ink. In the centre I put some flower centers from Prima. 


To finish the page of I added a few journalling tags, the photo and the title. The letters are made of plain chipboard letters, coated with gesso and spray inks. 

Hope you've enjoyed this somewhat incomplete step-by-step, and that you'll have a great easter:-)

26 March 2013

China Girl ~ altered puzzle piece!

Hi Gez here & today I am delighted to share my altered jigsaw puzzle piece with you.. 

I covered the giant puzzle piece with a generous coating of {Liquitex Gel Matt Medium}


 Then set about adding torn snippets of the gorgeous Graphic45 {Bird Song}


I added a layer of {Modge Podge} to seal all the edges..

Here is my finished piece.. the red letters and info circle are {Red Skinny Alphas} by Jenni Bowlin


 A wonderful & unusal way to display happy memories!

Thank you for calling today & taking a peek! Keep warm, Gez

25 March 2013

Drops


Hello!

I told you that stencils are one of my fav products. Unfortunately I haven't got many of them. That's why when I have an idea to use some shapes I need to do a stencil myself.
Today I will show you how I used a handmade shapes.

First I draw few yellow lines using Prima Donna Downey stencil.


Than I cut some drops shapes from an old stamp package. One side of the package is more absorbing than the other. I put the absorbing one facing paper.


I checked that my paper drop-shapes are touching paper. It's very important because I don't want ink to get through under the drops. Few deep breathes...and I sprayed Dylusions Ink Spray in two colours – pink and turquoise. I can't wait to check new colours of Dylusions Ink Sprays. They are in stock now!


Very carefully I removed paper drops and used them as a stamp ( an inky side where still you can find wet ink ).


To add more colour to my art journal page I cut small drops from Glitz Design Yours Truly Collection paper and I glued them to the page.


When I was sure the page is dry I used a black pen and Montana Acrylic marker to draw lines and some spots.


Here you can see small white spots.


I cut a dress for myself from sticky-back canvas and than stamp a Stampotique stamp using Ranger Archival Ink Jet Black. Not the first time and I'm sure not last I stamped a stamp upside down but never mind.


The last thing – I drew my body and I added other parts ;)


Magda x

24 March 2013

Play Time

Paula here - Today, I wanted to share some step by step photo's of me just having a play with some Tim Holtz Distress paints, inks and stamps.....excuse the step by step photo's, they were taken on my ancient mobile phone, so the quality is a bit iffy....have to say I wasn't sure what I was going to do when I started to play but tried to take photo's of most of the process .

Step 1
I started off by cutting a tag shape out of some scrap mountboard


Step 2
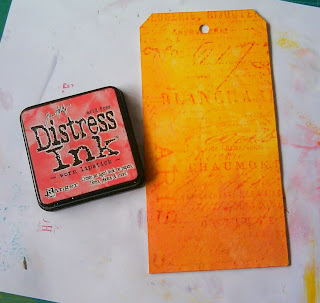
Shake the Mustard Seed Distress paint bottle and partly cover the tag, as shown.


Step 3
Shake the Rusty Hinge paint bottle and add the colour at the bottom of the tag.....then lightly use a piece of paper towel to blend the colours together.

Step 4
Spritz some water over the tag while the paint is still wet, let it settle for a bit and then dab off with a piece of paper towel. Dry (either naturally or heat set).

Step 5
Take some Worn Lipstick Distress ink and blend along all the edges of the tag and then stamp the text, as shown.

This is where the step by steps finish.....got carried away and forgot to carry on taking photo's!

I then stamped some butterflies onto the tag and slightly smudged the ink.....I then used Picked Raspberry distress ink to go around the tag edges and added a touch of the ink randomly onto the tag too.
I stamped Gog Lin (the little goblin) onto a piece of paper, coloured and cut him out and adhered to the tag...finally, I added the sentiment and highlighted Gog Lin and the sentiment with an orange marker pen.


Ingredients for tag
Tim Holtz Distress Paints: Mustard Seed; Rusty Hinge
Tim Holtz Distress Ink Pads: Worn Lipstick; Picked Raspberry
Tim Holtz Stamp Sets: Way with Words; Papillon


23 March 2013

Butterfly Tree

Hello again!
I've been playing with paint again.....but this time, new paint! Yep, just had to have the new Distress Paints from Ranger. All the colour on this piece is Distress paint..
The square cardboard base has a wrinkled layer of District Market Terminology tissue, glued on with a glue stick, and deliberately crumpled to give the texture....
This was given a thin layer of Picket Fence Distress paint, just to whitewash and tone down the blackness of the type. I then used Broken China Distress paint, using just a little. More as a wash really, just a hint of colour. When dried, I added a second layer gently over the wrinkles to highlight them. As with any paint, more than one layer builds up and darkens the colour, so this second layer shows up as darker against the first. Same colour, same paint, just more of it! This means stamping with the paint shows up as darker....as the dots show here...
I then stamped the flourish with Black Soot Distress paint. This is a Donna Downey foam stamp, foam stamps are great to use with paint, and clean up is very simple. In this design, the lower part of the flourish is just an outline, so I filled it in by adding more paint (just in case anyone was thinking 'I have that stamp, it doesn't look like that!')
My flourish became my 'tree' for the butterflies to sit on....
I coloured scrap card with Barn Door Distress paint. This shade is a little disappointing to me as its not as deep red as its inky namesake, more of a tomato red in my opinion. I needed three coats before I had the depth of red I was after. The butterflies (Unity)  were then stamped in black ink and cut out. I glued them to the flourish, then added Glossy Accents to give a sheen.
I also used the Barn Door Distress paint to print a little round the edges, just to tie the whole thing together colourwise.
My word is made from Jenni Bowlin alphabet stickers..
Nice and big, and a great font!
Have a great weekend everyone, hopefully you are all nice and warm indoors. This weather is just dreadful!!!
Trish xxxxxxxxxx