Showing posts with label Ranger. Show all posts

17 April 2016

Index Card Art !!!!

Good morning gorgeous ones !!!

It's no secret that I loooove index card art, it was, after all how I got started in mixed media and it still holds very dear to my heart. 

I was lucky enough to teach a class last week on this very subject and think my addiction for these little beauties definately rubbed off on one or two or six of the lovely ladies that attended.....


We used lots of the fabulous Dina Wakley acrylic paints, they are definately one of my favourite go to paints, the colours are fabulous and the consistency thick and luxurious.....


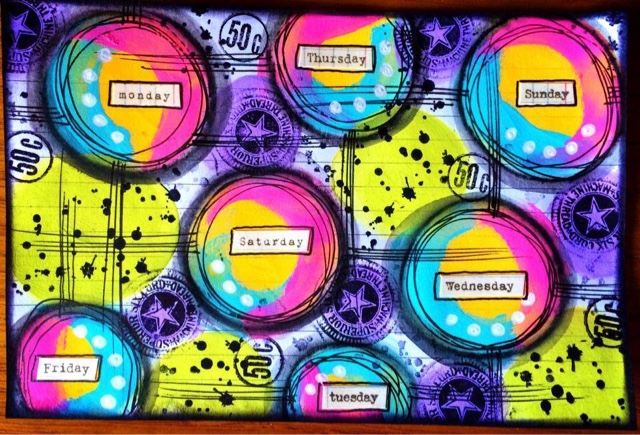
I just love playing on these small cards, they are inexpensive and I can experiment on them with new colours and supplies without having to worry about the end result...


One of the other paints I like to use are the Ranger Distress paints. Although thinner in consistency the blend really well and the colours coordinate perfectly with Dina's heavy body acrylics so it's a real win win for me.....


It's so easy to create gorgeous projects with a pile of index cards, a mix of beautiful paints, and a black and white gel pen.....so what are you waiting for ????


Thanks for stopping by
Have a beautiful Sunday

Bright and painty hugs
Tracy
Xxx

15 February 2015

Layout for December

By the time you're reading this, Trish and I will be at the NEC in Birmingham at the CHA UK trade show looking at all the good things coming out this spring.

Anyway, I felt it was time to do a December layout before spring comes and everyone is totally fed up with all things Christmas.


I didn't want to go down the usual Christmassy route so opted to use a kit called Freedom by Jenny Bowlin for Echo Park as I love that red and black look.


For the stars I used a Balzer Designs stencil called Punchinella  and tried out some black embossing paste by Dreamweaver for the first time and was totally blown away by it. I've usually added black gesso to my paste before but I thought I'd try out one which was black to start with and it's gorgeous. It's thick so no leaking under the stencil and glossy so you have this gorgeous shine when it dries.


The only other things I used on the page were some white gesso, Broken China Distress paint and a few bits of shiny turquoise washi tape by MME.

Have a good weekend what ever you're doing.

Jaine x

29 July 2014

July layout.


Here's my layout for July using the same Echo Park kit called Capture Life.


I took one of the papers (the reverse of the hearts sheet) which had a very plain neutral finish and as I'd already decided I was going to place the two photo's on either side of the layout, I spread some texture paste through this Prima stencil called Flower mostly down the centre. I had intended that the paste would act as a resist to my ink spraying but I picked up some yellow off the stencil by accident (dirty crafting) and thought I'd go with it as it didn't look too bad.

When the paste was dry I took a paintbrush and painted on my spray inks in random patches for a watercolour effect.

There are also some random spots of Stickles as I'm adding them to everything I do at the moment.

Have a good week

Jaine x

07 July 2014

Pimp my shoes!

This project is a little bit different from the sort of thing I usually bring you but I thought I'd show you a way to take your art off the page and wear it too.


This is the pair of shoes which started it all off, a simple pair of pumps which I painted on a while ago for a project in Craft Stamper. I wore them out recently and had lots of comments, one of them from a little girl who absolutely loved them and really wanted a pair of her own. As it was her birthday I thought it would be the perfect present.

I used a product called Inkssentials Fabric Medium by Ranger.  It turns all your acrylic paints, alcohol inks and ranger inks into fabric paints. Even glitter.

I started off by protecting the rubber sole with masking tape.


I stamped the birds and flowers from Rangers Dylusions How Does Your Garden Grow with a Stazon ink. I found it easier to stamp on the shoe with a piece of foam and my hand in the shoe so I could feel the stamp through the fabric. If you miss a few bits or some of the stamping doesn't come out perfectly just use a black permanent marker to go back around the image.


Mix up the medium one to one. You don't need much, a little goes a long way.


Paint in the design. Again don't worry about going over the stamping, you can go back over it later.


Here are the finished shoes. I mixed up some of the medium with some glitter added to add glittery bits on the shoes. The medium can also be used over the top as a sealer if you want as it's totally clear.


I made a second pair and love how they came out.


Why not consider wearing your art, it makes a great statement.

Jaine x

08 March 2014

It's the simple things.

I'll admit to being a pretty simple gal on the whole and it's the little things in life which give me the most pleasure. When I first saw Dyan Reaveley using this ink spray pad at winter CHA I thought it such a cool idea and couldn't wait to get my hands on one.  If you haven't seen it before it's basically an ink pad without ink! The idea is you use it to spray your inks directly onto the pad thus creating an ink pad with your own custom colours. It's washable too so you don't need to buy one for every spray colour you own.  It's not a small thing either and at a whopping 15.5 x 10.5 for the pad it'll ink up those massive background stamps easily.

 I thought I'd keep my project simple too just to show you the effect. Here I've used a black tag rather like the Ranger ones in the shop and simply stamped this Darkroom Door Birds 1 stamp using my pad and Dylusions White Linen ink directly onto the tag. The image isn't perfect but I wasn't looking for perfection. I also used the pad to create simple marks with a credit card and bottle caps and used the ink directly from the bottle to add some ink spots.


If you love your ink sprays and long to use them to stamp with, I highly recommend you get yourself this stamp pad. You'll love it.

Jaine x

21 February 2014

Robe a la Francaise - GDT Riikka Kovasin


Happy Friday! It's soon weekend! Riikka here to share with you my third and last GDT piece. Hope you have liked my creations so far!

Who am I? My name is Riikka Kovasin, I'm a Finnish mixed media style scrapbooker with a passion to have my fingers inked on weekly basis. I'm happiest when I can get messy with different paint media and create a piece of memory keeping at the same time. What a perfect combination! My blog is called Paperiliitin. Please come and say hi!


I'm more of a scrapbooker than anything else so I decided to do another layout for my last project. The spark for this layout was my a namesake of mine who asked me an advice over at Facebook for a layout she was working on. I really liked the composition she had going on there and asked her if I could do my version of the same. So here Riikka, is my take on the two photos and vertical title! 

The topic of the page is a princess dress I sewed for my 3-year-old as her birthday present. Her big sister got one just like it when she turned three so it's kind of a tradition. I used the same patterns for this dress than to the previous one, but the color is different. My older one wanted a yellow dress (her favorite color at that time) and my younger one chose turquoise (her favorite color). The dress has a flowing back piece, like the robe à la francaise has.


I started creating the layout by gessoing an area of the background paper where my main composition would go. Then I poured some Glimme Glaze to the paper and let it dry. After that I added some stamping, pencil doodling and inking through a TCW stencil. I also inked a piece of Prima Marketing resist canvas and used it later on in the layers behind the photos. I thought canvas and lacy details would really fit the subject of the page.

After the background was finished I then layered some patterned papers, stickers and other embellishments behind the photos. I used papers from 7 Dots Studio "9th Wave" collection as it fitted the color scheme so well. The embellishments are from that collection together with some from the "Domestic Goddess".

Thank you for taking a look - it has been a pleasure guesting here! Thank you for having me, Vicki! Hope to see you all around!


Supplies:


other: gesso, pencil, thread, twine, half pearls, stapler, correction tape

14 February 2014

I Love You To The Moon - GDT Riikka Kovasin


Happy Valentine's Day! Riikka here again with another guest design post and I have a little present for you - a video.

Who am I? My name is Riikka Kovasin, I'm a Finnish mixed media style scrapbooker with a passion to have my fingers inked on weekly basis. I'm happiest when I can get messy with different paint media and create a piece of memory keeping at the same time. What a perfect combination! My blog is called Paperiliitin. Please come and say hi!


For my second post I created a Valentine themed layout about my two daughters. The picture is an old one, but I really loved the topic and the angle of it. It shows them playing an afternoon tea party. 

The quote from the 7 Dots Studio "Messy Head" collection suited the layout perfectly as I love them both to moon and back. I also used other patterned papers from the collection. As one of the journaling style cards I wanted to use on the layout was purple, I added some purple details to the layout. If you want to see how the layout came to life, please watch the video underneath.


Thank you for looking! I hope I have inspired you! 


Supplies:


other: pencil, buttons, cord, stapler

06 February 2014

Valentine's Cards - GDT Riikka Kovasin


Hello there! Riikka here with a few guest design creations - first of all these Valentine's inspired cards.

Who am I? My name is Riikka Kovasin, I'm a Finnish mixed media style scrapbooker with a passion to have my fingers inked on weekly basis. I'm happiest when I can get messy with different paint media and create a piece of memory keeping at the same time. What a perfect combination! My blog is called Paperiliitin. Please come and say hi!  


I created these four cards using the gorgeous 7 Dots Studio "Messy Head" collection. It's soft tones and pink shades are perfect for Valentine's Day themed creations! The card basis are cut from sheet of Bazzill's Card Shoppe papers.

The main pieces of the cards are cut from a 12x12" paper and then layered with pieces of other patterned papers and embellishments. All of the cards have a common background style, a piece of patterned paper stamped with Finnabair's doily stamp using Prima Chalk Edgers and Archival Inks. The other thing the cards have in common are splashes of pink Glimmer Glaze.


I used different kinds of embellishments in the cards. They all have a bit of thread underneath the embellishments, but then the different cards have different moods. I used Mechanicals in some, Prima wood icons in some and 7 Dots Studio stickers and die-cuts in others. Please see the supply list at the bottom of the post, after some of the detail shots.

Thank you for looking! 


Supplies:


other: thread, paperclips, half pearls, chipboard arrow, pencil

24 January 2014

Metal Heart....

Hello!
I'm still on my 'use techniques you haven't played with for a while' kick..... so today I want to share a little weathered metal...

(This entire blog post is also a frustrating exercise in how difficult it is to get a good picture of mirrored card...especially a picture that didn't have me reflected in the surface!)
Now, I usually do this with metal foil, never tried it with cardstock, so it was a bit of an adventure! Worked brilliantly though!
Here's how...
Cut a shape from sturdy chipboard or greyboard. I drew around a big wooden heart I have in my 'things to alter' box!
Cut this out, then get the mirror card ready. (This is Ranger foil card)
We need to stick it to the greyboard, but my usual glue n seal/ gel medium approach is not going to work this time. Wet glue will leave a dull, non shiny residue on the surface, however carefully we apply it. I used a sheet of double sided adhesive, Wonder Tape sheets work very well. Once the adhesive sheet is on the back, cut the card into squares and rectangles of varying sizes.
Next, stick the shapes to the big heart shape, making sure they overlap slightly.
(that pic *almost* has me in it at the bottom lol!)
Trim the edges, and add a large eyelet if you want a hole to hang it up!
Next bit is where the 'magic' begins! Using a small balled embossing tool, press hard into the cardstock, and create dots and lines...
Scary bit time.... cover the whole thing with a layer of black alcohol ink...
Mine has a definite dark brown look....not a clue as to why, but I like it!
Next, take some wire wool (from the DIY shop), and rub away at the dried ink...
You will need a little elbow grease here, but remember not to rub too hard. This is cardstock remember, not actual metal! Once done, wipe down with a soft dry cloth to remove any wire wool residue...
So, background done! I've not gone overboard with the finishing touches as I wanted to show off the 'metal' not cover it up! A red clay heart....
and black cord tied through the hole...

So...get out that mirrored cardstock and give it an industrial look!
Trish xxx