Showing posts with label Sakura. Show all posts

21 July 2016

Clock Flower Journal Pages

Morning, peeps!  I don't often do journalling, but I was in the mood for a little painty play recently.
I started off by dragging some Dylusions Paints across the double page spread using a credit card.  Lemon Zest, Vibrant Turquoise, White Linen, and London Blue around the edges.
Added a bit of stencilling in White Linen and Squeezed Orange using Tim Holtz stencils, and while the sponge applicator was still loaded with Squeezed Orange I made three circles.
When the circles were dry I outlined them and drew stems and leaves with a black Derwent Inktense pencil, then smudged it with a damp paintbrush, and added white highlights with a Sakura gelly roll pen.  I overstamped the circles with the clock image from Tim Holtz Curiosities set using Ranger Archival Jet Black ink.
I finished the pages off by adding a sentiment, butterflies and a border with a Finnabair stamps.
Thanks for taking a look, and enjoy your day!

Shirley x

17 January 2016

A Quartet of Bright Canvases


Hi peeps, Shirley here!  I thought I'd banish the winter blues today with some vibrant colours.  I had some mini canvases in my stash, so I set to work, covering them with Dylusions Ink Sprays in Calypso Teal and Funky Fuchsia.  Once they'd dried, I covered them liberally with Finnabair Art Basics Clear Gesso to seal the ink - it doesn't seal completely, but does keep leakage to a minimum.
Sunglasses time: out came the lime green Dina Wakley Heavy Body Acrylic and some stencils by Tim Holtz and Rhonda Palazzari.
A bit of highlighting with a Sakura Gelli Roll white pen and a black pen to add depth.  It's only subtle but it does make a difference.
At this point, song titles sprang to mind for each mini canvas.  I wrote out the title words on black card, then wrote some of the lyrics around the edge of each canvas, photographed everything ready for my post, and decided I could be in breach of copyright, so I painted over the edges in lime and used the tiny stamps from the Hero Arts Happy Stamp & Cut around the edges.  Then I added encouragement phrases to each canvas instead.


In case you're wondering: Listen To The Music, Kissed By A Rose, The Times They Are A'Changin, Space Odyssey.

I hope they've brightened your day!

06 October 2014

Spots of colour!

Good morning, Gez here in a rather wet & windy part of England today!!! 

Gosh, we're having some rain!

I am excited to be sharing an on going project with you today that will just keep growing & growing!

If like me when I get new supplies I can't wait to try them out... I have decided to catalogue them and keep them altogether on a metal book ring...

I've got 4 tags to share with you today using some of my favourite products from A sprinkle of imagination.

First of all I stamped a brand NEW stamp from Stampotique Originals, (it's from the Circle Cube by Daniel Torrente) Vicki stocks lots and lots of their stamps and can order any that you see online. I have used an Archival Ink Pad for stamping which are both water and fade resistant and a Sakura Pigma Micron pen for labelling.

I managed to fit the circle stamp 8 times onto one tag as you can see using various products.

On my first tag I have used acrylic paints, sometimes it is so much better to see the paint on cardstock rather by just looking at the pot or tube as you get a better idea of the finished look when it's dry.


This is true of all the different products, so I went ahead and had great fun using Distress Inks,


and also, 


 Inktense pencilsby Derwent


Here is my finished swatch...


 for now!

I can keep on adding to my ring and so on!

Thank you for calling, Gez


26 September 2014

Ti Amo!!

Don't you just love a short cut!! I'm back with another quick card this week altho, at first glance it probably doesn't look like a quick card!!

I love creating my own backgrounds, getting out the gesso, paints, spray inks, texture paste, the lot!

Sometimes however, it's nice to get a little help to acheive that look you might have planned in your head.. especially if time is short! Want to know how?

For the background of this card I have used an already inky piece of patterned scrapbook paper from Glitz Design. I used a 6x6 sheet from the Wild & Free pad. These papers are scaled down versions of the larger 12x12 size and are perfect for card making.

I used a selection of my favourite stamps from Stampotique Originals and some of my favourite ink pads. The choice is yours for the taking...

Here is my quick background...


Next, I stamped my main images and sentiment onto watercolour cardstock. I decided to colour the images this week using Distress Inks and a fine paint brush.

All that was left then was to add some finishing touches using a white Sakura Gelly Roll Pen.

My finished card...


Thank you for calling. Wishing you a lovely weekend. Gez


21 February 2014

Robe a la Francaise - GDT Riikka Kovasin


Happy Friday! It's soon weekend! Riikka here to share with you my third and last GDT piece. Hope you have liked my creations so far!

Who am I? My name is Riikka Kovasin, I'm a Finnish mixed media style scrapbooker with a passion to have my fingers inked on weekly basis. I'm happiest when I can get messy with different paint media and create a piece of memory keeping at the same time. What a perfect combination! My blog is called Paperiliitin. Please come and say hi!


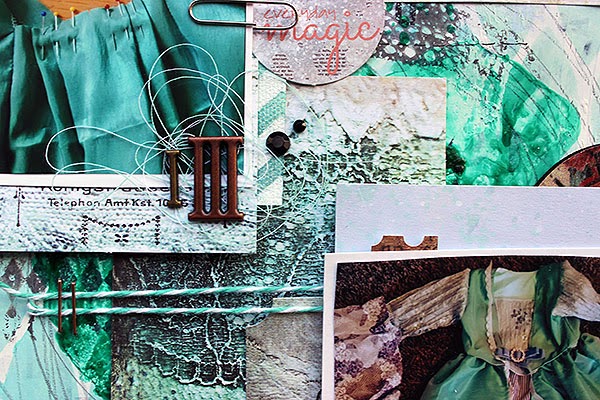
I'm more of a scrapbooker than anything else so I decided to do another layout for my last project. The spark for this layout was my a namesake of mine who asked me an advice over at Facebook for a layout she was working on. I really liked the composition she had going on there and asked her if I could do my version of the same. So here Riikka, is my take on the two photos and vertical title! 

The topic of the page is a princess dress I sewed for my 3-year-old as her birthday present. Her big sister got one just like it when she turned three so it's kind of a tradition. I used the same patterns for this dress than to the previous one, but the color is different. My older one wanted a yellow dress (her favorite color at that time) and my younger one chose turquoise (her favorite color). The dress has a flowing back piece, like the robe à la francaise has.


I started creating the layout by gessoing an area of the background paper where my main composition would go. Then I poured some Glimme Glaze to the paper and let it dry. After that I added some stamping, pencil doodling and inking through a TCW stencil. I also inked a piece of Prima Marketing resist canvas and used it later on in the layers behind the photos. I thought canvas and lacy details would really fit the subject of the page.

After the background was finished I then layered some patterned papers, stickers and other embellishments behind the photos. I used papers from 7 Dots Studio "9th Wave" collection as it fitted the color scheme so well. The embellishments are from that collection together with some from the "Domestic Goddess".

Thank you for taking a look - it has been a pleasure guesting here! Thank you for having me, Vicki! Hope to see you all around!


Supplies:


other: gesso, pencil, thread, twine, half pearls, stapler, correction tape

29 January 2014

10 minute journal page


After spending hours in my basement workshop trying to produce a journal page and failing big time I was getting a bit frustrated. I knew what I wanted to do and I knew I wanted to use this Andy Skinner stencil called Hippy Chick as I like to use silhouette figures in my pages. 

On my desk I'd also got my sheets of clean-off papers which I do keep for other projects. These are sheets from an A5 pad which I spray on or clean off stencils on and they themselves can become pieces of art work. 

I cut one down to fit my journal and glued it in.


I used a watercolour pencil to simply draw inside the stencil three times.

With a water brush I activated the pigment in the pencil and drew the paint in.

I could then write inside the shapes with my Micron pen. I wrote quickly and without taking the pen off the page so it isn't immediately legible but I know what was in my head at the time. The stars on the stencil I used the pen to draw inside too.

A few extra's like the letter stickers from the Finnley collection of papers and the Glitz washi tape along the bottom and it's finished. 

Try using a stencil simply without paint or ink and you might be surprised.

Jaine x

09 January 2014

A journey into Project Life.

Although I'm not totally new to Project Life, last year I stuck to my guns and created my own version in an A4 style. This year I've decided to keep a regular 12 x 12 format album which gives me loads more surface to play with. I still want to make it my own style and will be making my own journaling cards which I've done here. 

This is my title page.


I've used the Finnley collection by Glitz Design for my cards cutting them into pocket size pieces. 


I used the stickers from the same collection and Glitz washi tape which co-ordinates perfectly with the collection.


I finished off my cards by rounding the corners and adding some doodled borders with a black Sakura Micron pen. 


I've also used a Prima veneer piece from the Wood Icons collection, this one is actually left over from the Christmas box.


I hope to be able to show and tell more of my Project Life pages in the future. 

Happy New 2014

Jaine x

22 October 2013

Spooky altered envelope!

It's been a while since I last made an altered envelope and with the spooky season upon us I thought it would be fun to send some happy mail to my daughter away at University!


I started with a simple background using Distress Ink pads. Then I stamped the 'Abstract Foilage' stamp in the centre to form a rectangle for the address label again using Distress Ink and some white Gesso.. the 'Numeric' stamp and the 'Web' from Stampotique Originals were then stamped onto the envelope using Distress Inks for a muted look. The gorgeous Miguel Has A Gift brand NEW from Stampotique Originals was stamped straight onto the envelope using Jet Black Archival ink pad from Ranger. A little doodling with a black and white Sakura Pigma Micron Pen and my envelope is ready for sending!

 Thank you for calling, Gez
 

17 October 2013

Pumpkin Atc

Hi good morning from a cold and wintery Lancashire, England! It's rather blustery here today, raining and blowing a gale.. someone said we are due lots of snow in November.. I do hope this isn't so..

This morning I've an Atc to share with you..


The background was created using Distress Ink by Ranger and a few water splatters. The gorgeous pumpkins and lil man are both designed by Daniel Torrente for Stampotique Originals.

I coloured the stamped images using Distress Inks and added some fine details using both a black and white Sakura Pigma Micron Pen.

Thank you for calling today, keep warm wherever you are, 
happy creating, Gez

03 September 2013

I'm learning to fly! ~ Altered envelope

Happy, happy, happy! I am delighted to be returning from absence to join the Design Team. Special thanks, to Vicki and the whole team for putting up with me being missing! Life has been throwing quite a few curve balls this year.. another month and I should be out the other side! Too much going on to be away any longer though!!

Those who are regular visitors to my blog can't help but notice the excitment going on over at Stampotique Originals with TONS of FABULOUS new fall releases.. all of which will be arriving in the UK very soon and making their way up to Pocklington!

I am very, very privileged to already own some of the NEW designs and couldn't wait to ask Vicki if I could showcase some of them for her knowing what a FANTASTIC stock of them she carries over at the shop A sprinkle of imagination

Today, I am sharing an altered envelope.. I've been making these for just over 12 months now and always love how they turn out. My daughter has quite a collection!!


 Products used:

Blank envelope
Bubble wrap (for background texture)
Black Micron pen - see below

NEW STAMPS from STAMPOTIQUE ORIGINALS
(Available for Pre-order)
I'm learning to fly (2426J)
Hamlet of Halloween (6171J)
(Stars) from the Design Cube (10012R)


Here is the reverse side of my envelope.


More acrylic paint, stamps used are Enjoy today (7319) and Carol's flower, small (9166) from Stampotique Originals. I coloured the flowers using Derwent Inktense pencils and a black Sakura Pigma Micron Pen for outlining.

Many thanks for calling and leaving a comment if you get the chance Happy creating, Gez

02 September 2013

We should dance!

Hello!

Recently I was experimenting with a technique which I had shown you last time. It was a great fun and the best is...more to come! Today I have for you a quick art journal page.

As always I used a lot of different mediums for my background. Background is a mix of mists, Glimmer Glaze and inks including Ph Dr Martin's Bombay Indian Ink. I also put some modelling paste for a first layer.


I stamped Stampotique Originals stamps from a new release and Glitz Roller Doodle using Ranger Archival Ink.


 I drew blue spots using Posca Paint Pen. For last touches I used Sakura Pigma Micron Pen and black gesso.


Magda x

30 August 2013

Using up the left overs - art journal play.

This summer hasn't been the best of my life and without going into detail, at times it's been pretty depressing. I can't remember the last time I got out my art journal and just 'played' it seems so far away now but last weekend I had the urge to do just that and record a happy time. 


I didn't want to put much thought into it, I simply wanted to go with the flow and do what made me happy and this is what I did.

I keep all my left overs and scraps and these are what I grabbed first. Bits of paper from older projects and even the pieces with die cut shapes out of them (well, you never know when you'll want them right?), a few left over numbers (random) and some sticky backed canvas butterflies from the embossing workshop a while back. It all went down on the page.


I gave it all a coat of white acrylic, not too thick but thick enough to neutralize it all. 


Then came the fun bit. Sub conciously I reached for a paint colour which happened to be Claudine Hellmuth Studio acrylic in Classic Teal, watered it down and painted it on, spraying as I went. I held the book up to let it drip between the texture. It was having the desired effect and I felt content. My daughter even pointed out that I'd used bulldog clips to keep the page flat, in the same colours. It's funny what the sub concious mind can do. 


Once dry I added the chevron stamp with my Glitz roller doodle and Adirondack Stream ink, a couple of old postage stamps and a photo of me doing what I love. I used a K and Co Smash date stamp to show when it was and added a few ink spots with some Dylusions ink sprays.


The quote is from a Chinese proverb which I wrote using a Sakura Micron pen. I love how this pen flows nicely. 


Anyway, there we are, a journal page to cheer myself up, using left overs and what comes naturally.

Jaine x

05 August 2013

Moleskine drawings

Hello everyone!

Today I would like to show you a very quick drawing. All weekend I was away in London. I travelled by train and the tube a lot and because I didn't want to be bored I took my pocket Moleskine with me.


Before I was off to London I stamped a few Stampotique stamps. The rest of the drawing I made using Sakura Pigma Micron pen- really amazing pen, you should try it! To colour my drawing I used Derwent Graphitint and Water Brush. I also used a Posca paint pen.

Magda x

29 July 2013

homemade washi tape

Hello everyone!

Washi tapes are very popular for sometime. I would love to have one...but I haven't. But than I thought why not to make it by myself?! You can use different tapes to make your own washi tape. And what is the best part, you can draw/stamp whatever you want! I had been thinking about using a masking tape but than I received amazing Prima Writers Tape from Vicki. This tape is fantastic! You can stamp on it, draw or use some mediums on it. Tape is sticky back.

To make a simple washi tape you will need:
- tape - for a background
- paint - to add some colour
- waterproof pen - if you want to draw something
- waterproof ink - for stamping
- stamp


I made two pieces, one is drawn and the other stamped.


At the first piece I used a paint with water as a background and than added only the paint in some places. At the second one I applied the paint using my finger.


My ATC using these tapes


Products which I used to make my ATC:
- Stampotique stamp
- Prima Writers Tape
- Claudine Hellmuth Studio Paint
- Sakura Pigma Micron Pen
- Ranger Archival Ink
- Ranger Liquid Pearls
- Glitz Design Yours Truly paper
- Claudine Hellmuth Studio Black Gesso
- Claudine Hellmuth Sticky-Back Canvas
- Donna Downey Studio stencil
- Jenni Bowlin paper

Magda x