Showing posts with label sticky backed canvas. Show all posts

22 February 2014

Image transfer techniques


 It was whilst trying out some printing without using a gelli plate that I came upon this technique for transferring an image.  I tried this on paper first but found the paper tore but on sticky backed canvas it worked better. Maybe if I'd given my paper a coat of gesso first it might have worked better but I have to experiment further to find out. 

Anyway, I started off with a background of texture paste, (of course, what else would you expect from me?) through a plain old paper doily and some spray inks.


 I chose an image from a magazine of just a head shot and lay a piece of plastic over it. I used one of those clear pockets from a file folder so raid your children's school supplies.

The small bottles of Claudine Hellmuth Studio paints have a very handy thin nib to squeeze paint out of and can easily be used like a pen. I used this to draw the outline of the design onto the plastic.


 I placed the painted image face down onto the background and burnished with my finger.


 I had enough paint left on the plastic to transfer the design onto a journal page although it wasn't as clear.


 For the second transfer technique I used sticky plastic book covering but you could also use clear packing tape. I covered the image with it and burnished well.


 I cut around the image.

I then soaked it in water and rubed off the paper backing. I kept soaking and rubbing until most of the paper had been removed from the back and only the image remained.


 I used some gel medium to glue it in place.


To finish my piece I use my sewing machine to doodle around the edges.


 and stamped some script over the image and added lettering with stickers.

Sticky canvas is great if you don't sew and takes any manner of mediums on top give it a go. I hope you give the transfer techniques a go too, they're easy.

Jaine x

17 July 2013

Puffy Heart Love!

Hello!
I've been playing with sticky backed canvas..... and I sewed a puffy heart!
I'll get to the heart in a minute.....
The base for this is a box frame, so a nice bit of depth...
The background is very easy, it just takes a while because of the drying issues! Firstly, I covered the frame with old book pages using multi medium. This is the first waiting time...multi medium is not over fond of the heat tool, heat too much and it starts to bubble and lift up whatever you've stuck down! So, once dry, I gave it a wash of brown paint which takes seconds! I sponged embossing ink through a stencil, then added green embossing powder to give the detail....
A tiny bit of black splatter stamping finished the design. Then it was part two of the waiting game as I covered the whole thing in clear crackle medium!
Whilst that was drying (it takes a good 2-3 hours even in this heat!) I created the heart. I drew a very rough heart on the canvas, then cut two shapes out. Now, sticky backed canvas is ....um.... sticky backed. This isn't really ideal when you want to sew it! I've found the best way round this is to peel off the backing paper, then pounce the sticky side with an anti static bag, one of those things you use before you emboss to stop stray powder sticking where you don't want it! I would imagine rubbing a little talcum powder over the sticky side would work too, if you don't have an anti static bag. Once the sticky wasn't sticky any more, I sewed part way around the heart, stuffed it with a little wadding, then sewed it up completely. Despite the heart being all soft and squishy, you can still treat it as a canvas surface.....so I painted it! Red Claudine Hellmuth paint to be precise.....
I also covered it in crackle paint......
Once all the crackles were dry, I glued the heart to the background.
The hanger is a piece of driftwood, decorated to match the background...
I hammered two nails into the top of the wooden frame, then wrapped wire around the driftwood and around the nails to join the two parts together.
I rubbed a little gold paint into the crackles here and there to highlight them, then added the Alphapart words as a finishing touch....
I think I'll be making more puffy canvas shapes, really enjoyed making this one!
Trish xxx


13 June 2013

More canvas painting


This week I'm back to using my sticky backed canvas by Claudine Hellmuth. It really is wonderful stuff and I'm surprised at how much stuff I can paint onto it and not loose it's stickiness!!

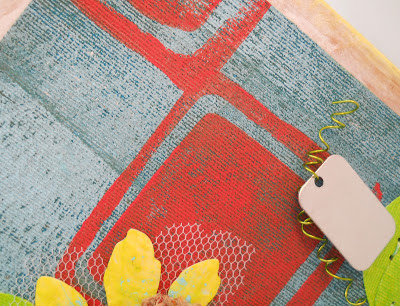
I saw this painted canvas in a magazine and thought I'd use it as inspiration to make a canvas of my own.


It was easy to get the grungy finish as when I used a brayer to roll on the acrylic paint, the texture of the canvas automatically gave me the look I was after. 


While I was in the Claudine Hellmuth mood I took out her Decor foam stamps to add my red squares. 


I used a tag from the set of Vintage Mechanicals by Finnabair  to embellish my flower stalk and more sticky canvas to die cut some leaves and a flower. 


Happy thursday, I hope it's a good one.
 
Jaine x


11 June 2013

Midnight in Paris tag!

Good morning, Gez here sharing a tag I made for my daughter.. we are in the process of deciding whether to visit Paris or Florence.. I think we might just have to do both!!

I started with a plain {black tag} size No.8, stamped and inked the background word stamp from the {Papillon} Tim Holtz Rubber Stamp set onto the tag. I didn't mind the little white speckles as I thought they look like tiny stars and I wanted a shabby finish to the tag..

Next I stamped the Effel Tower stamp onto black Glitz Design Color Me Happy {Chalkboard} cardstock which has a nice chalky old fashioned blackboard appeal to it (I can see many uses for that paper!)

To finish off the tag I used a butterfly stamp from the {Papillon} set and stamped it onto Claudine Hellmuth's white {Sticky-Back Canvas} using {Jet Black} Archival ink pad and coloured the butterfly randomly with {Distress Stains} I also added tiny dots of Ranger Liquid Pearls in a line down the centre of the butterfly to create a body and added a flick of {Funky Fuchsia} Dylusions ink spray to add to the grunge effect!

The heart and words 'someday' were cut from Glitz Design Color Me Happy {cardstock}

Thank you for calling, I hope you like my tag ♥

25 May 2013

Windows Ten

Hello!
When you work with printers trays, the natural thing seems to be to attempt to fill every last space with 'stuff'. Whether its random ephemera or stamped images, the general way of doing things is definitely 'more is more!' I want to share a printers tray with you today where I've knocked that idea on its head....to show you that concentrating on the tray rather than the contents can be just as interesting!
The Tando printers trays come in pieces, a back panel, three layers of apertures and a cover (which I didn't use in this case!)
 I worked on the back panel first, covering it with book pages and a few strips of washi tape (black dot SMASH tape). I smeared yellow, red and turquoise paint over the background, then did lots of black stamping, including the fab grid stamp by Jenni Bowlin...
I then glued all three of the aperture inserts together, then covered the lot with more book pages. I then painted and stamped them, just as I had done with the background. Doing this BEFORE you glue it to the background means you have much easier access to the inside parts of the apertures.....
Once it was all painted and stamped, I glued it to the background, then covered all four sides with more book pages to give a seamless look. The edges were then painted and stamped...

Once the actual tray was done I added the embellishments, few as they are!
I clipped the ends of the Prima bird clips, then glued them to a book page. I then filled in the centres with Glossy Accents. Once dry, I cut them out and adhered them to the tray...
I added a few small stars, punched and wooden....
and a red clay heart....
As this tray has 10 apertures, or 'windows', it seemed a little obvious what to call this piece.....

So that's it...a printers tray without all the extra 'stuff' !!!
Have a great weekend everyone!
Love Trish xxxxx


09 May 2013

Little birdie brooch.


Always about this time of year I have an obsession with birds and birdhouses as we have them nesting in two of our nest boxes in the garden plus 5 Housemartin nests on the side of the house. They fascinate me and give me heaps of inspiration for journal pages and paintings but I thought I'd do something a little bit different and take them off the page by making a brooch.

I used a piece of Claudine Hellmuth sticky backed canvas, cut out the house shape and painted it with Adirondack dabber in Citrus. I backed it onto a piece of felt, trapping some tulle in between, went around the edges with the sewing machine and added the Tim Holtz tissue paper off cut and a piece of lace trim.  

The bird is from Prima and I added a touch of light blue paint to it and stitched him on. 


The little bottle which is from a Tim Holtz Idea-ology corked vials packet, holds a piece of lace, some mini mini shells and a twig and is held on with some stitching. (I also added a small blob of glue to hold it in place and stop the stitching from coming undone).


I wouldn't normally show you the backs of my projects but I have to show you this neat brooch pin by Finnabair as part of a packet of Vintage Mechanicals. Ok it's sewn on a bit squiffy but as I said normally I wouldn't show you this side :)


You could make one of your own and instead of making a brooch why not stick the canvas to a tag as it's already sticky?


See you next week

Jaine x

24 April 2013

Inky Pinky


Hello!
Today I would like to show you my tag. It's a large size of #10 Manila tag by Ranger. It's a project with a few layers. It looks complicated but it isn't and the best – there are no rules! I used a lot of stuff and really don't remember what I used. Unfortunately my hubby didn't come to my studio (yet) and didn't 'steal' my project (as usual).


For the first layer I used: masking tape, white paint, Bazzill Basics Paper – Antique Newsprint and Glitz Design Yours Truly paper.
For the next layer I used: Dylusions Ink Sprays, paints and a black gesso from Claudine Hellmuth. For the third layer I used: Tim Holts Tissue Paper and Stampotique stamps. I also used Glitz Roller Doodles.

The fourth layer: white paint+glue, thread, tissue paper and Tattered Angels Glimmer Glaze. Almost there!

Magda x

28 March 2013

Print and stitch - it's magic!


Before I say anything I just want it to be known that this blog post is in no way condoning the use of magic mushrooms, it was only after I'd finished the page and taken the photo's that it was pointed out to me that it could be taken the wrong way.....so now that's off my chest.....I'll continue :) Phew!!

I decided for this post, to come back to the sticky backed canvas by Claudine Hellmuth. It's amazing, versatile stuff and as I've said in a previous post it stands up to a lot of abuse. One of the brilliant things you can do with it is to put it through your printer. Imagine your family photo's, something you've scanned into the computer or printed text.

Here I've chosen to use a photo I've been wanting to use for ages (the offending mushrooms). I cut a piece of canvas to the size of regular photo paper and put it into the printer tray making sure it was the right way up to print on the canvas side.  For me that's upside down but I only say that because I've printed before on the wrong side so it happens.


I trimmed the photo down and enhanced the colours with some Promarker pens. After layering my photo on a journal page which I'd sprayed and stencilled using Dylusions sprays and stencils, I used my sewing machine as if I was doodling with a pen.

A little tip, if you a have letter stickers which are the wrong colour for your project (I had Jenni Bowlin alpha stickers but in red) simply colour them in with a marker pen and don't forget to use up those negative spaces either if you've run out of letters. That way you get a lot more mileage out of your stickers.


I cut a flower using a Sizzix die and sprayed it with inks.  I stuck this down too along with a few threads and stitched over the centre.


I finished the mushrooms off with some sticky gems and used up a small strip of canvas by stamping on it using a border stamp from Dylusions and sewing over that too.

Jaine x

05 March 2013

Canvas Atc's.. by Gez


For sooooooo long....... I have wanted to try out the Sticky-Back Canvas Atc's by Claudine Hellmuth and I am excited to share my results with you! I wanted to throw lots of different products at these to see how they reacted.

I used the white sticky back canvas atc's and cut some plain white card for the reverse sides.. slightly smaller than the canvas.. stuck one to the other and set about fraying the edges!


 I used Distress Ink pads on the first atc and applied them with a piece of Cut n Dry foam for the background. Adding some flicks from a bottle of Paradise Pink, Tattered Angels, Glimmer Glaze (it comes with it's own brush!)


The main image is a Resist Canvas Bird by Prima.. coloured with Distress Stains in Dusty Concord & Broken China.. gotta LOVE those colours together!

This little birdie is merrily singing soooo he just had to stand on a scrap of music paper!! The word is computer generated and I think you can just see on the photograph in the background some silver acrylic circles using the paint and the lid from a bottle of Ranger's metallic paint dabber. The gorgeous little gems are by Prima (505506) Say It In Crystals

Success! I love how this Atc turned out!

    ~♥♥~

The background for the 2nd atc was created using Dylusions Ink Sprays straight from the bottle onto the canvas.. with more blobs of the Paradise Pink Glimmer Glaze.. and silver acrylic circles..


More music paper used for the flower, and gems along with another computer generated word.. I wanted all my Atc's to tie in together as a set.. same but different.. if you know what I mean!!

 ~♥♥~

I think I saved my favourite atc until the last to show you.. I had a mini brainwave amidst the chaos going on in my head! What if... I could decant some of my lovely Dr Ph Martin's Bombay Indian Inks into some of the little Mini Mister bottles with some water.... YES! It worked lovely for the background!!

Before I misted the background.. I stamped a text stamp using gel medium onto the canvas... and QUICKLY, cleaned the stamp!


I have to admit to being a little impatient waiting for the gel medium to dry & used the heat gun! Becareful, if you don't any bubbling, let it dry naturally!

    
 Time for some spraying.. (and inky fingers!)
                    

More flicking with the Glimmer Glaze! Gems & stamped circles using Jet Black Archival Ink

The heart was cut from some plain white cardstock and covered with Washi Tape and mounted onto 3D foam pads.

PHEW! Hope you are all still awake!!!

Thanks for calling today. Gez oxox

 ~♥~