Showing posts with label stamps. Show all posts

01 December 2015

12 Brands of Christmas-Brand #1 *Hero Arts*

Hello


HELLO!
It's December 1st...so that means.....drum roll...... the start of our 
HUGE,
 MASSIVE, 
GINORMOUS,

 12 Designers at Christmas blog extravaganza!

Christmas is getting oh so close now!  Eeek
Its a this point of the year I start wondering what exactly it is that 

I have done with the first 11 months! 

Right up until Christmas Eve, we will be featuring a fabulous project by a guest designer, or showcasing an exciting big Brand every single day! Yep, you read that right.. 
Every. Single. Day!
So, bookmark the blog and check back often, we have loads to share in the run up to Christmas 2015!

Right..best get on with it then.....


This year we have the shop stocked full of goodies for making quick, 
or not so quick Christmas cards. 

One of my favourite brands for this is Hero Arts.  
They have such a great variety of stamps for this time of year, so here is a quick
 run down of some of my favourites!


Kelly Purkeys "Kellys Noel" set is perfect for simple graphic cards.  


if you have something a little more cute, then you cant go wrong with this set.  
Three Elves with a die. These sets are proving to be very popular.  
I've already had to stamp out a few sets of these as my daughter wants to spend hours colouring in. She has promised me they will make it on cards but I suspect she has an elf house 
somewhere in her room full of Santa's little helpers!


Don't fancy Elves... how about Penguins then? 


How about this 6x6 Hand drawn snowflake background to create some interest in your winter 
or Christmas projects.  It is cling mounted but it may be easier to lay it face up and place your cardstock on top of it. 


If colour layering is where your heart is at, then this layered Christmas tree set is perfect. 
All those extra little stamps in this set could be very useful, and with a To and From stamp great for gift tags as well. 


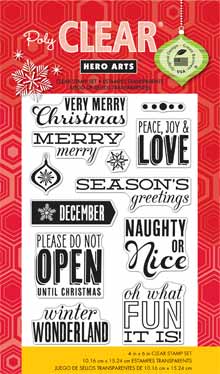
We've also got a few sets that are just sentiments.

The Merry Stamp & Cut set is a hot favourite with me this year. 
Pop back in a couple of days to see how I've used it on 
some of my Christmas cards for family & friends this year! 

Happy Christmas Card Making!! 

Vicki 

01 May 2015

Bank Holiday Special

Good morning to you! 

For this weekend only 
CHRISTY TOMLINSON 
stamps made by Unity
have a WHOPPING

30% off!!
We have a fabulous selection of stamps that are perfect for all your mixed media projects, be it a spot of art journalling, or scrapbooking. 

You don't need any special codes, 
the prices are already reduced for you on the website. 

We won't be repeating this offer
and we won't be restocking the designs either 
so this is your chance 
to grab a bargain! 

This offer will run 
from 
Friday 1st May 
until 
10:00 Tuesday 5th May

Have a wonderful Crafty Weekend !

Vicki 

05 November 2014

BasicGrey....


You may have guessed it that the new BasicGrey collection, Aurora is safely arrived with us today and is already up on the website!

This is a fabulous collection with 12 double sided 12x12 papers, 6x6 paper pad, 
embellishments and sticker sheets

There's also a coordinating set of clear stamps, rubber background stamps
and stencils from Hero Arts.

You can find the full collection here, with a 10% discount if you purchase all 12 papers. 


21 February 2014

Robe a la Francaise - GDT Riikka Kovasin


Happy Friday! It's soon weekend! Riikka here to share with you my third and last GDT piece. Hope you have liked my creations so far!

Who am I? My name is Riikka Kovasin, I'm a Finnish mixed media style scrapbooker with a passion to have my fingers inked on weekly basis. I'm happiest when I can get messy with different paint media and create a piece of memory keeping at the same time. What a perfect combination! My blog is called Paperiliitin. Please come and say hi!


I'm more of a scrapbooker than anything else so I decided to do another layout for my last project. The spark for this layout was my a namesake of mine who asked me an advice over at Facebook for a layout she was working on. I really liked the composition she had going on there and asked her if I could do my version of the same. So here Riikka, is my take on the two photos and vertical title! 

The topic of the page is a princess dress I sewed for my 3-year-old as her birthday present. Her big sister got one just like it when she turned three so it's kind of a tradition. I used the same patterns for this dress than to the previous one, but the color is different. My older one wanted a yellow dress (her favorite color at that time) and my younger one chose turquoise (her favorite color). The dress has a flowing back piece, like the robe à la francaise has.


I started creating the layout by gessoing an area of the background paper where my main composition would go. Then I poured some Glimme Glaze to the paper and let it dry. After that I added some stamping, pencil doodling and inking through a TCW stencil. I also inked a piece of Prima Marketing resist canvas and used it later on in the layers behind the photos. I thought canvas and lacy details would really fit the subject of the page.

After the background was finished I then layered some patterned papers, stickers and other embellishments behind the photos. I used papers from 7 Dots Studio "9th Wave" collection as it fitted the color scheme so well. The embellishments are from that collection together with some from the "Domestic Goddess".

Thank you for taking a look - it has been a pleasure guesting here! Thank you for having me, Vicki! Hope to see you all around!


Supplies:


other: gesso, pencil, thread, twine, half pearls, stapler, correction tape

14 February 2014

I Love You To The Moon - GDT Riikka Kovasin


Happy Valentine's Day! Riikka here again with another guest design post and I have a little present for you - a video.

Who am I? My name is Riikka Kovasin, I'm a Finnish mixed media style scrapbooker with a passion to have my fingers inked on weekly basis. I'm happiest when I can get messy with different paint media and create a piece of memory keeping at the same time. What a perfect combination! My blog is called Paperiliitin. Please come and say hi!


For my second post I created a Valentine themed layout about my two daughters. The picture is an old one, but I really loved the topic and the angle of it. It shows them playing an afternoon tea party. 

The quote from the 7 Dots Studio "Messy Head" collection suited the layout perfectly as I love them both to moon and back. I also used other patterned papers from the collection. As one of the journaling style cards I wanted to use on the layout was purple, I added some purple details to the layout. If you want to see how the layout came to life, please watch the video underneath.


Thank you for looking! I hope I have inspired you! 


Supplies:


other: pencil, buttons, cord, stapler

09 February 2014

Wish -tone on tone paint effects.

Hello!
I'm back to painty messiness today...and I want to show you how you can incorporate scraps of waste, but matching colours into your work.
I created a background using lots of layers, and added in some stencilling through some sequin waste, and splats of black UTEE. A few random painty lines too!
When I'm adding paint to cardstock, I always work on a base of white copy paper. This means when I go over the edges of the card, paint ends up on the paper. When I'm done, it means I have a piece of A4 paper with random painty mess on it too! In this case, I stamped the heart onto a section of the A4 paper, then cut it out and added it to the background using gel medium....
With a tone on tone effect like this, it can get a little lost, so I gave the heart a little shading around the edges. Everyone has their own favourite way of adding shadow, I like using a black pastel pencil and smudge with a paper stump. Whilst you want the heart to stand out, you also want it to blend in too, so it looks part of the piece and not just plonked down on the background. To do this I made sure my painty lines went across the heart too, and the UTEE splatters were on there as well!
The final touch was a simple stamped word....
You could always stamp onto tissue and glue down with Mod Podge if you're not that confident stamping directly onto the finished piece!!

Have a great weekend everyone!
Trish xx


06 February 2014

Valentine's Cards - GDT Riikka Kovasin


Hello there! Riikka here with a few guest design creations - first of all these Valentine's inspired cards.

Who am I? My name is Riikka Kovasin, I'm a Finnish mixed media style scrapbooker with a passion to have my fingers inked on weekly basis. I'm happiest when I can get messy with different paint media and create a piece of memory keeping at the same time. What a perfect combination! My blog is called Paperiliitin. Please come and say hi!  


I created these four cards using the gorgeous 7 Dots Studio "Messy Head" collection. It's soft tones and pink shades are perfect for Valentine's Day themed creations! The card basis are cut from sheet of Bazzill's Card Shoppe papers.

The main pieces of the cards are cut from a 12x12" paper and then layered with pieces of other patterned papers and embellishments. All of the cards have a common background style, a piece of patterned paper stamped with Finnabair's doily stamp using Prima Chalk Edgers and Archival Inks. The other thing the cards have in common are splashes of pink Glimmer Glaze.


I used different kinds of embellishments in the cards. They all have a bit of thread underneath the embellishments, but then the different cards have different moods. I used Mechanicals in some, Prima wood icons in some and 7 Dots Studio stickers and die-cuts in others. Please see the supply list at the bottom of the post, after some of the detail shots.

Thank you for looking! 


Supplies:


other: thread, paperclips, half pearls, chipboard arrow, pencil

11 January 2014

Stargazing Hares...

Hello!
More paint from me today, but this time combined with a little 3D assemblage...and the use of a niche..
I started off with a box canvas, then flipped it over to use the back! The back of a canvas has a perfect niche, although different sizes and brands of canvases will be put together differently, and so have niches of varying shapes and sizes! The back of this canvas also had the very ugly 'fold the canvas sheet over and use a million staples to secure it' thing going on....not ideal! A great way of disguising this is to spread a layer of texture paste over it. I blasted the texture paste with a heat gun just to give the surface a bit of a 'skin', and then pressed bottle tops and sequin waste into it. This gives nice texture, as you can see...
I used loads of different coloured paint, simply smearing a layer on, then drying and going in with a different colour. I also stamped some dots onto tissue paper, and used Mod Podge to adhere it in places. Once dry, the Mod Podge is transparent and the dots look like they were stamped straight onto the background...
The fabulous hares (Crafty Individuals), were stamped onto scraps of blue painted card, then cut out. I stamped the head parts onto yellow painted card, cut out the crowns and added them to the blue hares. I covered them in Glossy Accents to give a 3D shine. Once dry, they were placed on a bed of thin, curled and twisted green cardstock.
My stars are suspended from a curve of wire...
I took three strands of wire, and twisted a little extra wire around the three strands to hold them together. I painted and then glued three stars onto the ends. The wires were then glued onto the side of the canvas.
I added two spools to the bottom...
And some cut up letters to form the word...
I had fun playing with niches again...I have a feeling I may be making some more soon!
Have a great weekend,
Trish xxx


07 January 2014

A little collage for the new year!

Hello!
New Years resolutions? Oh yes.....but just the one so it's manageable!
I'm determined to play around with crafting styles and techniques that I don't 'do' on a regular basis! Stop the 'go to' creating!!!!!
So, first technique I really should do more of...collage! Now, my initial idea was to use cut out magazine pics, but that was just a step too far and I got the stamps out instead!
Quick and easy painted background....just smear and brush on the paint, then add stencilling and doodling. Not too much thought, just go with it!
Random stamping..the Prima Finnabair stamps are perfect for this...
The stitched circle is another Prima favourite! I stitched the painted panel to a piece of black card, them got on with the elements for my collaged art doll.
She is created from a combination of stamped images and hand drawn/painted shapes. The wings are Stampotique hearts, stamped over some text...
Her body is a shape cut from painted cardstock...
Her legs and arms are scraps of card given the stripy treatment, with a little doodling added...
Her face is of course Stampotique again, LOVE these large heads! Perfect for art dolls. I've used hot glue to attach all the bits, I really like using hot glue as you can manipulate it it be a little 3D in places so your design isn't flat. In this case, her extended arm with the punched out star is standing proud, giving nice dimension. This may not be ideal if you are creating a journal page, but as this isn't destined to be squished together in a journal it works just fine!!!
See you soon
Love Trish xx