Showing posts with label Posca. Show all posts

03 September 2016

Music - Up cycled CD case

Happy weekend everyone, Clare here today with a Sprinkle from my imagination!  Recently we have been sorting out our bedroom in preparation for some decorating!  You know what it's like?  You unearth lots of bits and bobs that you you really had forgotten about.  Well I found out an old cd case with some old CDs and decided I would give it a make over.


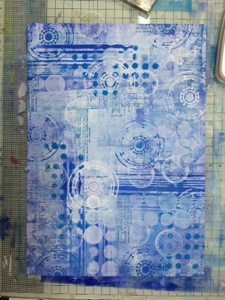
I started off by giving the case a coat of gesso so that the paints would have a good base to cling to.


Using Dylusion paints (vibrant turquoise, lemon zest, cherry pie, white linen, fresh lime). I painted  directly onto the case.  Using stencils from Tim Holtz, Dina Wakely & Dylusions I added some shapes with the paints I had originally used in the background.


Using Dylusions Dy's Alphabet I stamped onto the case with black ink.


I originally stamped Dina Wakelys Shilloueted woman onto the case but because of the texture she didn't pop as much as I wanted her to!  So I stamped her onto some white tissue paper,  heat embossed with clear powder and carefully applied her to the case using Claudine Hellmuth Matt medium.


I added some doodlles using Posca pens.  My case is now ready to be filled once again with CDs for the car and I shall no longer have my daughter moaning that I'm always listening to the same music!


Thanks for stopping by today, remember to stop by A Sprinkle of Imagination for your mixed media materials.

Hugs,
Clare X X X 


22 August 2016

Master board makes

Hello fellow bloggers,  I've been going master board crazy lately, it really is a good place to start when you are looking for inspiration for a project.  Working with stencils and paints to build up the layers and create different looks the effects you can end up with are too many to mention.


I started of with with my master board using Dylusions white linen, London blue and after midnight.
With the help from Dylusion, Tim Holtz and TCW stencils I built up my layers.  I added some
background stamping using the stamps from Tim Holtz District warehouse set.


The circles are from Finnabair Don't for get to fly set.  I stamped these directly onto my master board and then stamped these onto watercolour card with black ink and heat embossed with clear powder.  I coloured in the flowers and added some doodling with a white Posca pen.


I cut out the circles and layered them onto the card.  With a white and black posca pen I flicked and splattered across the card and finally added the lawn fawn sentiment 'Happy birthday to you'.


 I also used another section of the master board using the warehouse district and still have another couple of pieces to come back to for future birthdays.


Thank you for stopping by today.  I hope you have enjoyed my blog post? Come back again soon!

Crafty hugs,

Clare X X X 


http://www.asprinkleofimagination.com/stencils/

11 August 2016

Here's the science bit!

Hi blog friends it's Clare here today and today I'm revisiting a technique that I used a long time ago.  It's more of an experiment with paint if I'm honest, it really is quite scientific!


Using Dylusions lemon zest, I painted a layer onto the canvas and dried.  After this I painted a watery layer of white linen, with a pipette I added some drops of surgical spirit. Here's the science bit!  The surgical spirit pushes the paint away leaving these beautiful natural circles that you can see below.


It is very important to do this in a well ventilated room!  Once the white layer was dry I added a watery layer of vibrant turquoise and added more surgical spirit, dry again, and another layer of watery white.


Once my white layer had dried I added the final layer of bubblegum pink and repeated with the surgical spirit.  I stamped Stampotique, Kira Nichols, Kitty Squad stamp and coloured with  water soluble crayons.  I cut them out and placed them popping out of the circles.  I stamped one of the Dylusions sayings and added to the mini canvas.  Finally a little doodling with my posca pens.


I decided that I would add a magnetic sheet to this canvas and pop it on the fridge.

Thank you for stopping by today, have lots of crafty fun!

Hugs,

Clare X X X 


27 July 2016

Bonjour!

Bonjour bloggers,  my theme today is a little on the French side!  My Daughter, Sophie,  has just returned from a little trip across the water.  It was her very first trip abroad on her own (with school). I was a little anxious, to say the least but she is home safe and sound.

I asked Sophie to keep her tickets and leaflets etc and said that we could do something special with them upon her return.  I decided to make a memory book where she can keep her special treasures and photos.


I painted the book cover in Dylusion London blue, white linen and cherry pie.  Using Tim Holtz stencils and the above paint I stencilled over the page.  


Once dried I doodled using a Posca pen.  I used the French words and The Eifel tower to stamp directly onto the book cover.  The stamps are from Julie Nutting 'bonjour' set, I didn't use the doll from the set  but selected another that was big enough for my project.  I coloured the doll using Inktence pencils and collaged her on to the cover.


All ready to hand over to Sophie to create her book of memories.

Thank you for stopping by today.

Happy crafting,

Clare x x x 

19 July 2016

All hearts and flowers.

Good morning all! It's been a while since I last posted for A Sprinkle of Imagination so without further ado let me show you what I have been up to in the room of craftiness!


For this card I used The following Dylusions paints: Dylusions paints Cherry pie, Lemon zest, white linen.  I started by scraping lemon zest over the card with an old credit card.  I repeated this with the cherry pie, with the edge of the card I added some lines with the Cherry Pie.  I dried with a heat tool and then scraped over some white linen. I blended some more white linen through  the Tim Holtz 
splotches stencil. Through the Dina Wakely TCW stencil , grunge hearts, I blended with Cherry pie and Lemon zest.


Onto some card, previously sprayed with Dylusions inks, I stamped with the heart stamp from Finnabair set Trust the magic several times to create my petals.  I assembled them together and added some glimmer with a Wink of Stella clear pen.  Using the small butterfly from the Finnabair spread your wings set I stamped a couple of butterflies to embelish the card.  I finally splattered with my black and white Posca pens.


Thank you for stopping by today.   I'll be back soon with some more painty and inky mayhem.

Crafty hugs,

Clare x x x 


12 June 2016

Boots

Howdy folks, I've  sadly made it to the end of what has been a couple of  relaxing, crafty weeks.  It's back to school for me on monday where I shall be daydreaming of my little crafty hideaway and doing maths, of course!  So with that in mind I have prepared myself a little door hanger in anticipation of the monday morning blues.


On the door hanger I painted with the following Dylusion paints: Bubblegum pink, cherry pie, vibrant turquoise, white linen.  I also used black linen for the circles.  I doodled around my mark making 
with a white Posca pen.  I chose Kate Crane's delightful Stampotique character 'Boots' with hope that she will lift me from my doldrums.  I coloured her in with Inktense pencils, cut out and adhered her to my door hanger.  


All I need to do now is decide where to hang it.  Dare I hang it in my teaching area at work or just on my bedroom door to warn the family to tread carefully?

Enjoy the rest of your weekend everyone!

Crafty hugs,
Clare x x x 


04 June 2016

Happy you!


Hi guys I'm here today with my latest post for A Sprinkle of Imagination.  Along with me I have brought Nina Angel, Magda Polakow's cute design from the Stampotique originals.


I started to work on a piece of black card.  Using Dylusion paints, bubblegum pink and vibrant turquoise I blended through Dylusions starry night stencil.  Once my colours were dry I bumped the 
stencil over and blended some white dylusions paint through the same stencil.  I doodled over the constalations with a white posca pen and set aside.


Nina Angel was stamped, cut out and then watercoloured using distress inks.  From a piece of card that has previously been sprayed with Dylusion inks I die cut a star and added some white dots.  From the Lawn Fawn die 'Happy birthday to you' I cut out the words happy & you and joined them together. And added some more white dots.


Thank you for stopping by today, remember to stop by the ASOI shop and check out the fabulous selection of stamps, stencils, paints and mediums galore.

Happy crafting,
Clare x x x 

29 May 2016

Recycling Backgrounds

I've been recycling a piece of stamped card where the impression hadn't been as clear as I would have liked, and I didn't want to throw it away, so I painted over it to push the text to the background.


The stamp in question was the large text stamp from Tim Holtz Papillon.  I sponged Dylusions Paints (Cherry Pie and Fresh Lime) then using London Blue I scraped some paint lines.  A splattering of After Midnight and White Linen completed the background.


Once that was dry I stamped Donna Downey Poppies, masking the first one while I stamped the second one, then drew in the stems with a black Posca pen, and sponged some white around the outlines to help define the image.


Drawing stems onto flower head images is a great way to stretch your stamps.


Have a great bank holiday weekend!
Shirley x

23 April 2016

Horlogerie

Hey peeps, happy Saturday :)  Today I've been playing with one of my favourite Tim Holtz stamp sets, Papillon.  I just love the large background script stamp.


I started off by stamping the image with Versafine Onyx Black on card, then sponging Distress Inks (Spun Sugar, Shaded Lilac, Dusty Concord, Peeled Paint).  A quick blast with the heat gun to seal the inks, then I added some highlighting with a white Post paint pen.  I trimmed the panel using the largest frame from the Lawn Fawn: Lawn Cuts Small Stitched Rectangle Stackables which give a lovely stitched edge.

I wrapped some grape Prima Jute around the panel then mounted it onto my base card, and it was finished.  Or was it?  Maybe it was lacking a little something.  The moths and butterflies in the Papillon set came to the rescue!


That's better!  Have a crafty weekend :)

20 March 2016

It's A Man Thing


Happy Sunday, peeps!  Shirley here with a trendy masculine card for you.


I started off by stamping the guy image from Dylusions Mini Couture using Tea Dye Distress ink, watercoloured the image using the same colour, then masked that with some scrap paper.  I inked up the Mix Tape 6x6 stencil by Ronda Palazzari with Distress Inks, turned it over and placed it over the masked stamped image at a jaunty angle, pressing it down with kitchen roll so that the colours mixed, and the excess was mopped up.


The scrap paper I used for masking was red and white checked, but because it got soaked by the Distress Inks, some of it ripped and stayed behind as I was removing it.  Doesn't it look cool, though?  Might have to try drawing checks on the jacket next time!


I used a stamp from Dina Wakley Textures to add some detail around the edges, then trimmed the panel, matted it onto black card, then adhered it to my card base.  On a spare piece of black card, I wrote the HB2U with a white Posca pen, and stuck a strip of the trimmed card across the bottom using 1/8 inch Wonder Tape.  It just adds that little bit of interest.

Enjoy the rest of your weekend!
Shirley x

16 March 2016

I could while away the hours

Hi I'm here today to share an entry into my large art journal.  It must be the time of year as I am feeling a tad florally at the moment and some blooms have just landed onto my art journal pages!


For this project I used Dylusion paints.  I mixed crushed grape and fresh lime with some white to
make my colours pastel.  I recently have enjoyed designing and carving some of my own stamps onto
speedball easy cut stamp carving blocks.  I used one of these to stamp onto my background with the pastel colours.  I also stamped  one of Nathalie Kalbach grunge stamps in black for a little more interest.

I pencilled on my flowers along with some free falling leaves, leaving these void I began to blend crushed grape and white linen around the pastel openings.


I added some doodling with my Black and white Posca pens.  Onto some white card i stamped a Julie Nutting mixed media doll, Megan and coloured her in.    On a clean up page,  where I had been cleaning off  my brushes I stamped  my background  stamp and then stamped Megans dress over the top and cut out to dress my doll.


I finally stamped my saying using Dylusions alphabet stamp

Thats all from me today, thanks for stopping by,
Hugs, 
Clare x x x 


06 May 2015

Closing eyes, dreaming big...


Today I created for you a joyful tag with mixed media painting and drawing.


 It’s created on the cardboard piece which was left over from one of Finnabair products (maybe mechanicals?). So instead of throwing it away I started with thick layer of Dina Wakley Media Line white gesso and then applied some random papers and bits of newspapers using gel medium from Dina’s range again. I love that gel medium as it also creates a very good surface for application of inks, sprays and any wet mediums. Here is work in progress photo just to confirm that there is nothing like clean desk when creativity hits!


This tag was a gift for a work friend who was leaving due to end of the contract and asked me to do something for her. I decided to make a dreamy girl with closed eyes so it’s all left to interpretation.


Drawing was done by using combination of Neocolors II and Inktense pencils and again white gesso. To manage smaller elements and all details I used my beloved Posca pens in white and black.
I imagined her hair in some sort of chaos but still in shape and after building small buns with Noecolors I used Bombay India Inks in Aqua and Teal to draw same sort of snail shapes. By adding a little bit of water spray, then letting it dry and then repeating process I built layers of her funky hair. In this project I used Neocolors in two ways- wet and dry. Wet for more full background result (full colour on hair) and dry for volume effect (thick lines on her hair). Playing with Neocolors is such fun!:)


Finishing touches were stamps and distressing edges with Adirondack Dye Ink Pad in black. I also added bits of jewellery for her earings and wrote some thought in my messy handwriting style.
My girl left me now but will stay happy with my friend - so she is in good hands…


Hope you like her too!
Big hugs...
Honorata

01 December 2014

12 Designers of Christmas : Day One: WELCOME!

HELLO!
It's December 1st...so that means.....drum roll...... the start of our 
HUGE,
 MASSIVE, 
GINORMOUS,

 12 Designers at Christmas blog extravaganza!

Right up until Christmas Eve, we will be featuring a fabulous project by a guest designer, or showcasing an exciting big Brand every single day! Yep, you read that right.. 
Every. Single. Day!
So, bookmark the blog and check back often, we have loads to share in the run up to Christmas 2014!

Right..best get on with it then.....

I've drawn the short straw (!!) and I'm up first! Now, I need you to be gentle with me today, this is the first time I've shared one of my 'people' with the world. Up until now they have been creations for my eyes only, but I thought I should get a grip and show you lot as well! Here is my Sprinkle Fairy...
 My background is a simple painty creation. I gessoed my cardboard base, then whilst it was still wet, smeared on some blue and green. More gesso stencilling, and printed on gesso dots for snowflakes. I used a Posca paint pen to draw on some flakes too!
Then, on to the figure. Sketched out roughly, then coloured with a mixture of Neocolours, paint and watercolour pencils. A little fineliner black pen to highlight a few details, and my Sprinkle fairy was born....

ASOI products used:

And now the exciting bit! As well as our 12 designers, we will be showcasing 12 brands this December too. We have a large prize box all ready and waiting, containing one product from EACH of those 12 showcased brands! To win this box of fabulousness, all you need to do is leave a comment on EACH of the blog posts of our 12 designers. My blog post today is the first, you'll need to comment on the post of each of the eleven designers that will be coming along every other day until the 23rd. The posts will be open for comments right until the end of the month, then a name will be randomly chosen and announced as the winner on 12th Night (6th January)

So.....we're up and running! Don't forget to check back tomorrow to see which big brand is being showcased!
Have a fabulous week!
Love, Trish
 xxxxxxxx


08 October 2013

Love travels... Tag by Gez

This week I've created a tag using some of the gorgeous papers by {Glitz Design} called {Sunshine In My Soul}.

These papers are really too nice to cut into, but I took a deep breath!! Hope you like my tag!

 I had so much fun making this tag ♥

The papers were mainly pieced together and adhered to the tag using {Matte Multi Medium} my go to glue everytime!

The sentiment is a stamp by {Stampotique Originals} along with the swirly twirls.
 I added white ink using a {Posca Paint Pen} and blinged them up with some gorgeous {Prima Crystals}.

Thank you for calling and leaving a comment if you get the chance. 
 
Happy creating, Gez